After recently going through setting up some Access Points for a customer at work and experiencing the ease of Unifi for wireless I wanted to take the simplicity and customisation back to my home networking setup and really dive into the Unifi ecosystem
My current setup was a Netgear Nighthawk R7000 in AP mode for wireless, a Dell N2048 1Gb switch which was a little noisy, but some custom Noctua fans and some rewiring did help massively with that, and OPNsense as a VM for my router and all in all, it was a solid setup and it was a bargain and got the job done
So, as part of the Unifi overhaul, I changed the AP and switch, but kept OPNsense due to my mini server having 2.5Gb and OPNsense’s much greater feature support compared to the Unifi Cloud Gateways, the Dream Machine would have better matched it but was out of my price range
Replacing the Dell N2048 was the Unifi Pro Max 16 which was plenty for me, and at £250 it was a steal
It came with 12x 1Gb ports, great for most of my stuff, like my AP, games console, laptop dock and so on, it then had 4x 2.5Gb ports which were perfect for my little server/router and future expansion, and 2x 10Gb SFP+, and given these were broke on my Dell switch, this was a very welcome upgrade for my main server, which doubles as a NAS to move from 1Gb to 10Gb

AP wise, WiFi 6 would be nice, but you really want the WiFi 6E supported APs, and WiFi 7 was pretty power hungry and I dont do a lot with my AP bandwidth wise, and a 70Mbps VDL internet line was my bottleneck basically all the time on wireless, so I settled for a second hand AC-HD AP which I got for £20 and gave me all the features I wanted at about 500Mbps on WiFi 5 which is plenty for now
The main feature I wanted was multiple VLANs as SSIDs on my AP for IoT when looking at some smart bits like bulbs and plugs, so them on their own isolated network, where they can only talk to Home Assistant, is the real win here
So, below I will walk you through my setup for the Unifi Controller and configuring the systems
I opted for a dedicated VM for the controller, while you can use Docker, I had issues with adopting and setting the DB up, and I generally found a VM to be easier
Important – By continuing you are agreeing to the disclaimer here
Controller Deployment
To start we will want a VM of some sorts, ideally a VM with nothing else running on it, but you can use another server if you need to, you can Windows or Linux, here I will be using Ubuntu, for Windows you may need more RAM
You will want the following specs
- 2vCPU
- 2GB RAM
- 40+ GB Disk (My Ubuntu minimal template is using 6GB post deployment)
Update all your packages with
sudo apt updateInstall Java 17 JRE and other packages needed
sudo apt install curl haveged gpg openjdk-17-jre-headlessThen we need to add the Unify repos to Ubuntu with
curl https://dl.ui.com/unifi/unifi-repo.gpg | sudo tee /usr/share/keyrings/ubiquiti-archive-keyring.gpg >/dev/nullecho 'deb [signed-by=/usr/share/keyrings/ubiquiti-archive-keyring.gpg] https://www.ui.com/downloads/unifi/debian stable ubiquiti' | sudo tee /etc/apt/sources.list.d/100-ubnt-unifi.list > /dev/nullAdd the Mongo DB repos with
curl https://pgp.mongodb.com/server-7.0.asc | sudo gpg --dearmor | sudo tee /usr/share/keyrings/mongodb-org-server-7.0-archive-keyring.gpg >/dev/nullecho 'deb [arch=amd64,arm64 signed-by=/usr/share/keyrings/mongodb-org-server-7.0-archive-keyring.gpg] https://repo.mongodb.org/apt/ubuntu jammy/mongodb-org/7.0 multiverse' | sudo tee /etc/apt/sources.list.d/mongodb-org-7.0.list > /dev/nullBefore installing Mongo DB, update your packages again
sudo apt updateThen install mongo DB
sudo apt install -y mongodb-org-serverWe’ll want to enable the service
sudo systemctl enable mongodAnd start it
sudo systemctl start mongodThen install the controller
sudo apt install unifiThen you can navigate to the WebUi on the following if you setup DNS
https://<server-name>:8443
If you didnt use DNS
https://<ip-address>:8443
Fill out the server name and region

You’ll then need to login with your Unify account, if you dont have one, you can register here

Or if you click Advanced Setup at the bottom, we can use a local account

Click Skip here to use a local account

Add a username, password and your email

Then click Finish in the bottom right
Adopting Devices
Now we have the controller setup, we will want to add our devices, they should be connected to the network in some way together, the AP into the switch, and the server with the controller should also be on the switch, but you might have other switches, this will heavily depend on your environment, but all devices are on DHCP and should be able to communicate with each other
By default, the switch has the native VLAN to 1, so anything untagged will be on that VLAN, and the AP/Switch will be on that VLAN for now and we can move it to another later if you want
Then, you’ll need the IP of the AP/Switch, I’d recommended you have DHCP on the AP net and reserve the IP using a DHCP reservation, you can set it static once the controller has adopted the AP very easily, so I would recommend this by far, even if your AP network just had a DHCP scope with a few addresses for new APs to get, for the AP, if you connect your phone to it, the app can give you the IP
Its worth noting, all APs require PoE, so if you dont have PoE, you’ll need the PoE injector for Ubiquity, which is sold separately
Now, if the controller is on the same net, it will likely find it, however, so you can skip below to logging into the controller and the SSH part isnt needed, but, if its not, or it doesnt find it, you’ll need to tell the AP where the controller IP
This example was taken from another environment where I encountered this, which is why the IPs and AP Model is different, you are likely to see this in an enterprise environment and likely wont at home, but its included for completeness or if you have issues with the controller picking the device up
We need to SSH into the AP now its on the network and we have its IP, you can use Putty, or Powershell
For Putty, open the app and put the IP in, and hit open

Accept the key alert

Put the username in
ubnu

For the password, when asked, use ubnt again
This should log you in

Now, to tell the AP where the controller is use the following command
set-inform http://<controller-ip>:8080/informSo for my controller on 172.16.4.254, I would use
set-inform http://172.16.4.254:8080/informIt will then say its sent the adoption request to that IP and to use the controller to finish the adoption process
The controller we setup earlier, can be accessed on
https://<controller-fqdn>:8443
Or
https://<controller-ip>:8443
Where <controller-fqdn> is the DNS name if you set that, or <controller-ip> is the IP address of the controller server
In the controller, on the devices tab, the third one down on the left in blue, the new AP has popped up as orange and has Click To Adopt showing

Once you Click To Adopt, the controller will start the adoption process and you can manage the AP from the UI and push settings you already have
For example, if you have a network applied to all APs, it will start showing those, if you have networks only on some APs, then you may need to add networks to this AP
Other devices such as switches are the same
Updating Devices
Devices may receive updates over time, or when you buy and adopt a new AP, the firmware may be out of date by a bit
To check if there are any updates, log into the controller on
https://fqdn:8443
Or
https://ip:8443
Substituting ip and fqdn for your controller IP address or FQDN in your DNS server
Heat to Devices, the third option down on the left in blue and click the Click To Update button

If you want more info you can click the AP instead, and if you hove over update on the pop up blade on the right, it will show you the current and target versions

Then click confirm to update

Renaming Devices
To view and edit devices, log into the Unifi manager
Note – Changing the name will reboot the device giving an outage of a couple mins at most
Do to devices, the third option from the left on blue and click a device

On the new blade on the right, select the settings cog, on the right of the new blade and input a new name at the top

Eg

Then hit apply at the bottom of the blade

Setting A Static IP
Once the device is adopted you can click on it from the Devices tab to change its IP

Then add your IP, DNS, subnet, gateway and DNS suffix, and click Apply in the bottom right

Adding VLANs
Head to Settings/Networks and click New Virtual Network
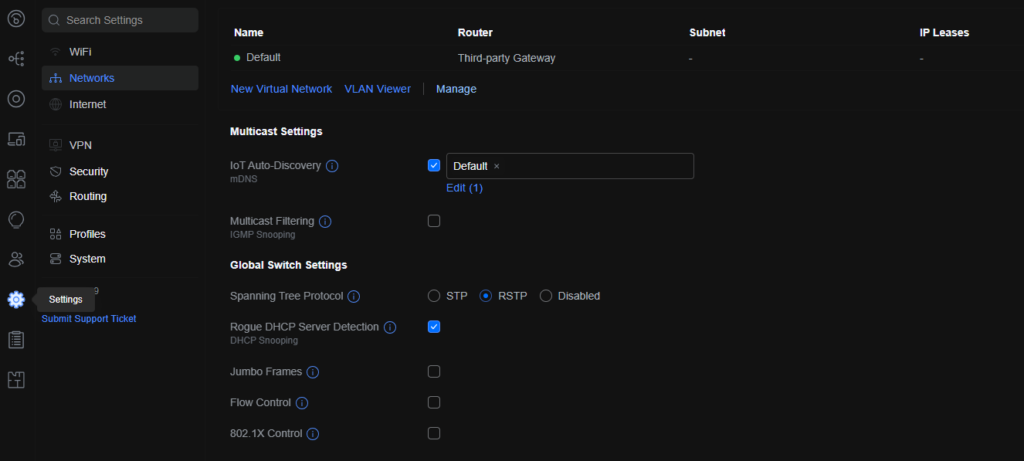
Name the VLAN, if you have an L3 switch, you can use it as the GW, or select 3rd party if your router is managing the gateway

Assigning VLANs
If we head to the Ports tab, we can assign VLANs to ports

If I click port 1, this will be my WAN port, which I need in Access/Native mode on the WAN VLAN, and not tagging
I can name the port, select the native VLAN, and then block all tagged VLANs so only VLAN 256 is in use, and then click Apply at the bottom

The VLANs tab also shows this, with VLAN 256 as Native in blue, and the rest are blocked, Green is for tagged

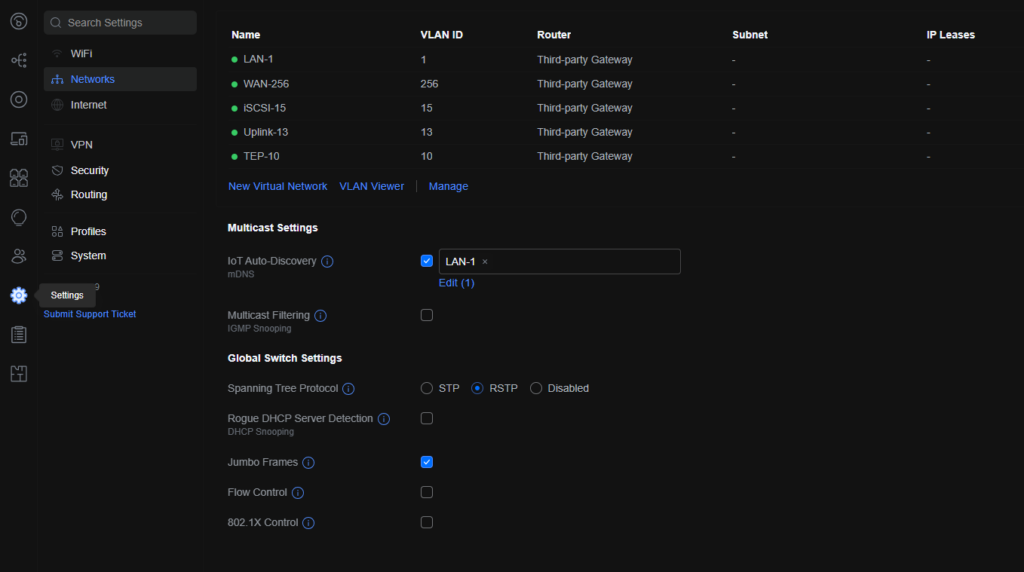
Enabling Jumbo Frames
You may need support for an MTU higher than the default 1500, the jumbo frames setting will set the switch MTU to 9216, but you only need to do this if you have an explicit need for it
This is located under Settings/Networks under Global Switch Settings
L3 Networks – OPNsense
If you have a network you want the switch to be the gateway, to create a network, head to Settings/Networks and click New Virtual Network
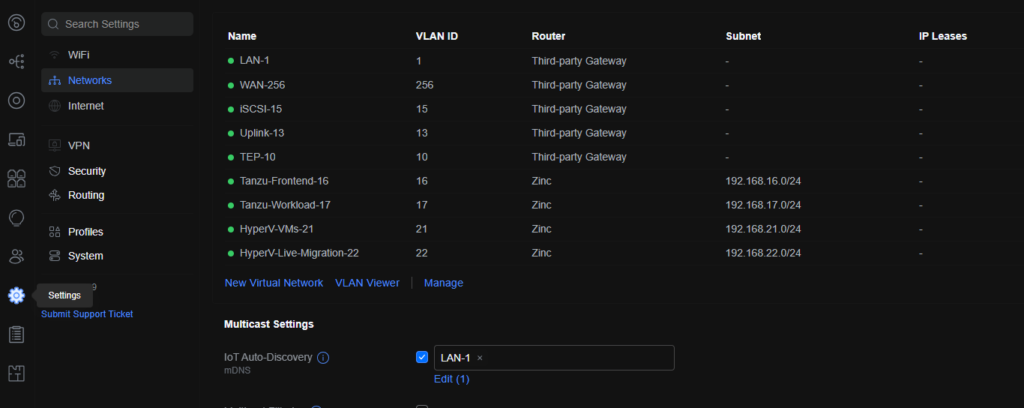
Name the network, and select the router to be the switch, uncheck Auto-Scale Network, and give the switch an IP, the network gateway, and select the netmask

Under Advanced select Manual, this allows you to change the VLAN tag, and customise the DHCP server options, you can use the switch as a DHCP server, or add a relay to your own DHCP server

Then click Add at the bottom
Once you add your first L3 network managed by the switch, the Inter-VLAN Routing network will be created

VLAN 4040 will need to be ensured to be tagged on the uplink to your router, for my, I dont have a Unifi router, I have OPNsense, but the config is the same from Unifi’s article here
The switch, being the first Unifi appliance with inter VLAN routing, will have the IP 10.255.253.2/24 on VLAN 4040
The router is expecting to have 10.255.253.1/24
For the below article, I am assuming you have VLANs configured on your OPNsense router
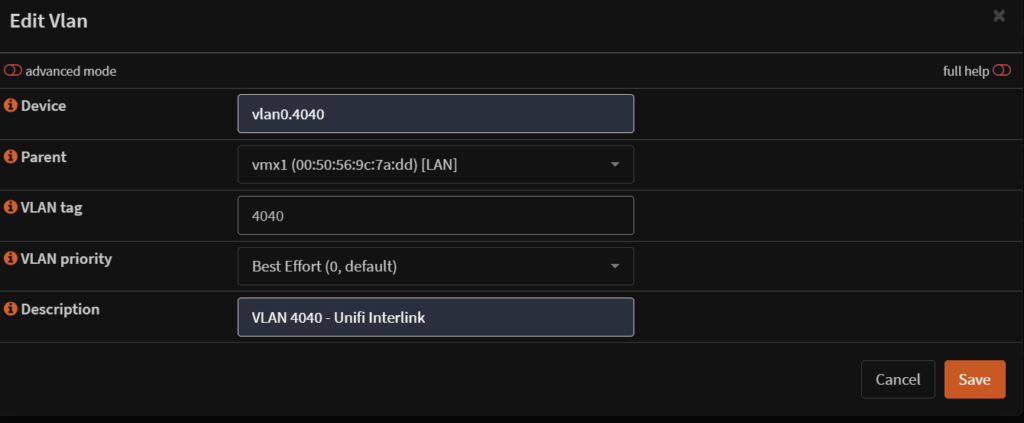
To add a VLAN head to Interfaces/Other Types/VLAN

Click the + to add a new VLAN

Give it a device in the top box, it must start with vlan0.
Add a parent device, as I am trunking this through the LAN interface I am using it as a parent
Add the VLAN tag of 4040 and add a description and click Save
Then click Apply

Now head to Interfaces/Assignments

Add a description and click Add

Now click into the Interface

Check the Enabled box, set IPv4 configuration type to Static and add the IP 10.255.153.1 and make sure the drop down on the right is 24
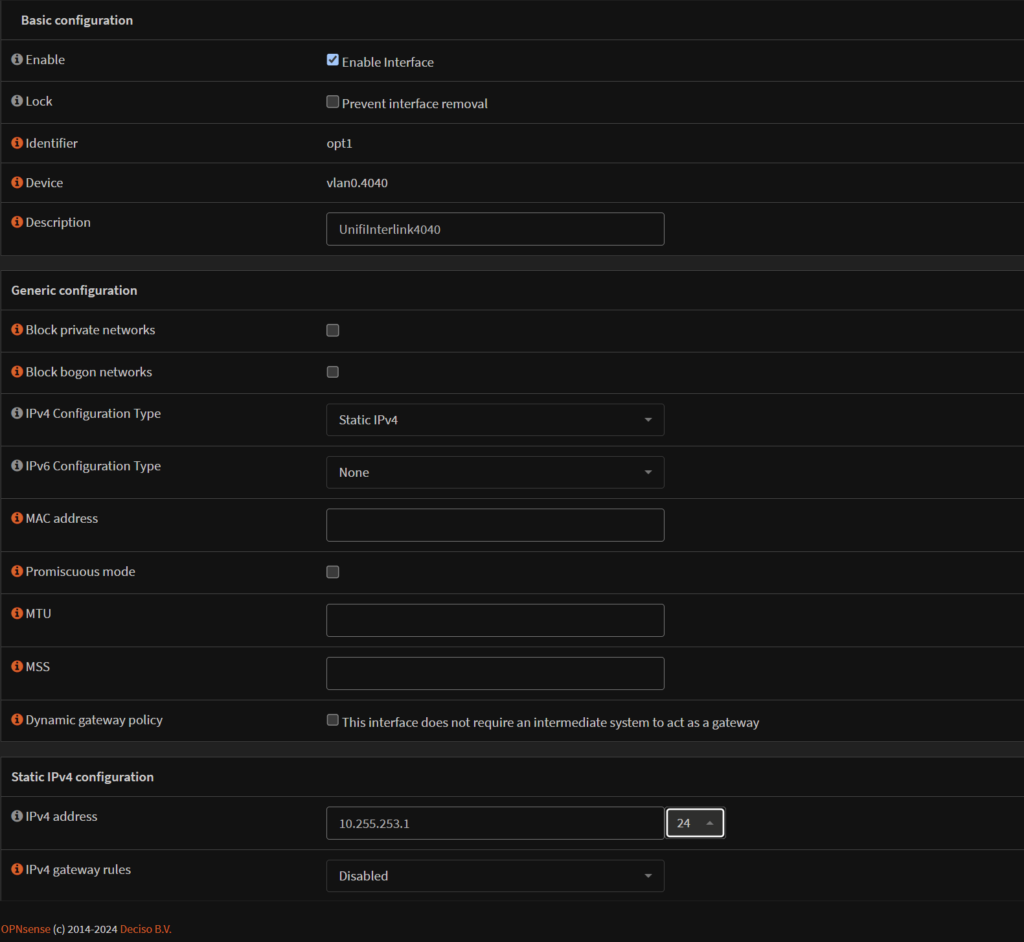
Then click Save at the bottom

And then Apply

Now we have the link sorted we can see its all ok, as we can ping the switch IP from a client connected to the router on another network

Now the interlink is sorted, we need to tell the router how to get to the switch managed server VLAN we setup
Now we need to add a gateway for the switch IP, head to System/Gateways/Configuration

Click the + on the right
Give it a name, I used the switch name, for the interface, select the VLAN 4040 interface, then for the IP use the switch IP, keep everything else the same and click Save
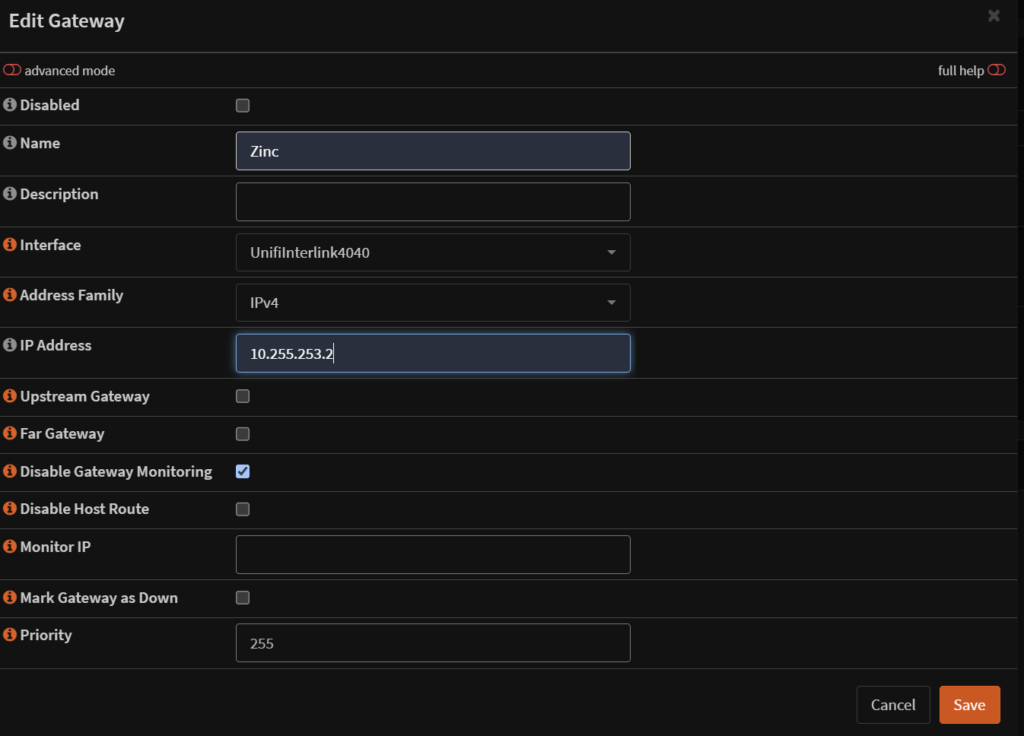
And click Apply

Now head to System/Routes/Configuration

Click the +

Add the network for the VLAN on the switch, select the gateway as the switch IP and add a description and click Save
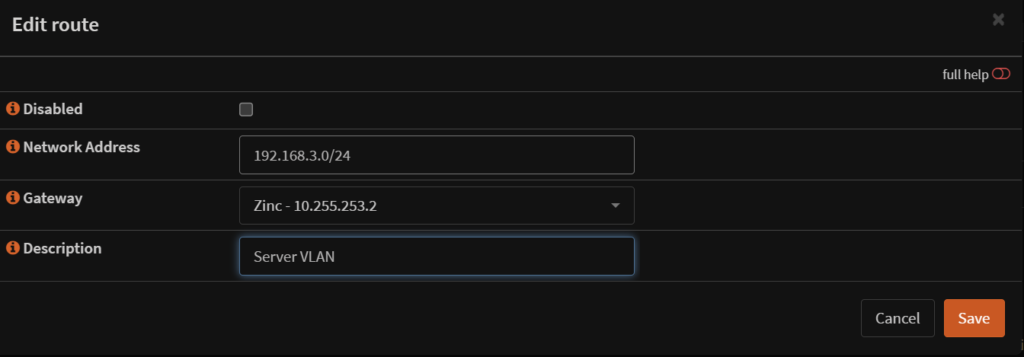
Then Apply

Lastly we need to allow traffic to flow within the network, as this is managed by the switch there isnt really any firewalling, and we need to allow traffic, so I am allowing all traffic, but you may want filter it if needed
Head to Firewall/Rules and select the Interlink interface

Click the + to add a rule

To add an any-any allow rule we just need to then hit Save at the bottom

And another changing the direction to Out

We should have two rules like this, and we can then click Apply

And when we ping from a client, we can get to the switch IP

In OPNsense if you dont configure the Firewall rules client may have issues routing out
