Last updated on March 10th, 2025 at 21:45
A little while ago I nabbed a Dell M1000e for basically nothing with a few blades and some 10G switches, and it was the perfect hobby lab, albeit with some major drawbacks, but it definitely was the coolest lab for a while
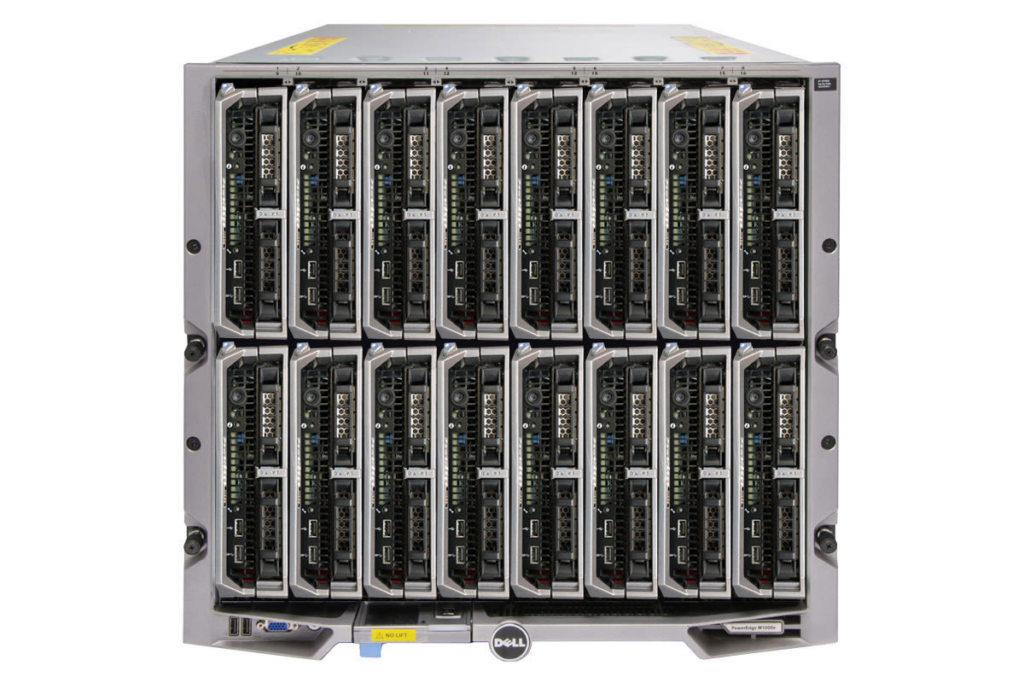
So, first off, what is the Dell M1000e, well, its a monster of a unit and is functionally a datacenter is a box, a very dense and unbelievably heavy 10U box
With it empty, it came in at about 50KG and was a two man job to get upstairs, apartments really dont fit this hobby well..
In the front, you can fit 16 blades, each blade is the equivalent of a full server, it then takes 9 fans, which my god are they loud when it boots, 6 PSUs, 2 CMCs, 1iKVM and 6 switches, giving you 22U of rack space in 10U, and this is where it shines, density
It takes quite a few blades in the front, M420, M520, M620, M820, M630, M830, M640
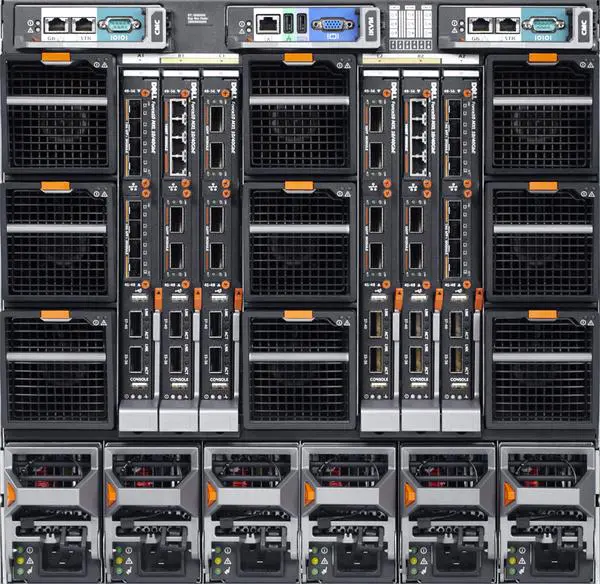
There is also a screen for some chassis management along side a VGA and 2 USB ports for connecting to the blades
The rear of the chassis hold 6x PSUs at the bottom, 9x fans in the middle along with 6 IOM slots, 2 per fabric and then the CMCs on the
Those fans go up to ~18k RPM and when you power it on they go at their max, and it genuinely sounded like it was going to take off and fly out the window, and all that came at a staggering 500w, in fans alone, which is insane
It does get quieter when it fully boots, and for what it has its not too bad noise wise, though a little much for the living room
However, there was a work around, someone on Reddit found the following command that wasnt in the CMC manual, and when you SSH into it, you can manually set the fans, though take care as bits might overheat
And interestingly this works, it seems, with all CMC units, the FX2S I tested it on also worked perfectly, and I assume the VRTX will be included, though I am yet to get my hands on one
racadm getfaninfo -d -p glacier -w <pwm%>If you then want to return the fans to automatic you can run
racadm getfaninfo -a -p glacierSo while it was the coolest lab I have ever had, it wasnt going to last long in my living room and I did swap it out
Important – By continuing you are agreeing to the disclaimer here
How about the power on it?
Power Usage Breakdown
I did a bunch of manual tested using the CMC reported power, so there may be a little margin for error compared to a meter at the plug
The chassis with no switches or blades plugged in and 1 PSU with 7/9 fans, 2 of mine were broken, pulled 70w, this was with the fan speeds at their minimum using the CMC command above
The blade power depended on the hardware and OS, with 2x 2690v0, 8x DIMMs and 1 SSD in the front the blade would get to ~100w in Ubuntu, or 250w in ESXi, I had a lot of issues getting the blades to use C-States in ESXi hence the power difference
The 10G switches I had were the M8024 with 2x 2 port RJ45 10GB expansion cards, these pulled 70w each at idle
So all in all, the power wasnt as bad as you would think for what it is, but for a some lab, the number of network ports leaves a little to be desired, each blade can have a total of 6 ports, up to 8 using a quad port LOM and the 32 internal port 1Gb switches, meaning if you want multiple ports, you need multiple switches
Now lets go over how to use the CMC to configure the chassis and manage the compute
Setting Up The CMC Network
The CMC network can be edited under Chassis Overview/Network
Here you can setup the name, domain and IP settings for the CMC
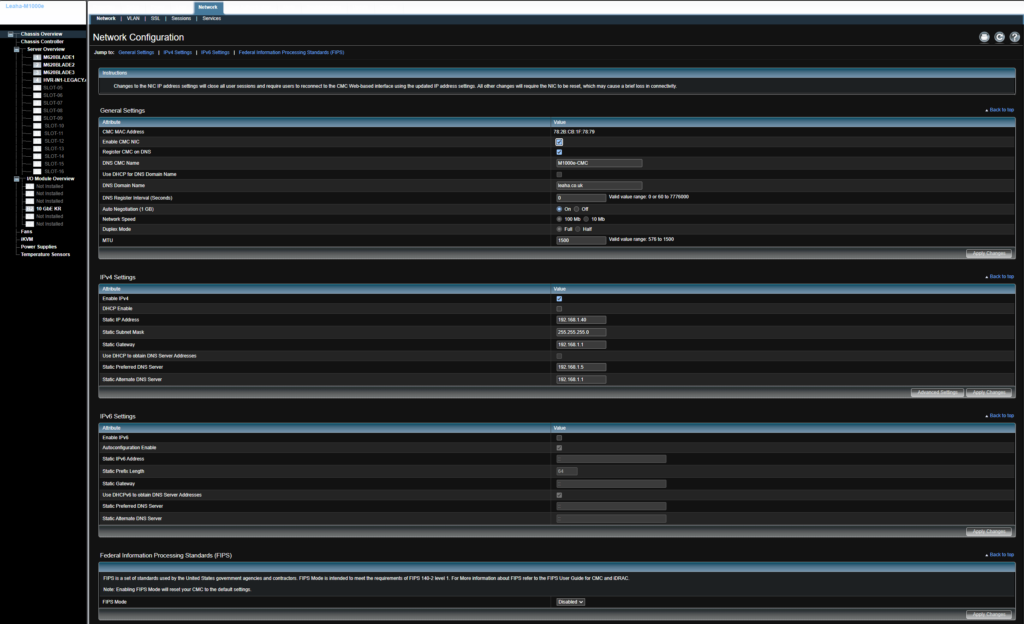
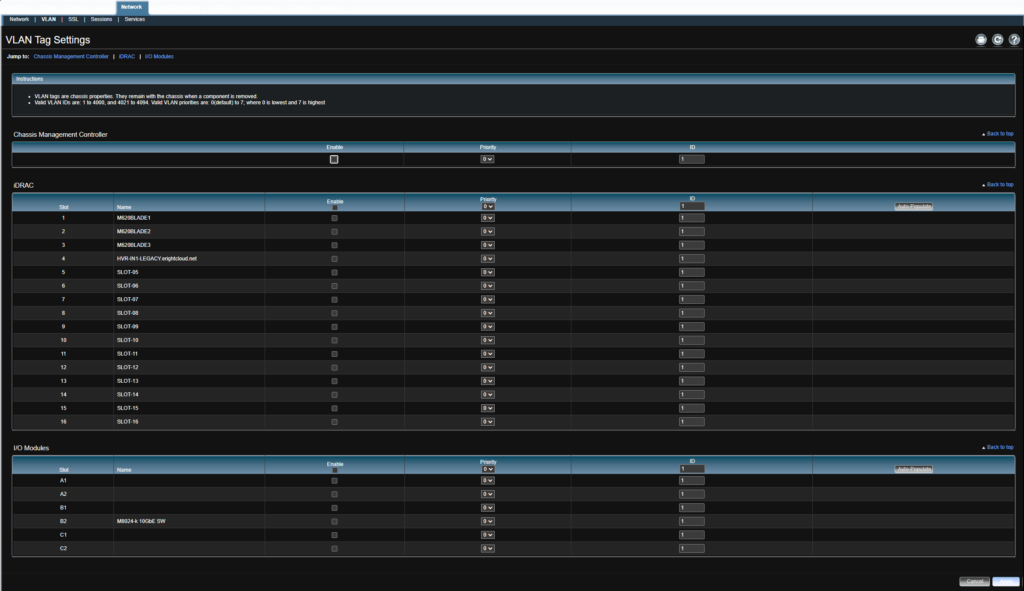
You can then head over the the VLAN tab to setup the VLAN for all management IPs through the CMC, this included the CMC, iDRAC and Switch Management
Bulk iDRAC Configuring
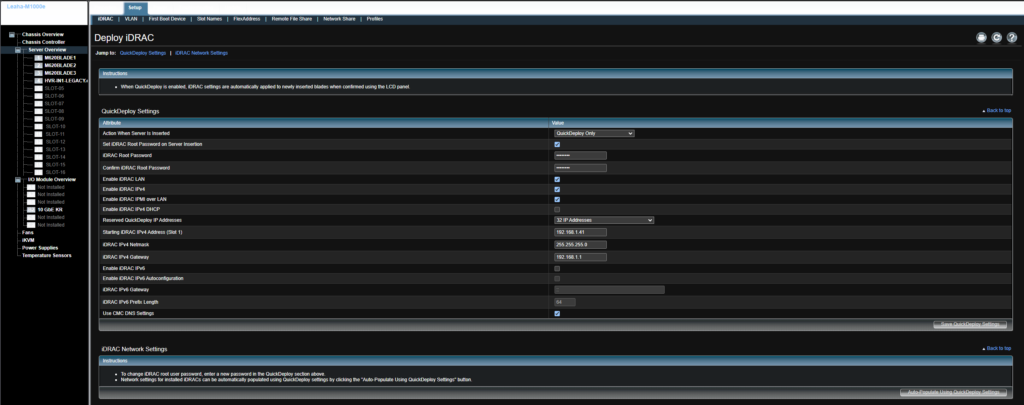
You can auto configure the iDRACs of all blades from the server overview under Setup/iDRAC
Here you can setup an IP block for the iDRAC, GW and apply the CMC DNS settings to auto configure the blades
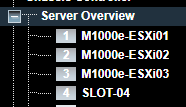
Naming The Blades
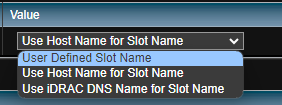
If you want to change the default name of the blades, head to Server Overview/Setup/Slot Names
You can configure them to use the hostname of the blade

Or you can change it to the iDRAC DNS name, or a static name
For static names you can pop them in here and apply
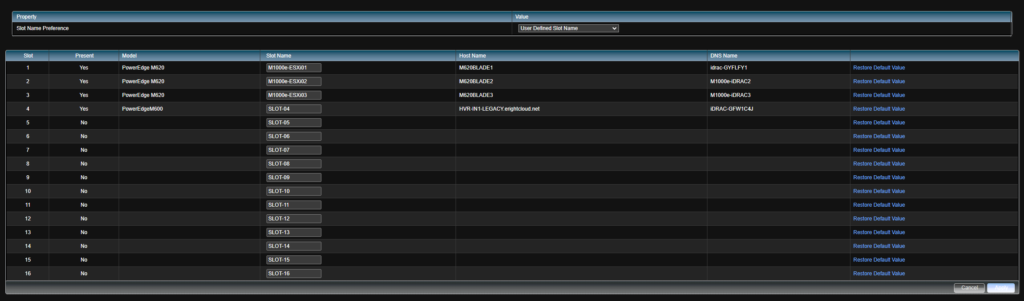
The blades will then get updated
Now we have gone over the M1000e, how do you patch and update such a system?
Patching Order
The system should have its components patched in the following order
- CMC
- iKVM
- IOMINF Firmware (IOM Coprocessor Firmware)
- IOM Firmware
- Blade Firmware
- Blade Software
For the blade firmware you will want to use something like Dell OME, and for the software this will depend on your OS
You can check out my article on vSphere patching which you can apply the firmware section for the blade firmware with OME, and software if you have ESXi here
CMC
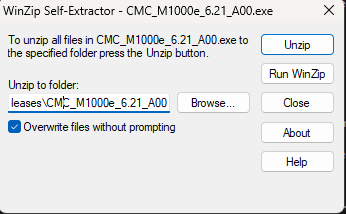
Download the CMC version you want to install from here
I am using the latest 6.21 CMC

Once thats downloaded, you’ll need to extract the CMC firmware file, double click the firmware application to unzip it

Then unzip
Then head to the update tab, select the standby CMC, then click Apply CMC Update

Then click choose file to select the upgrade firmware

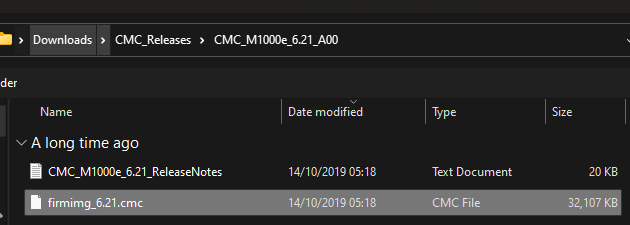
Select the extracted file under CMC_Releases

Then click begin firmware update
And wait while the standby CMC updates

After around 10 mins, the standby CMC will be updated if you refresh your browser and go back to the updates section and you can see the standby has been updated

Now failover the active CMC to the standby thats just been updated, you can find this from the Chassis Overview/Troubleshooting, then reset components, and reset/failover CMCs

Then repeat the process for the new standby CMC
IOMINF
Go to Chassis Overview/Update and select the IOMs you have here and click apply IOM Updates

This applies any IOMINF firmware contained in the CMC update, then click begin update

If after you update this you find its vanished, check under I/O Module Overview/Updates for the IOM Coprocessors Firmware, here its been updated to v12
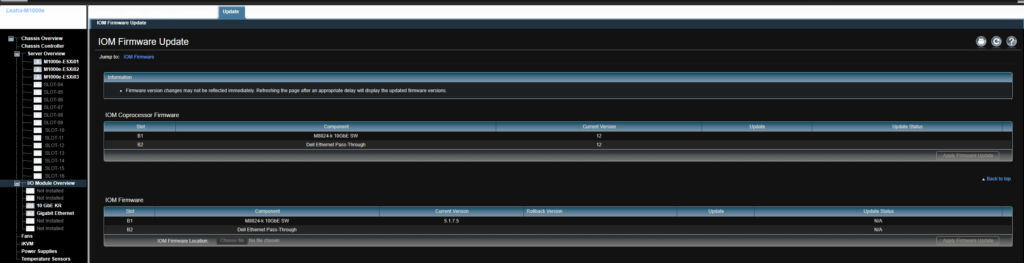
IOMs
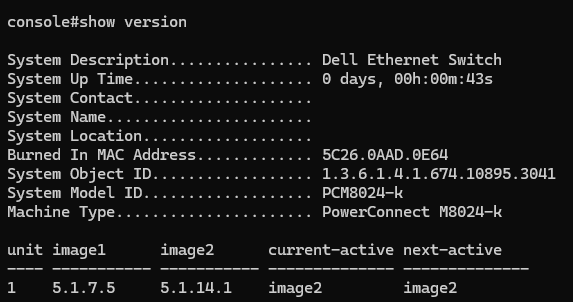
After the CMC/IOMINF has been updated the IOMs will need patching, my system has a PowerConnect M8024 10Gb switch on firmware 5.1.7.5
The latest firmware is 5.1.14.1, there is an upgrade guide from older versions, ie 2.x, 3.x and 4.x and Dell’s documentation shows you can jump from 4.2.1.3 to 5.1.14.1
Next you’ll need a tftpd server, you can download one here
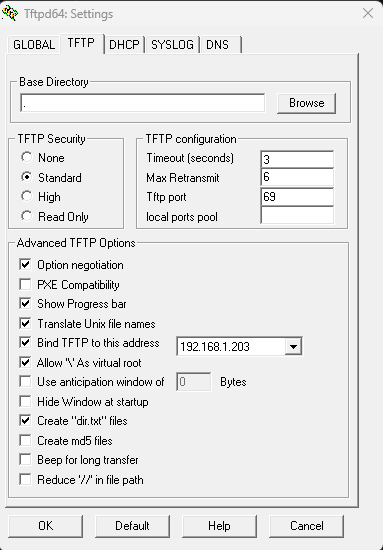
Install that and start it up, from there browse to the directory with the firmware from Dell’s website, with the .stk file in it, and put the server interface on the adapter on your network the CMC can communicate with
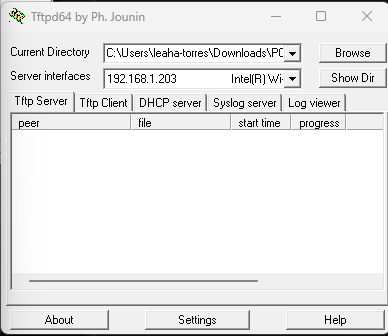
Then click settings and set the following, with the bind address being the address of the server interface
Now, ssh into the switch, or ssh into the CMC and aquire a remote serial connection with
connect switch-xyWhere xy is your switch, eg mine is in fabric B1
connect switch-b1Take a copy of the running config with
copy running-config tftp://<IP>/running-config.txt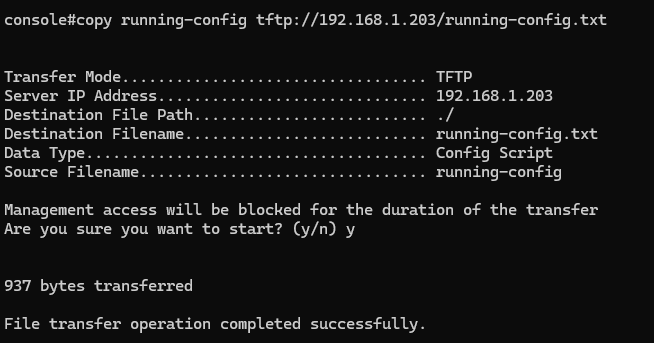
Copy the startup config with
copy startup-config tftp:///startup-config.txt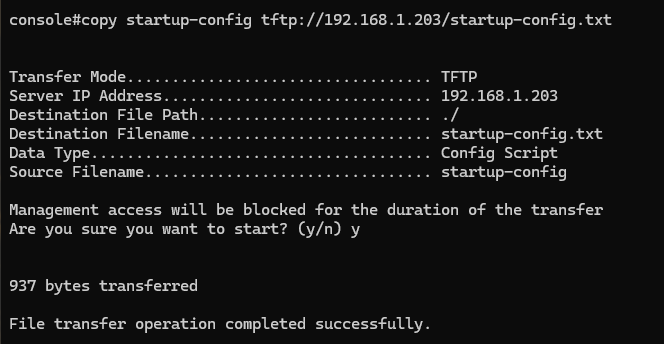
And ensure the running config loads on next boot with
copy running-config startup-configThen copy the firmware image with
copy tftp://192.168.1.203/<Image-File.stk> imageEg
copy tftp://192.168.1.203/PCM8024kv5.1.14.1.stk image2Once its finished, you will get an output like this

We can validate this by running
show version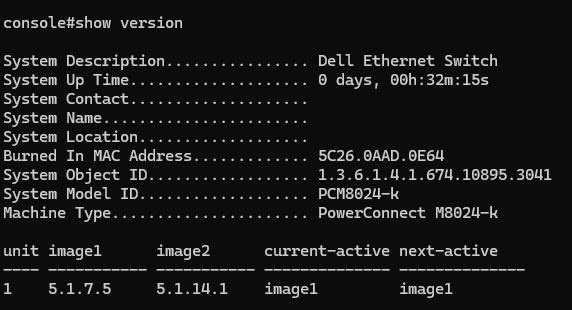
Now we need to activate the firmware and boot the image with
boot system image2Then reboot the switch into the new bootcode with
update bootcode
Then using
show versionWe can verify we are running the latched firmware and that will persist across reboots with the next active