Last updated on January 17th, 2026 at 18:03
In this article we are going focus on vSAN, with no extras added in and how to make the most out of it, as the quotes have gone up a lot, but there is also a lot more on offer that most people didnt have before, so there is a little silver lining to the price hikes
A typical 4 node cluster with 32 core CPUs, single socket using the Dell R6515, gives you 8TiB/server for a total of ~32TiB in a cluster, so you could use 4×1.92TB SSDs per node, using NVMe SSDs, this is comparable to a SAN, taking Dell’s PowerStore as an example, Dell sell this with a guarantee, for virtualised workloads with compressible data, of 3x data saving, so an effective capacity of ~75TiB, vSAN can also use compression and duplication, so should be comparable under ideal circumstances
Its worth noting deduplication is only available in vSAN OSA in vSAN 8, for deduplication in vSAN ESA, vSAN 9 is required, you cannot convert from vSAN OSA to vSAN ESA
We can also leverage erasure coding, RAID 5, within vSAN on a 5+ node cluster to significantly increase our storage capacity, at the expense of network traffic and a little performance, using vSAN storage Policies
So given vSAN can do everything your SAN can, you should probably look at this for the greatest flexibility and as a cheaper option, given the bulk of the cost is in the appliance, not the disks, if we spec our servers with disks and utilise vSAN, this should work out significantly cheaper, and possibly even pay for the VMware licensing over three years, though this varies heavily on the price your supplier can get
So with that in mind, its 100% worth asking for a quote for some vSAN ready nodes, vs, for example, a PowerStore 1200T, then comparing the cost and business requirements before committing to a particular setup, especially, as we’ll dive deeper into below, the vSAN can do everything a PowerStore, or an equivalent Alletra from HPE, since you’ll be buying VVF for your VMware estate whether you go vSAN or with a traditional SAN
Important – By continuing you are agreeing to the disclaimer here
1 – vSAN Reservations
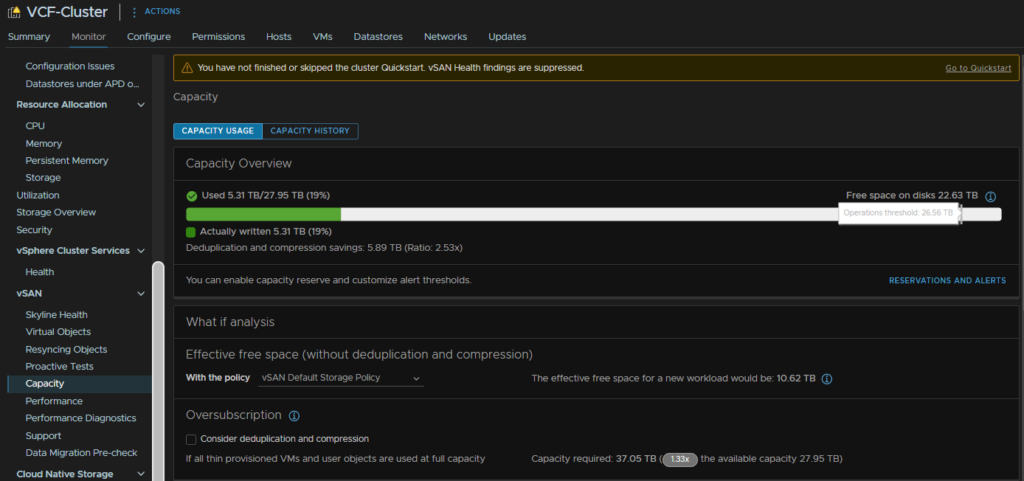
With vSAN, you have an amount of storage that the cluster should never go over, under any circumstances, the operations threshold, above this things can really break, you can see this by clicking the cluster and heading to Monitor/vSAN/Capacity
Now, ideally, we want to reserve this, so 100% capacity is this operations threshold to prevent issues like this from occurring, if we click Reservations And Alerts we can toggle a slider to reserve this space so we can put the vSAN is massive danger by over filling it and using space the system needs, then we can hit Apply
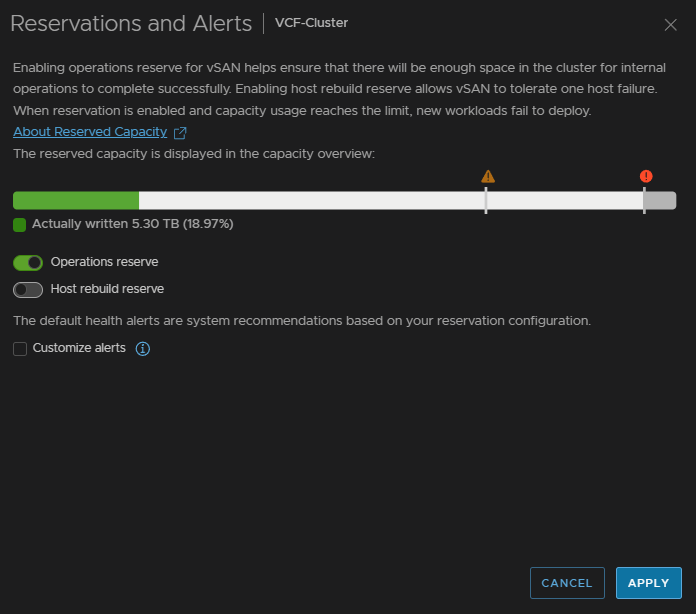
Now we can see its reserved and the 100% capacity is the operations threshold, but we have introduced a slightly new problem, if we hit 100% we will have a lot of issues we need to avoid

Click back into Reservations And Alerts
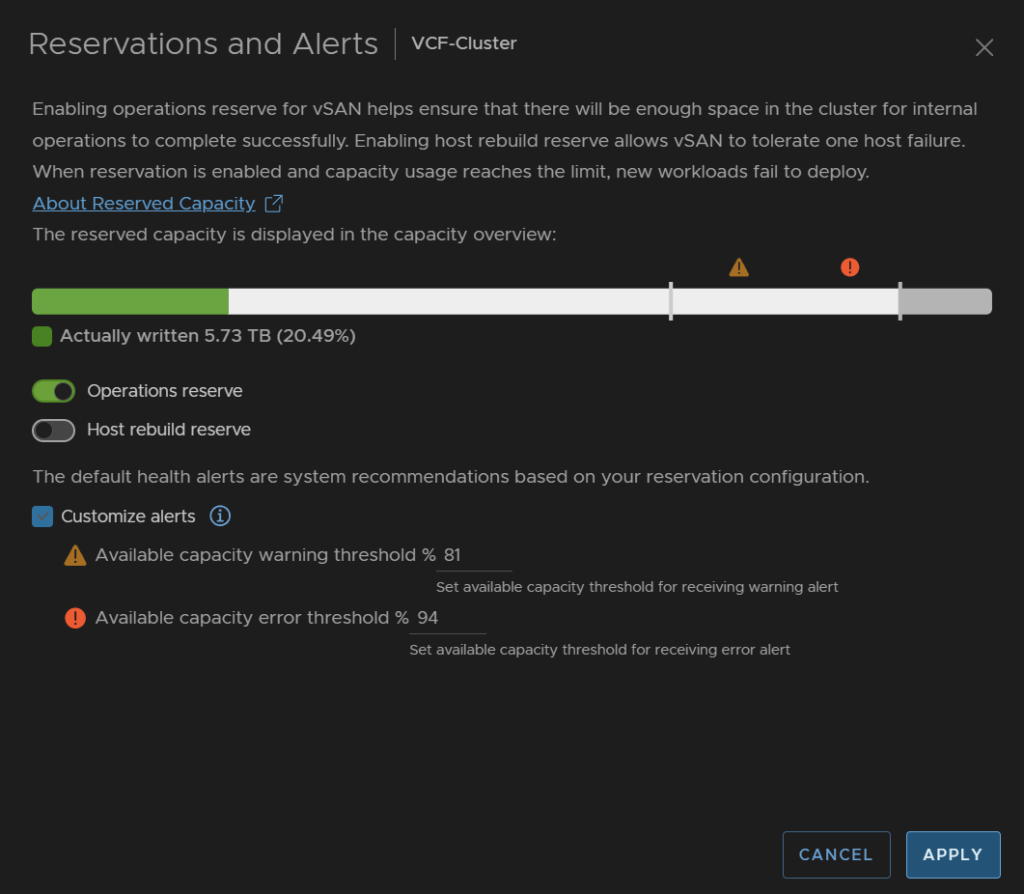
Check the box to customise alerts, we want to set the critical threshold to something a bit more helpful than 99%, normally it isnt this high, but the reservation pushes it to this
I set it at 94% and set the warning a little high to 81%
Now we will get an error when the storage is getting critical
2 – Guest Unmap
When VMs in a cluster use disk space, the blocks are mapped, with any vSAN/VMFS datastore when the guest OS has files removed freeing up space within the guest, but the blocks are not unmapped on the thin disk
With vSAN, we have the option to enable Guest Trim/Unmap, this allows vSAN to reclaim disk when the guest OS has files removed, so this is really helpful for maximum space efficiency, if the VM is already on however, it will need a reboot
From my testing, this works out of the box on Windows Server 2022/2025, however with Linux, it doesnt seem to, Broadcom’s documentation points to using certain commands on the guest, but I was unable to get this working
So in a Windows environment, this is very good, for Linux less so, though you may be able to get it working, but your milage may vary
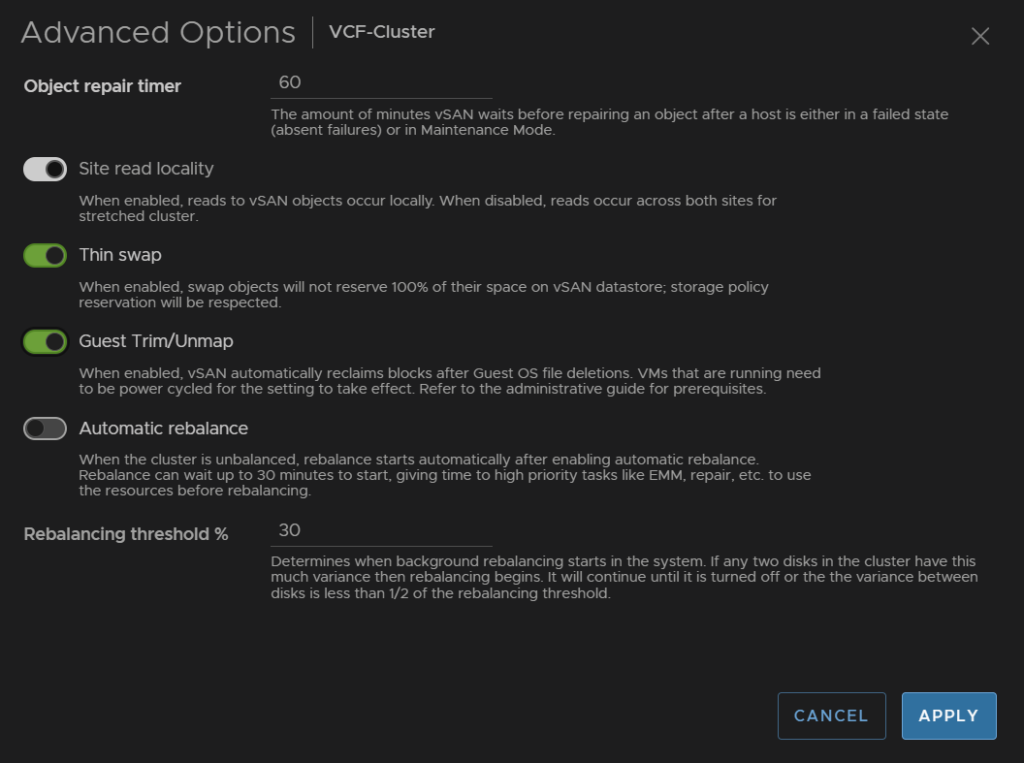
Click the cluster, then go to Configure/vSAN/Services and under Advanced Options click Edit
Click the toggle on Guest Trim/Unmap then click Apply
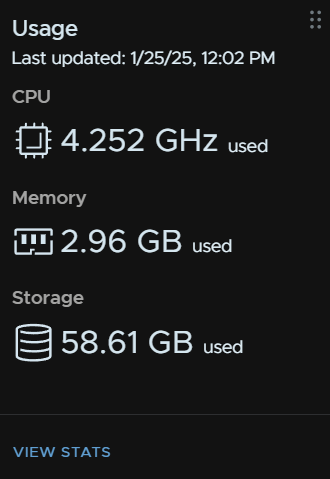
Now, lets see how helpful this is, a jumpbox I had, used to have several ISOs which caused the disk to balloon vs the other jumpbox
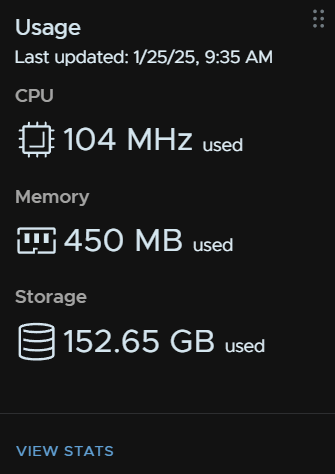
After a few hours it did come all the way down to match the ~30GB the OS is using, this shows as ~60GB due to the RAID 1 policy
3 – Storage Policies
How storage is used and made redundant in vSAN is policy driven, this is very helpful for applying how redundant VMs are
There are a few policies to be aware off
- RAID 1, this causes each object, Eg a VMDK, to have a mirroring, the object is stored on two hosts in the cluster and a third hosts get a metadata file, VMs will use ~200% of their disk space
- RAID 1 FTT2, this is a three way mirror, VMs use 300% of their capacity
- RAID 0, this applies no redundancy, I wouldnt recommend this at all, VMs use 100% of their disk space
- RAID 5 – Erase Coding, this uses the principle of striping in RAID and applies this to objects, the data is striped acorss three hosts and a parity stripe on a fourth, VMs use ~ 133% of their capacity
- RAID 6 is the same as RAID 5 but with an extra parity stripe, VMs use ~150% of their capacity
RAID 1 requires a minimum of three hosts, though I would recommend no less than four hosts in a vSAN cluster – FTT1
RAID 5 requires a minimum of four hosts, but I would recommend five – FTT1
RAID 6 requires a minimum of six hosts, but I would recommend seven – FTT2
The advantages of policies is we can create them based on these storage designs and apply them to VMs to reduce the storage footprint, or increase their redundancy
I would leave the default policy alone and create new ones to apply to VMs
RAID 5 has a big benefit in a 5+ node cluster for how much usable storage you get, for ESA you will have NVMe disks, but I also recommend 25GbE networking for vSAN, as this significantly increases the bandwidth uses and lowers overall performance for a VM
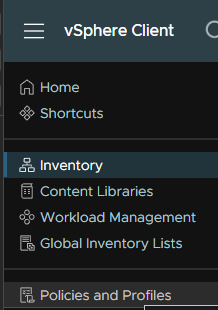
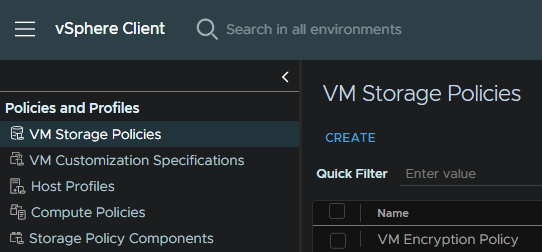
To create policies click the three lines in the top left of vSphere and click Policies And Profiles
Under VM Storage Policies we can click Create
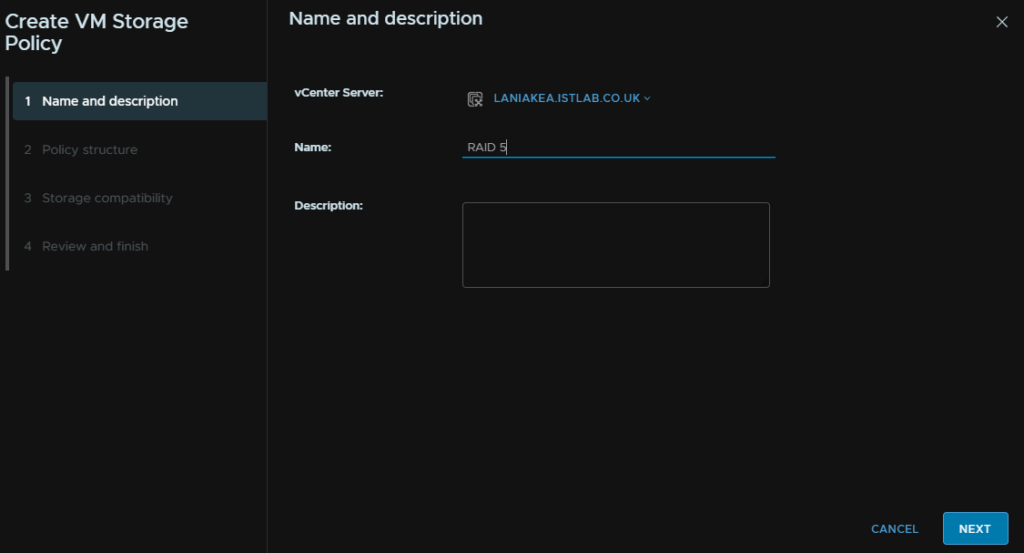
Give it a name and click Next
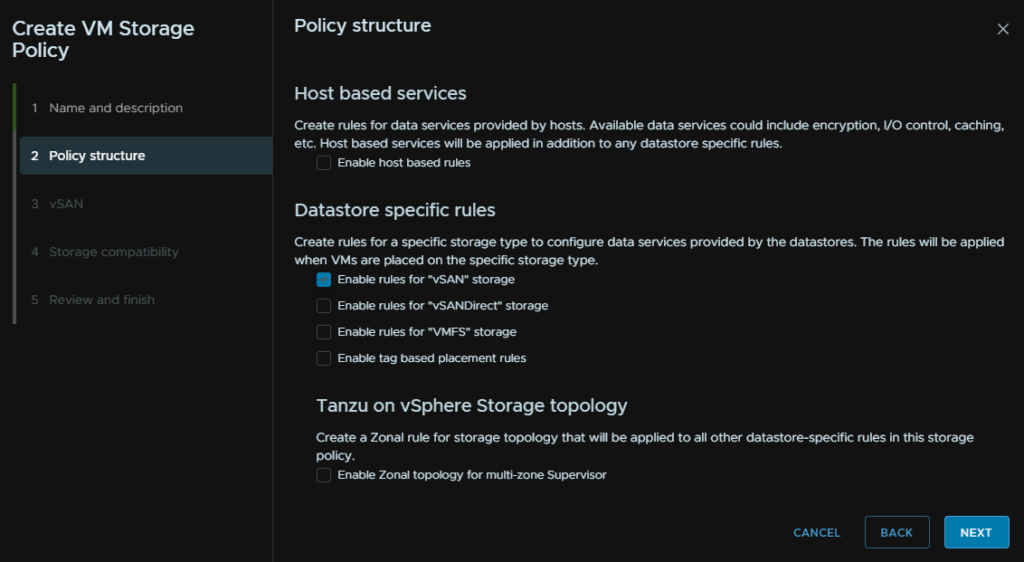
Check the box to Enable Rules For vSAN Storage and click Next
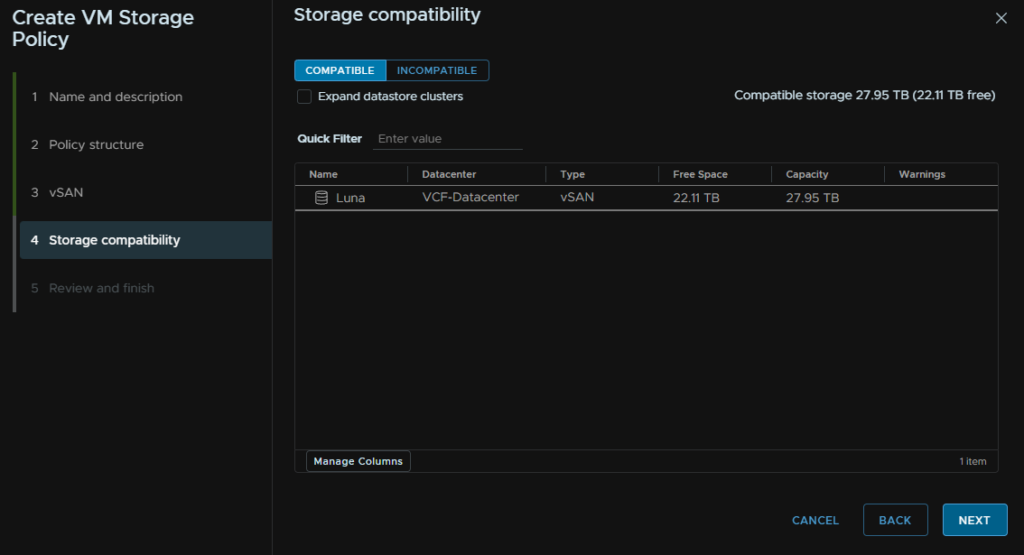
Under Failures To Tolerate, select RAID 5, then click Next

Click Next again
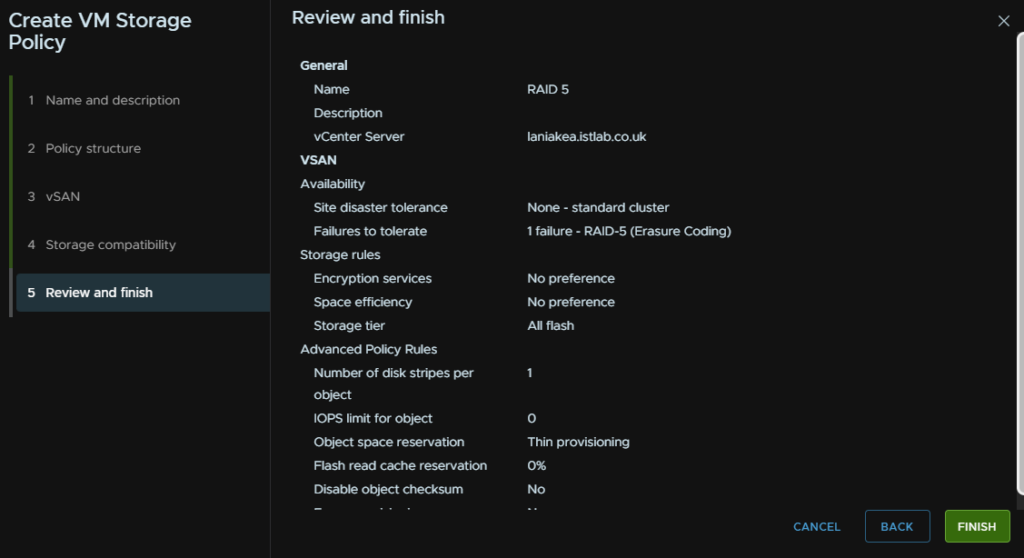
And then Finish
Now if we go and edit a VM, we can expand the hard disks and change the storage policy to the new one, and click ok
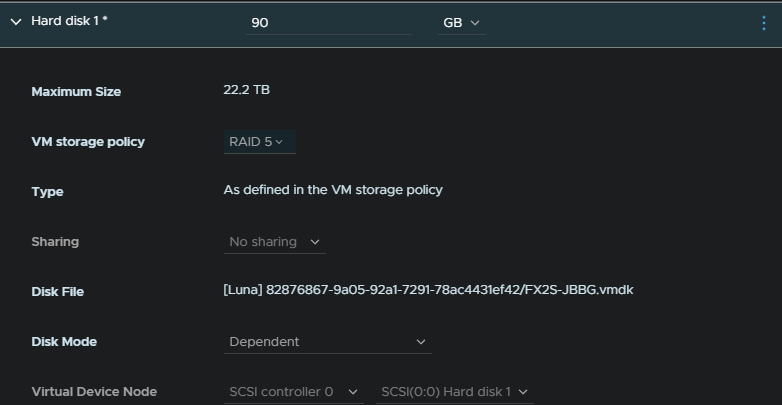
This will apply the RAID 5 target resulting in the VM size shrinking from 200% disk usage to 133% on the vSAN cluster making it significantly more storage efficient, though it does have a performance drop so there are places where it can be good and others where its not
You will probably want better redundancy offered by RAID 1 or RAID 1 FTT2 for something like a DC
4 – Adding Disks
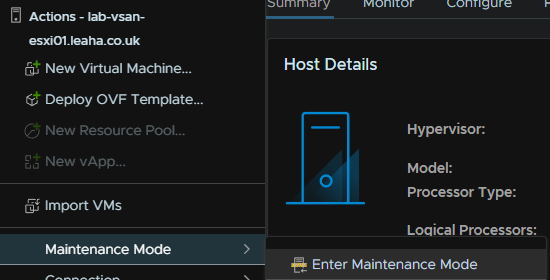
If you want to expand your vSAN cluster with more disks per host, you will first want to put the host into maintenance mode by right clicking it and going to Maintenance Mode/Enter Maintenance Mode
Then Power/Shutdown
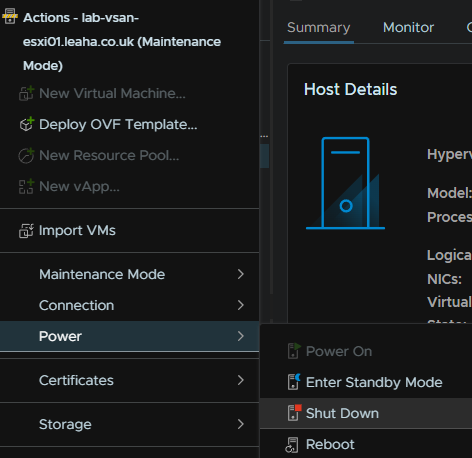
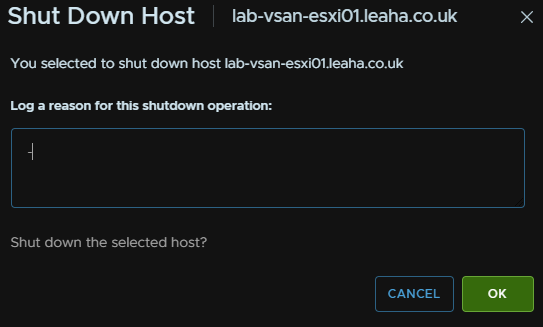
Enter a reason and click ok
When the host is offline, add your new disk in, for optimum performance is should be the same size as the others, then power the host back up
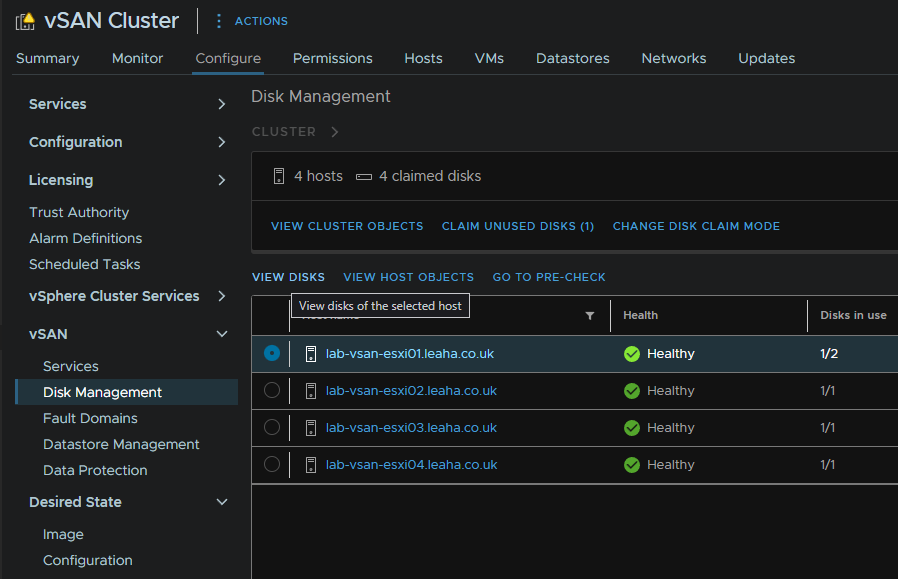
When its back online, click the cluster and head to Configure/vSAN/Disk Management and click View Disks
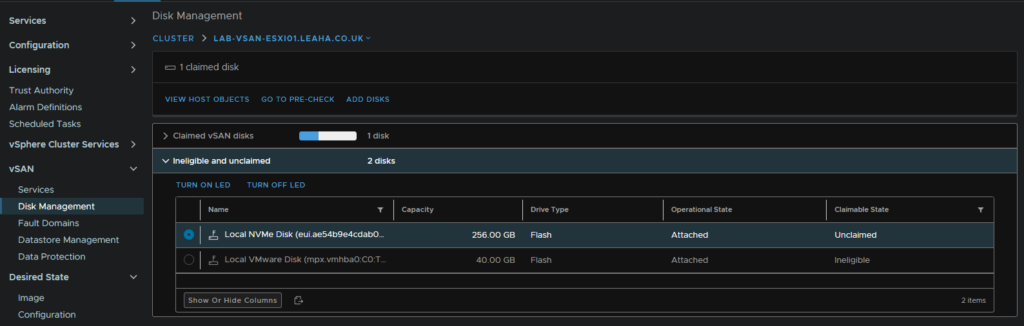
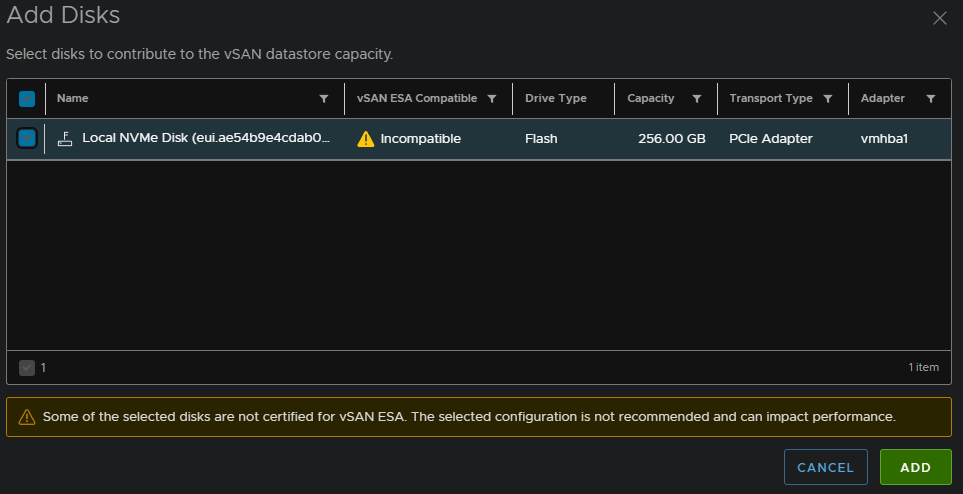
Expand Ineligible And Unclaimed, you should see your new disks and it should be marked as Unclaimed on the right, make sure its selected
Then click Add Disks
Select your disks and click Add, for a production system, you should not have the hardware certification warning, else VMware will not support it, this is just because mine is a virtual lab
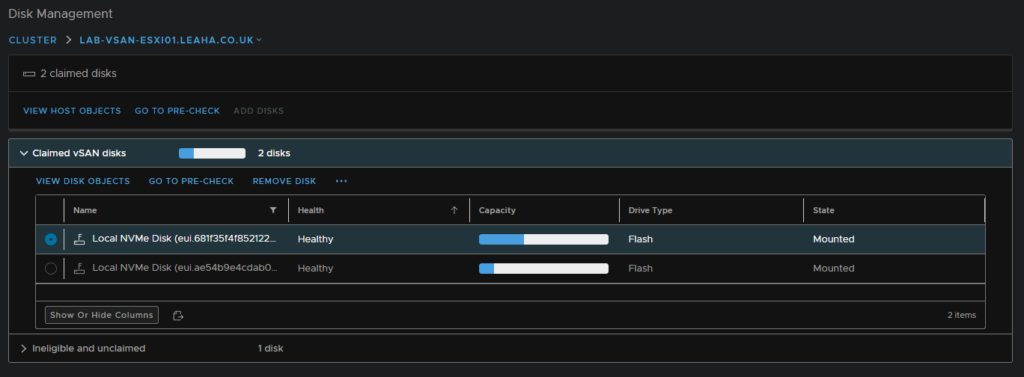
We can now see the disk has been added
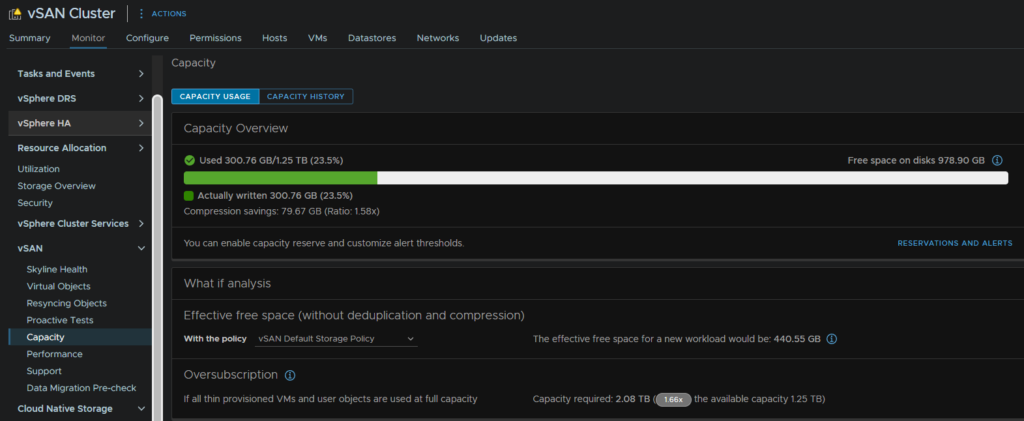
And from the cluster on Monitor/vSAN/Capacity, we can see the space has increased
Then right click the host and click Maintenance Mode/Exit Maintenance Mode

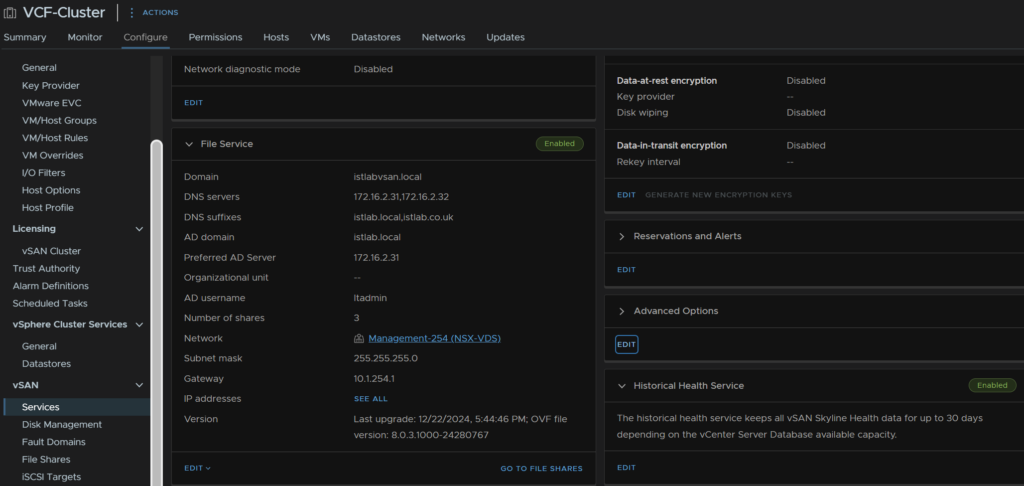
5 – File Services
vSAN file services aims to provide the same NAS functionality with SMB/NFS that a PowerStore can offer with AD RBAC and HA via the vSAN cluster with shared having their objects stored using storage policies
Performance wise I was able to get ~450MB/s from the share, which is most likely due to the SATA SSDs in the cluster being a bottle neck
If you have the new ESA with NVMe disks on 25GbE, I would expect this to be a lot higher, but outside of media requirements, I dont see many people needing 1Gb+ speeds off the file share you might have at the office
5.1 – Enabling The File Services
To setup the file services, you’ll need some IP addresses on the network you want to use it on, and this will deploy one VM per ESXi host
You’ll also need a dedicated port group for this on a VDS, this is because it will lessen the security, so even if its the same VLAN as a port group you already have, it needs it own group
To be able to use SMB shared you’ll need to connect this to an AD server which is also manage RBAC for the shares
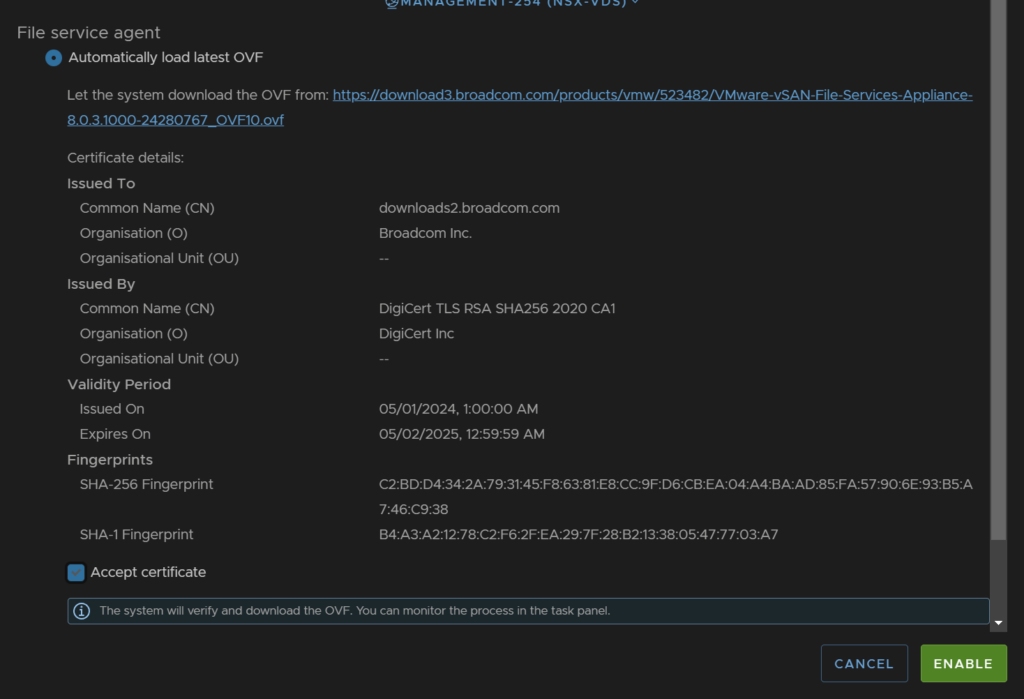
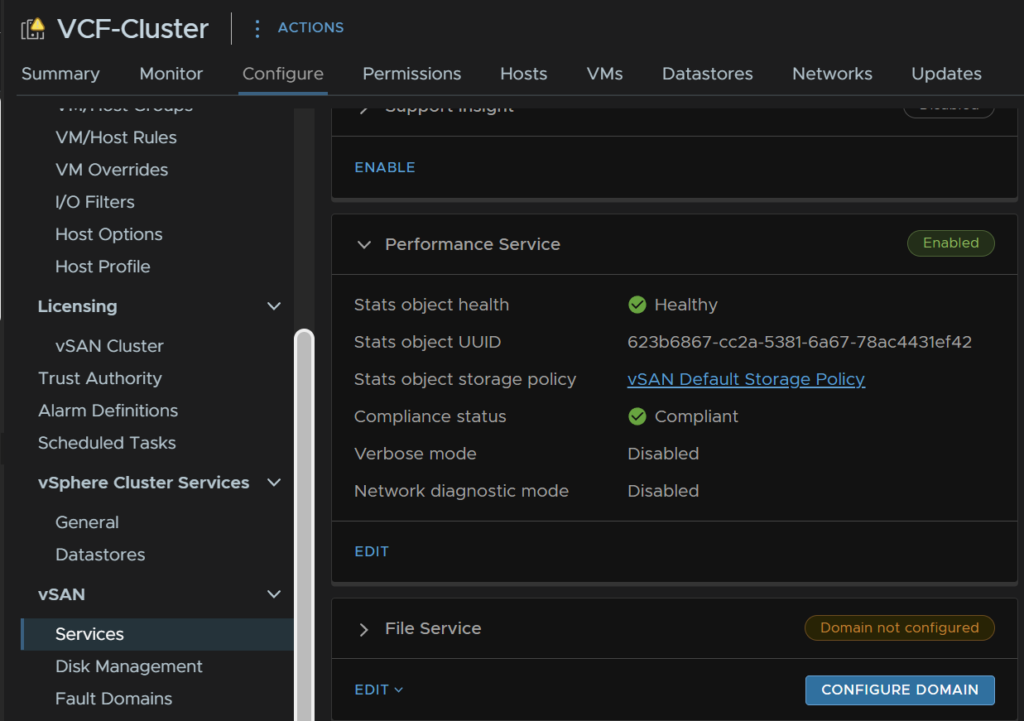
To enable it, click the cluster, then head to Configure/vSAN/Services, and at the bottom, click Enable under the file services tab
Click the Select drop down on the network section, and select the network port group you want to use

Keep the top option of automatically loading the latest OVF and accept the certificate at the bottom, then click enable
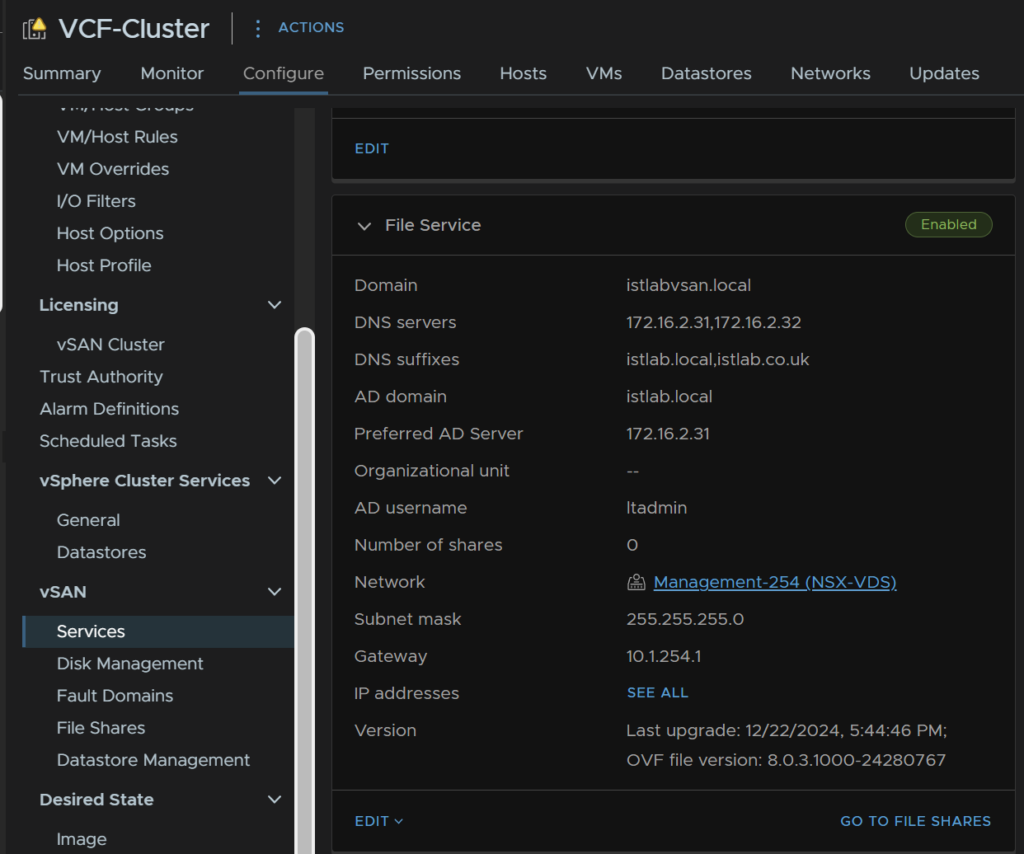
Now when we head back to our cluster and go to Configure/vSAN/Services, we have the option to configure the domain, if we click the Configure Domain button we can continue
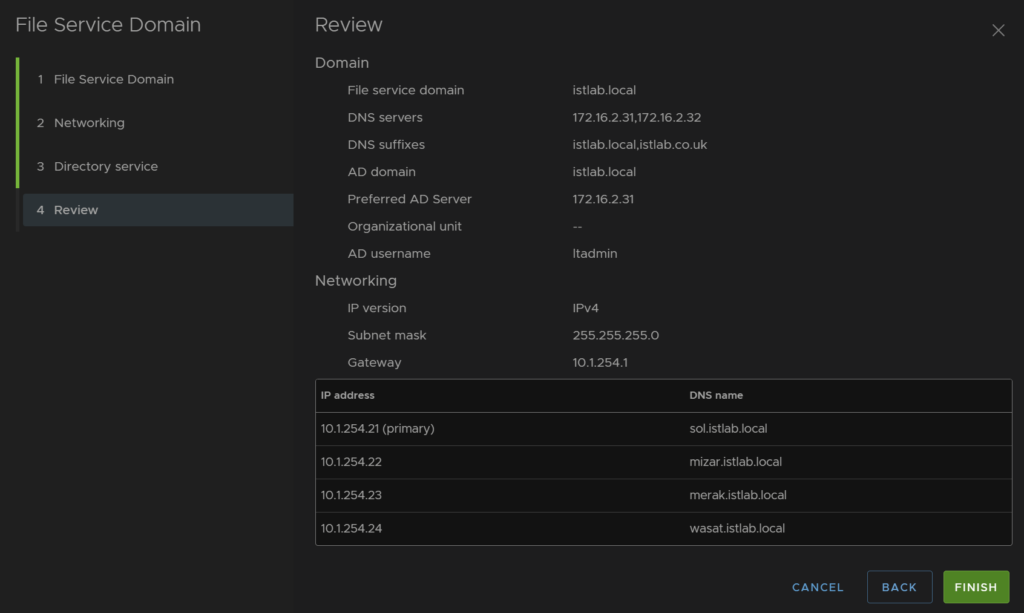
We need a unique domain name for the vSAN file service

Now enter the IP Protocol, I am using IPv4
Then add your DNS servers, this should be able to resolve the AD Domain, which is normally your AD servers, add any DNS suffixes, I have two, istlab.co.uk which is the main name, and istlab.local, the AD domain suffix, the subnet mask and gateway for the network, this will be for the port group we selected earlier

Now we need the IPs and DNS names, everything by default will run off the primary IP, these IPs will also be on the network on the port group we set, and the DNS names need to be resolvable, and be the same domain as AD

Enable AD, enter the domain, you can select the preferred AD server if needed, I added my primary DC, then a domain admin user account
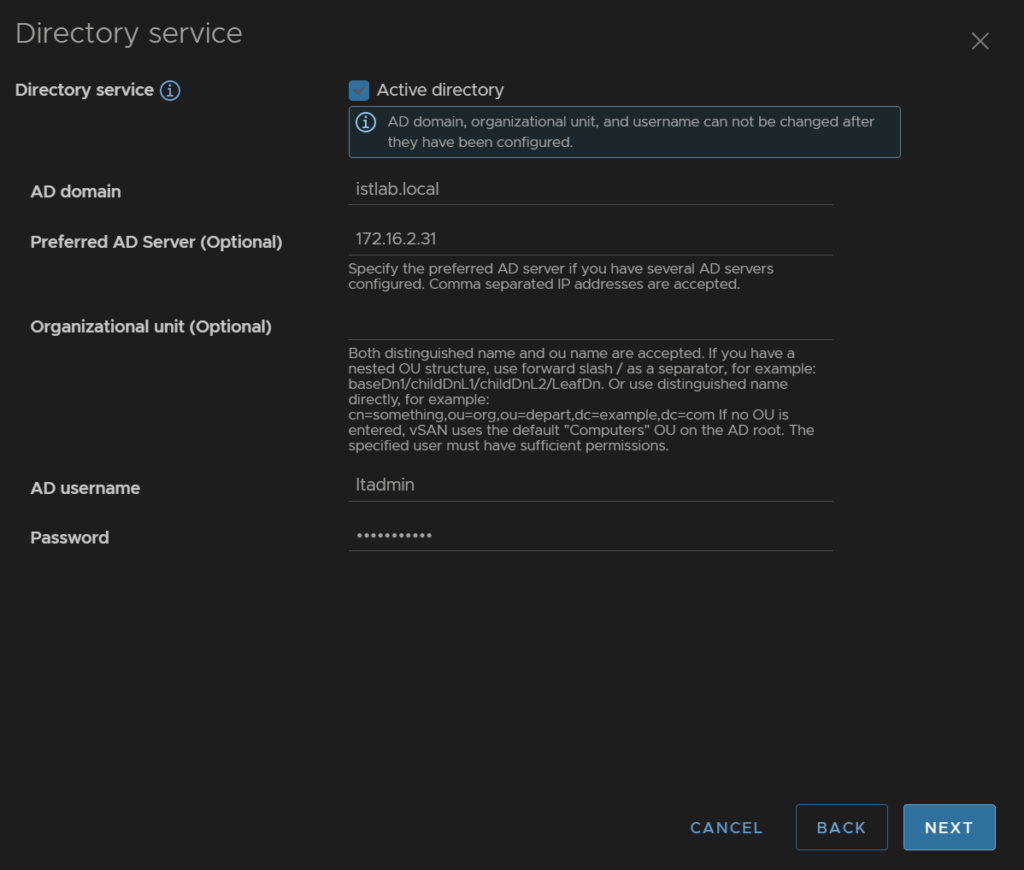
Then review and finish
We can see the widget has populated, and under the cluster we have Configure/vSAN/File Shares we can access
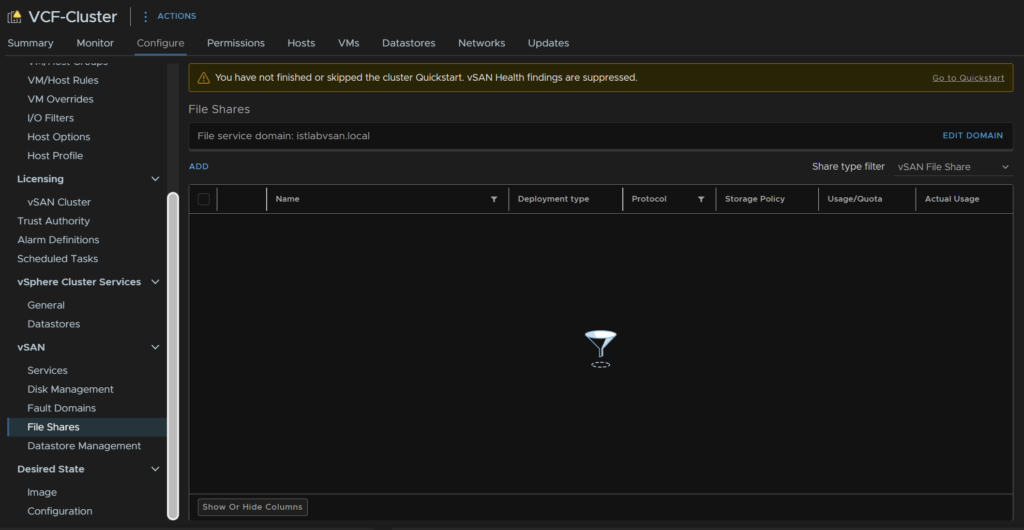
5.2 – Creating Shares
Once its all setup we can add a share from the cluster then Configure/vSAN/File Shares, then click Add
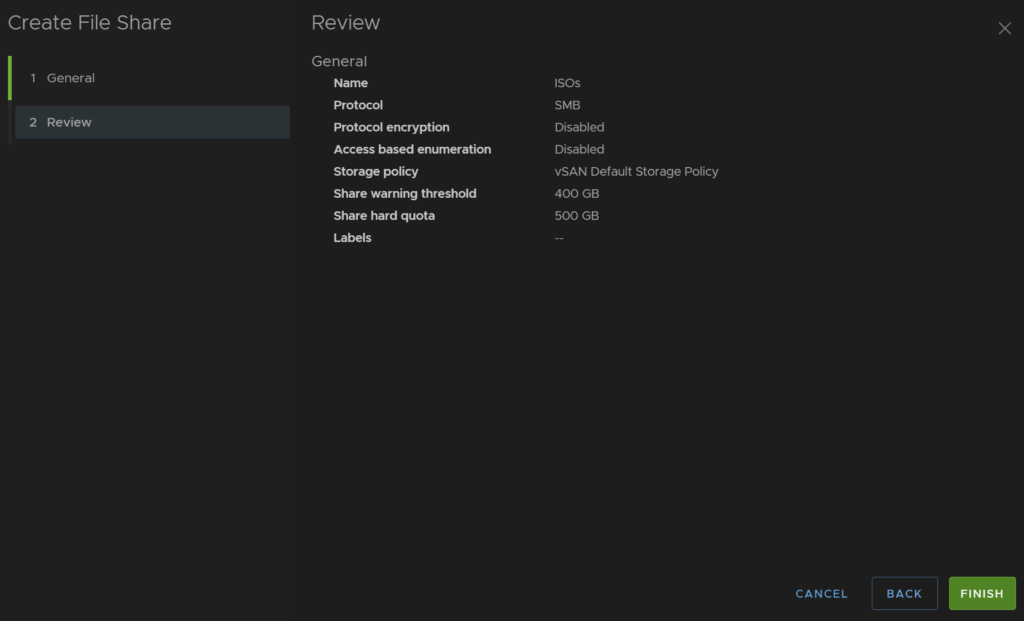
Add a name for the share, select the protocol, you can then enable encryption if you need, and ABE, this can slow shared down, over 10k files, but hides anything a user doesnt have access to
Select the storage policy, the default is fine, though you can get creative with different shares and storage shares if you want to save space
You can then add a warning threshold, and a hard quota, and labels if you want, but I left it blank
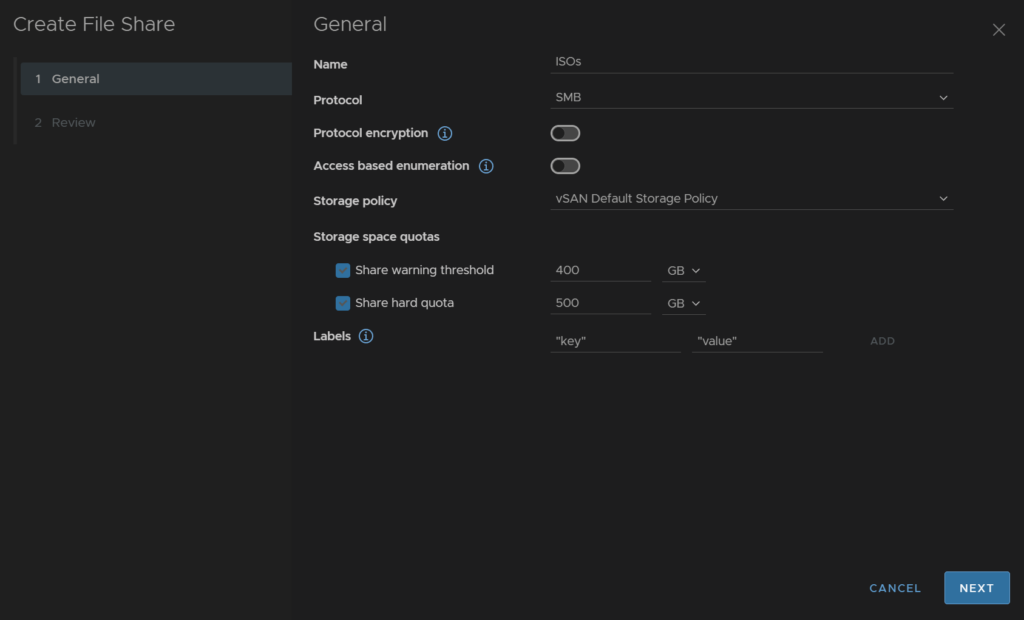
Then click Finish
5.3 – Edit Share Permissions
Now we have our share, how do we setup the permissions on the share to prevent certain people from accessing it
We can select our share and click Copy MMC Command

We need to then head to a machine on the domain, with suitable domain privileges, I used a domain admin here, and pasted the command into an admin PowerShell window, it should look like this
In the newly opened window, we can see all the shared on the primary IP the vSAN File Services has, and we can see our new ISO shares

You can then double click your share and manage your permissions for the top level here

You can then manage subfolder like you would on a Windows file server from File Explorer
6 – iSCSI Services
Performance wise, I saw this to be similar to the File Services
Its also worth noting, that this cannot be used to connect to another ESXi host, you likely wont be doing this in production anyway, but in a lab scenario, I wanted to test it as an iSCSI target for nested hosts, sadly, the only option there is NFS via the File Services
6.1 – Enabling The Service
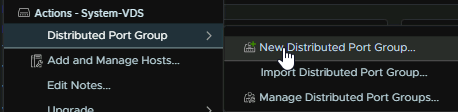
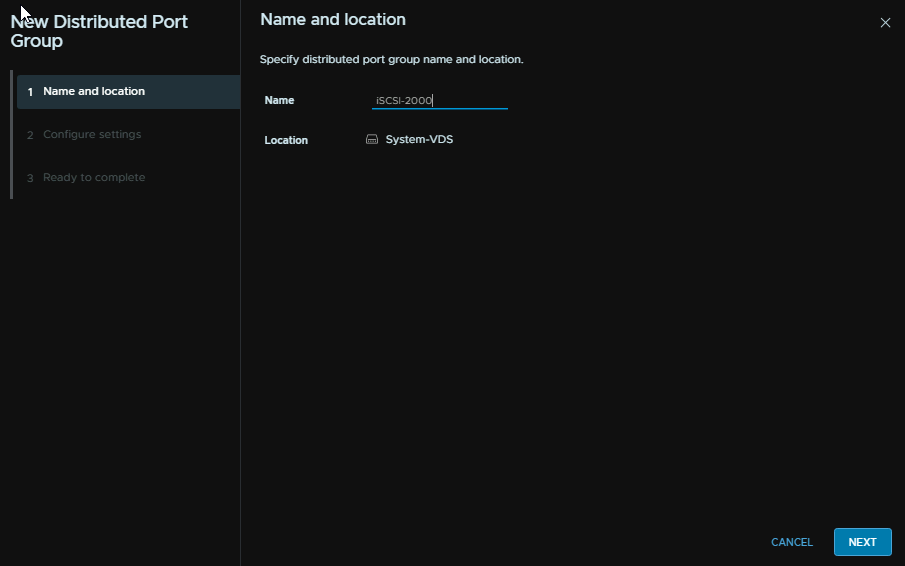
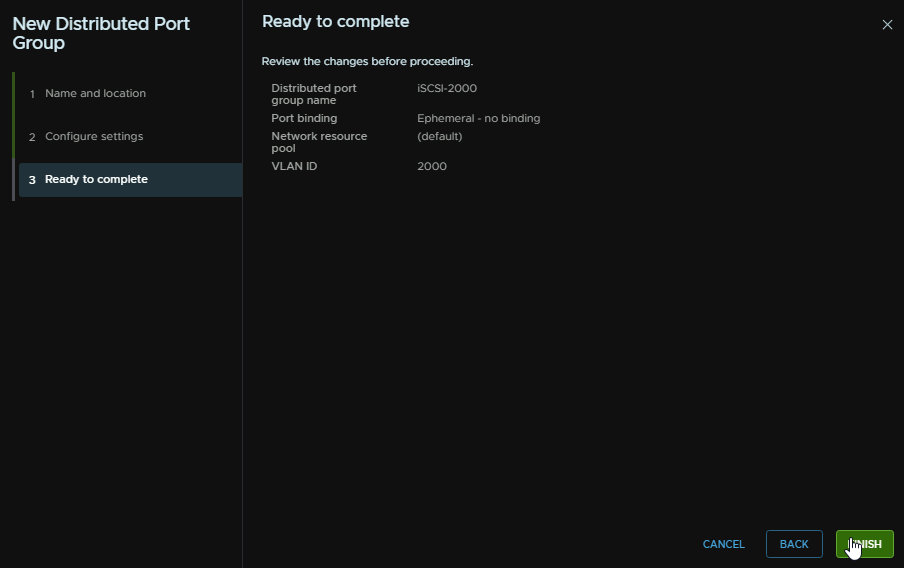
Firstly, we need some networking, I would recommend having a non routable dedicated network for this, here I will be using VLAN 2000
Right click the VDS you want to add this too, ensuring the ports connected have this VLAN allowed to the trunk list, and click Distributed Port Group/New Distributed Port Group
Give the port group a name and click Next
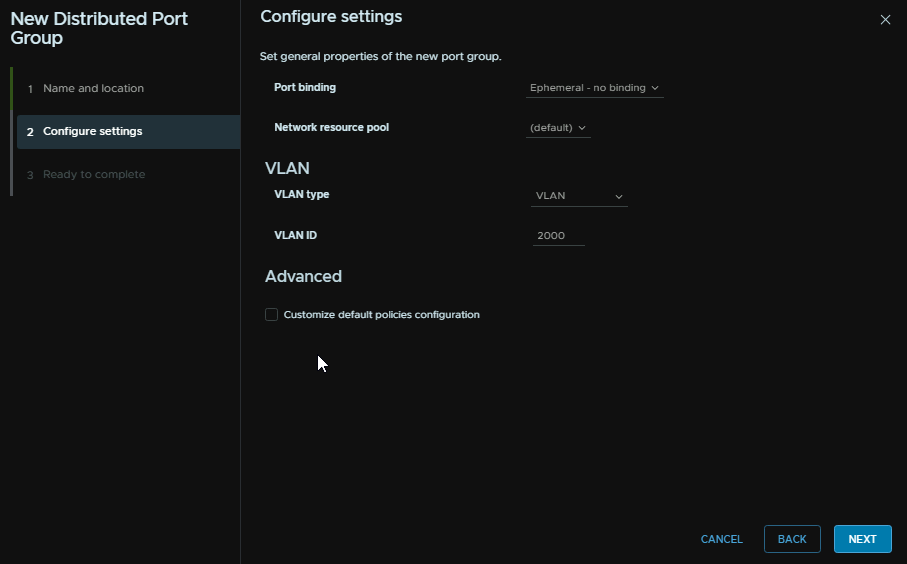
Select Ephemeral for the port binding and select the VLAN to be the VLAN you want, in my case, 2000, then click Next
Then finish
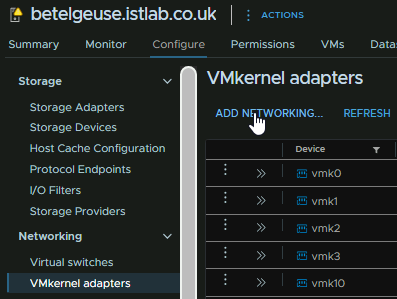
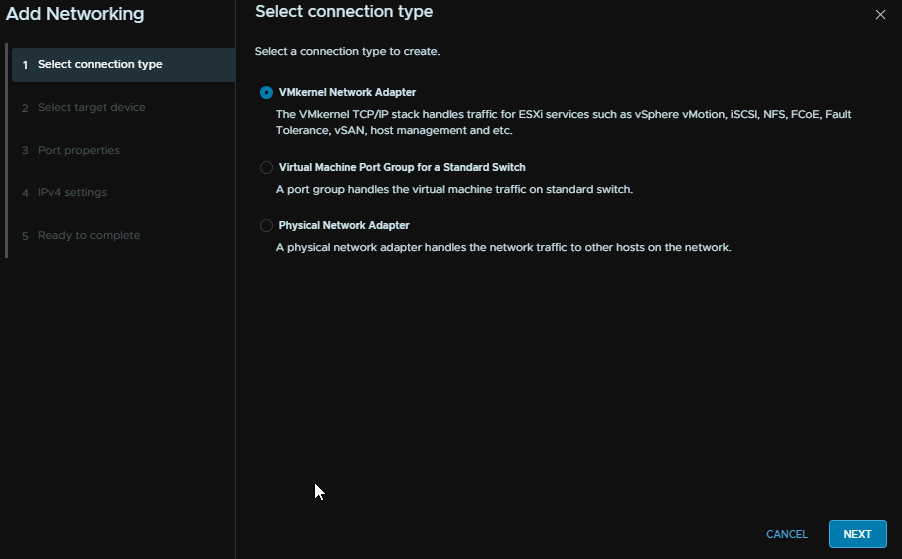
Now we need a vmk per server o the iSCSI VLAN, click the host and head to Configure/Networking/VMkernel Adapters and click Add Networking
Select VMkernel Adapter and click Next
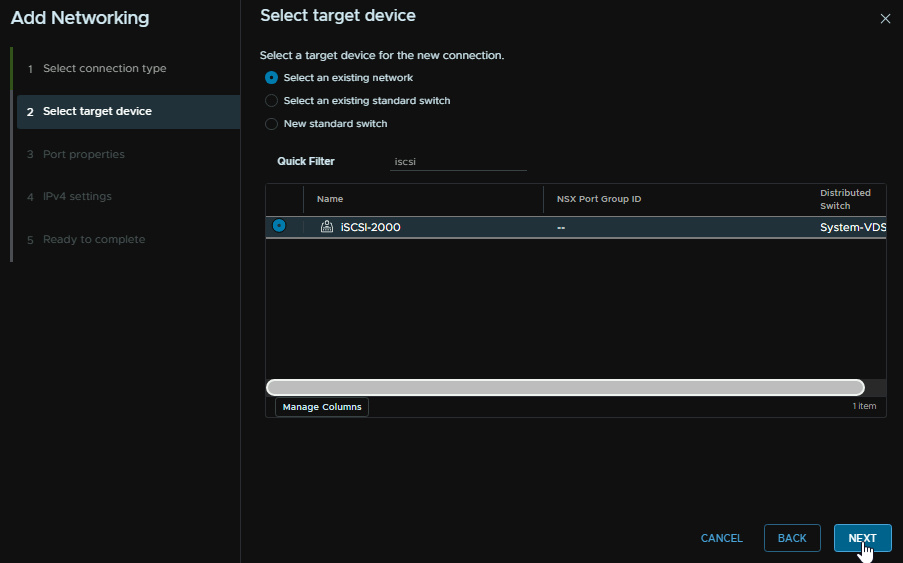
Select the port group and click Next
Click Next, my switch has an MTU of 9000, so the VMK will be using that, but be careful with MTU changes that everything in the chain has the same MTU for bits, then click Next
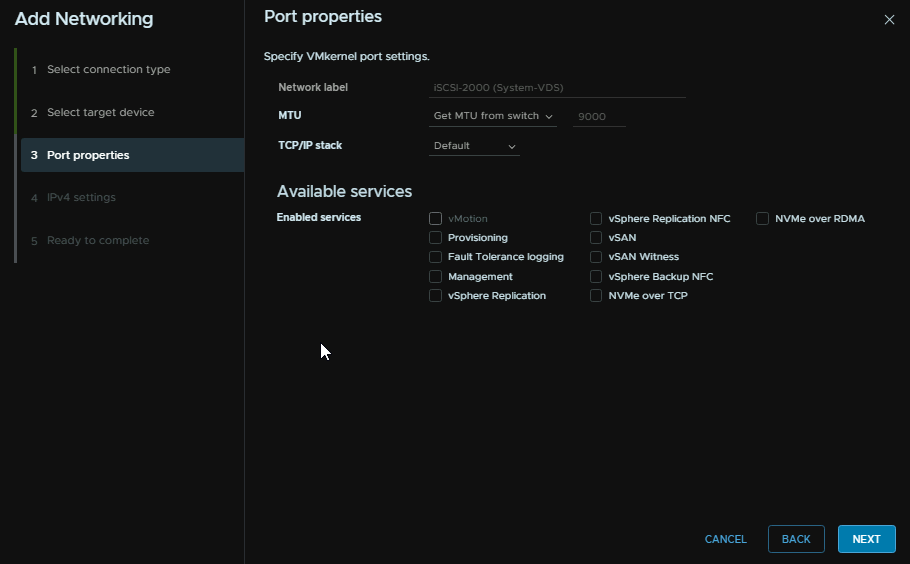
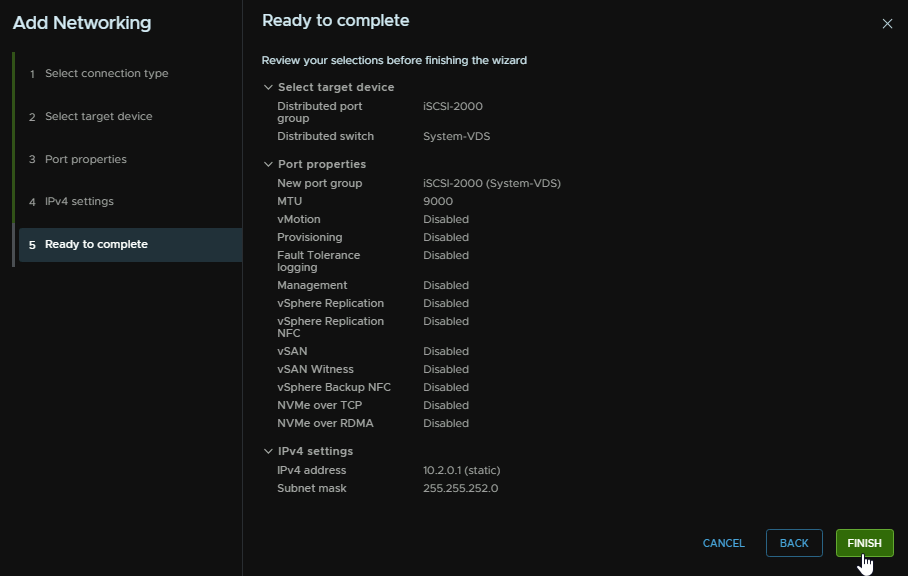
Add an IP address and a subnet, the gateway wont matter as its L2 anyway, then click Next
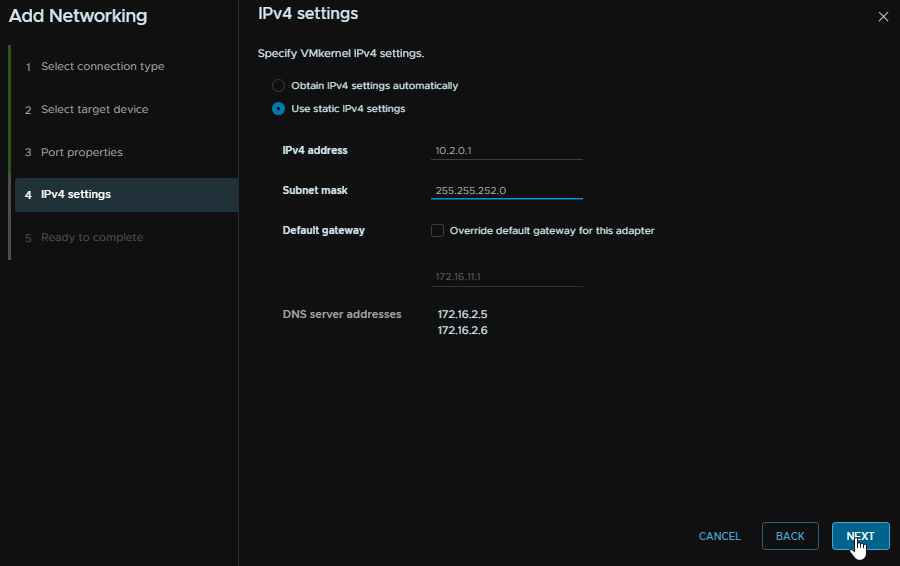
The click Finish
The repeat with different IPs for the rest of the hosts, the vmk needs to be the same, ie vmk4 on all hosts
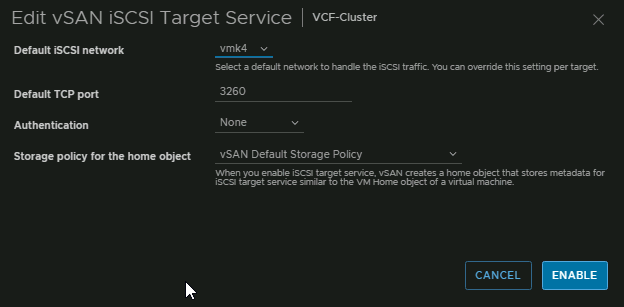
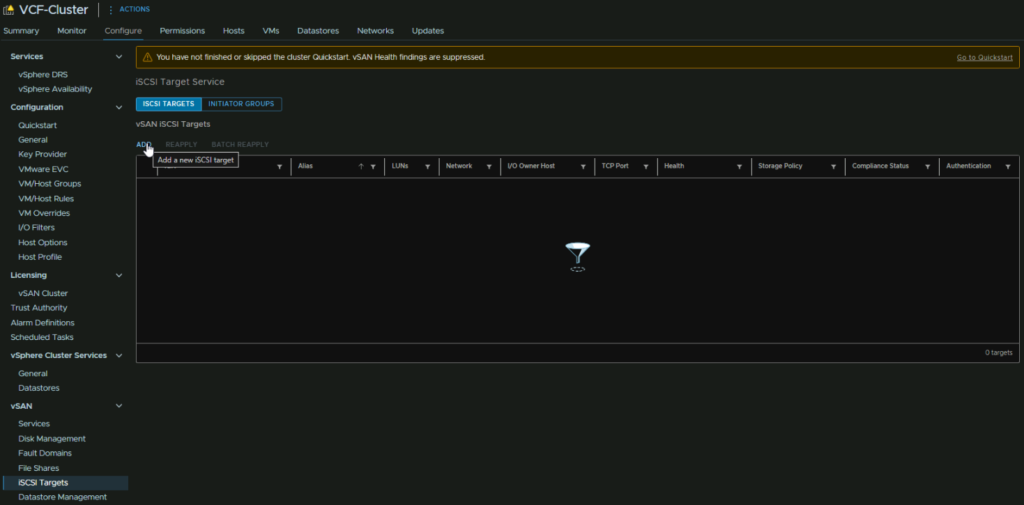
To enable this, click your cluster and head to Configure/vSAN/Services and under the vSAN iSCSI Target Service, click Enable

Select the vmk, I have vmk4 on all the hosts, select the port you want, authentication you want, and a storage policy, then click Enable
6.2 – Adding Targets And LUNs
You may need to refresh your page for the iSCSI Targets section to crop up
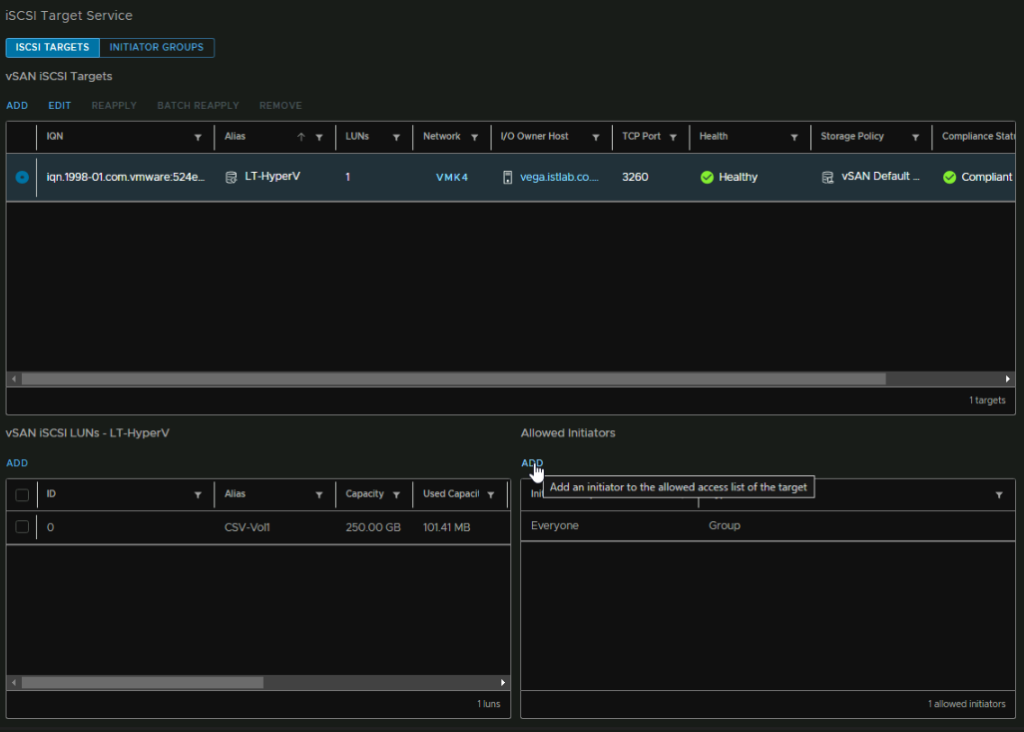
Click the cluster and head to Configure/vSAN/iSCSI Targets then click Add
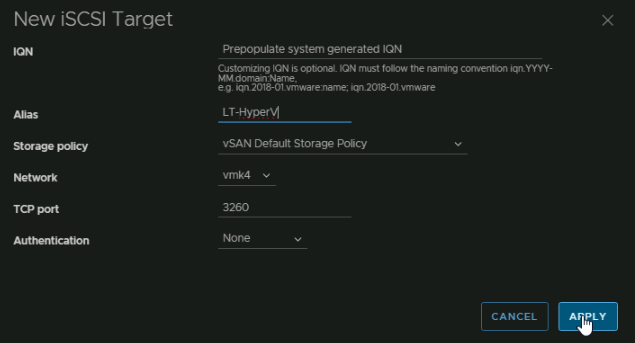
Leave the IQN empty, this will auto populate, give it an Alias so we know what the LUN is for in the vSAN configuration section, select your policy, I am just using the default, but you can change the policy to change the amount of space/redundancy
Make sure network is using the vmk we set this up with, which is vmk4 on all hosts for iSCSI, the port is the stock 3260 and you can set authentication but this is normally ignored anyway, so I am leaving it black, then click Apply
Now we have our Target remote hosts can connect to

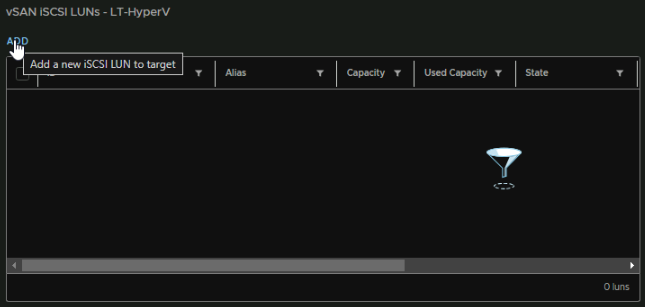
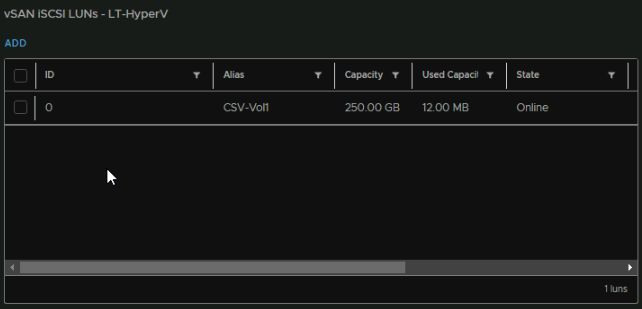
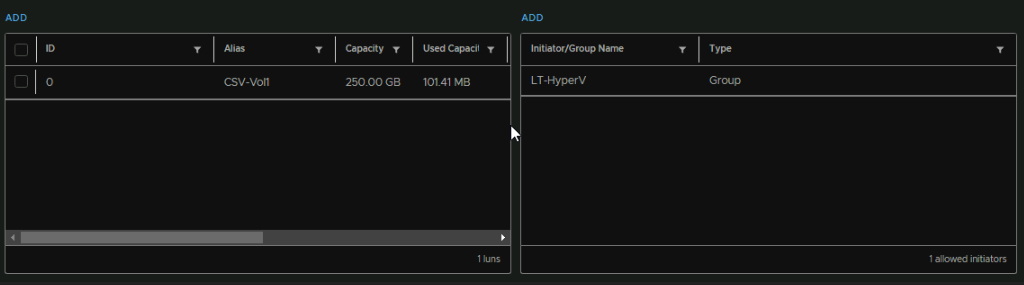
Towards the bottom we can add a LUN for this selected target by clicking Add
Leave the ID at the default value, give it an alias so we know what volume this is, select the storage policy, and add a size, then click Add
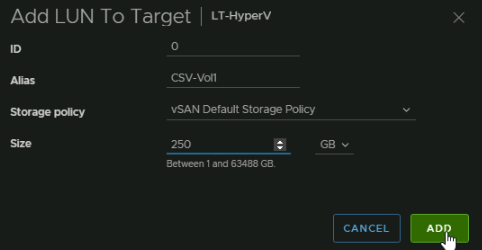
Here we can see the LUN and its used capacity
Now we have our LUN, we need to connect our client, this varies depending on the OS
I will be testing a Windows VM for iSCSI storage for a Hyper-V lab using CSV storage
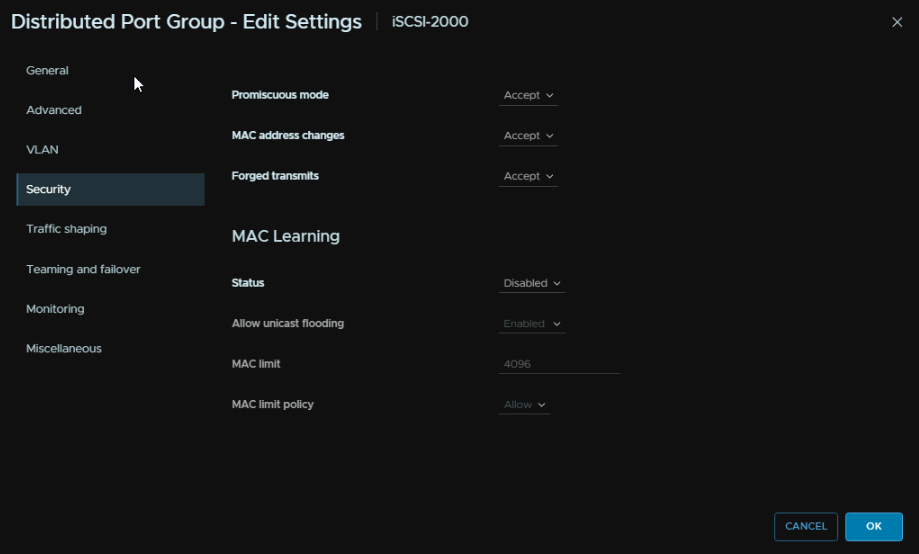
For nested VMs you may need your port group to have these Security settings else the VM will not communicate properly, but I would try without this first in a production environment as it should work
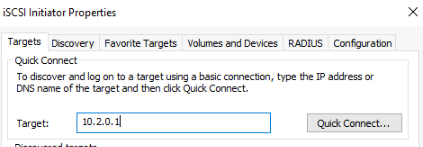
For our Windows machine, lets test iSCSI, installing and configuring the server for iSCSI is out of scope for this and will be covered in the app you want to deploy its self
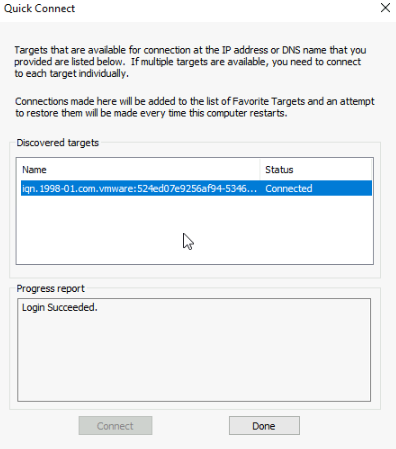
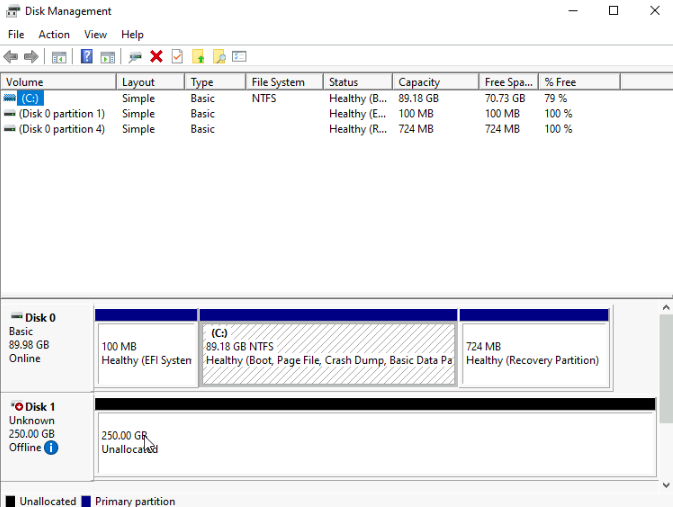
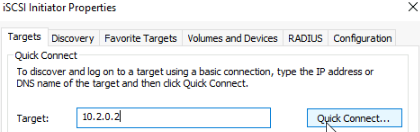
The VMK IP of the host that is the I/O owner is 10.2.0.1 so if we add that in Windows as a target and click Quick Connect
We can see the vSAN initiator shows up and logs in
And in Disk Management we can see our 250GB disk showing up ok
Now, this is great, but what if we want our host doing the I/O to go into maintenance mode, the connection is only for that IP
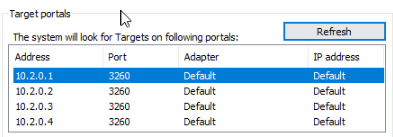
We can add these to the quick connect
It will say there are no targets, as this host isnt the I/O owner, but thats fine, its meant as another path if the host is in maintenance mode
Now all the servers are in the Target Pool, so the client should be able to get its iSCSI disk from any host in our cluster
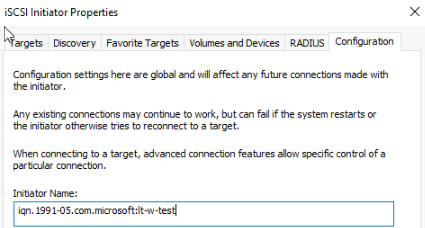
Now, by default, all servers can connect to a LUN, for Hyper-V in this example, I only want my cluster nodes connecting to this LUN, not someone else cluster, so under iSCSI and then Configuration, we can copy the Initiator Name
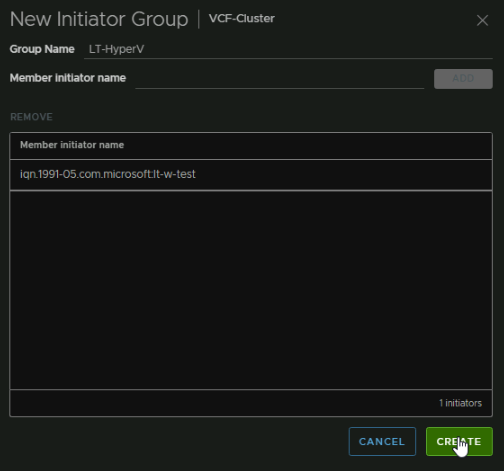
Back in vSphere, click the Cluster and head to Configure/vSAN/iSCSI Targets/Initiator Groups and click Add
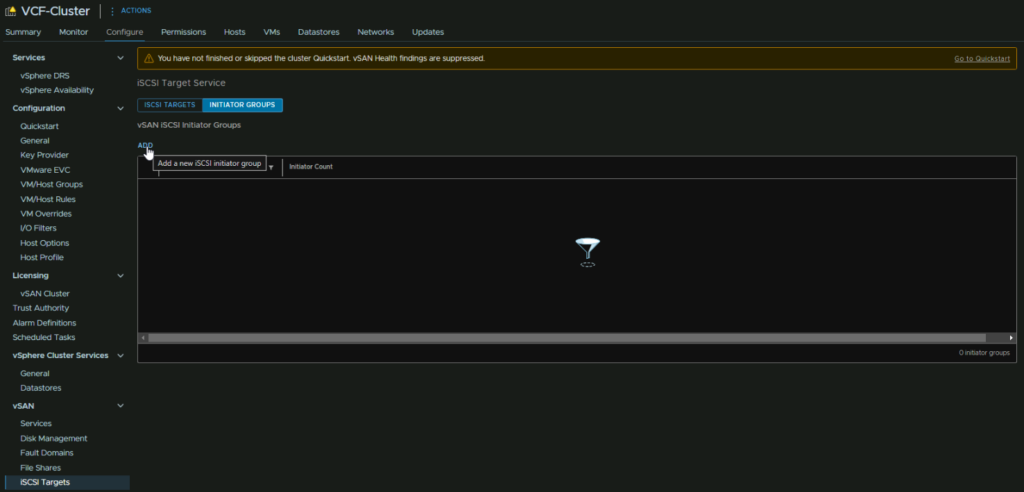
Give the group a name, and add the initiators of all hosts you want to access the target we just set up, and all its LUNs
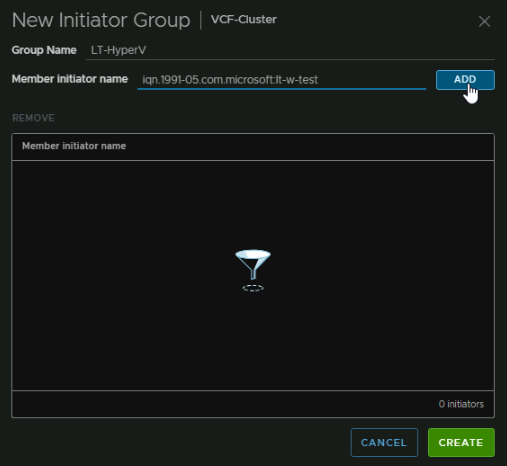
When you have all your hosts, I just have one for this demo, click Create

When you have all your hosts, I just have one for this demo, click Create
Back under iSCSI targets select the Target, then click Add under Allow Initiators, you will see the default group allowing everyone
Select the Initiator Group radio button and click your new group, then click Add
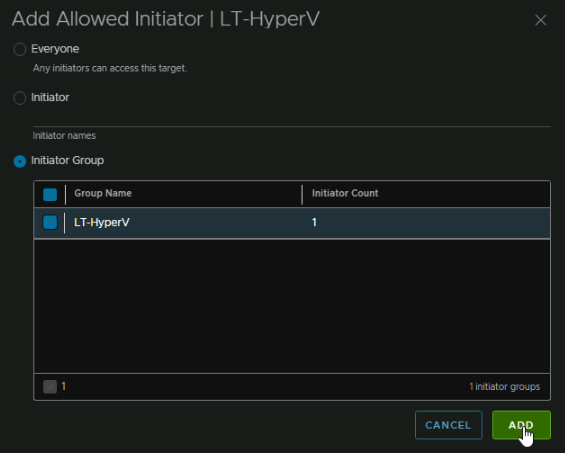
Now we can see the Everyone group is replaced by this group, so only my Hyper-V servers can access this
On a sequential write to the test VM, then putting the host managing the I/O into maintenance mode to force a failover of the I/O owner did extend the time for the host to enter maintenance mode which isnt an issue, but there was a 15-30 second drop where the file copy went to 0 while Windows reconnected iSCSI as we added all hosts to the list which doesnt seem too bad, though I dont have the same test with a PowerStore to compare with a controller failover
7 – Data Protection Services
This is only supported on the vSAN ESA architecture due to the entire design overhaul and the way data is stored, so is donest work with the OSA architecture
7.1 – Data Protection Services
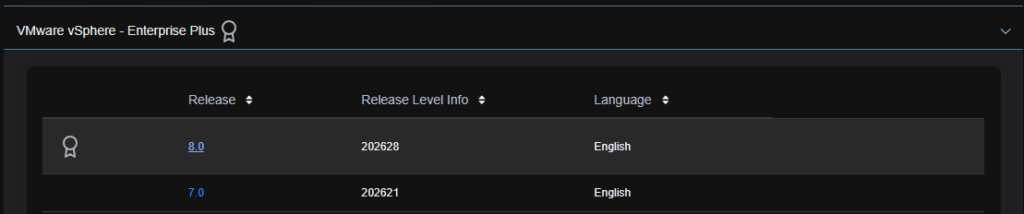
To get this set up we need to download the appliance, we can get that from VMware vSphere on the Broadcom downloads page
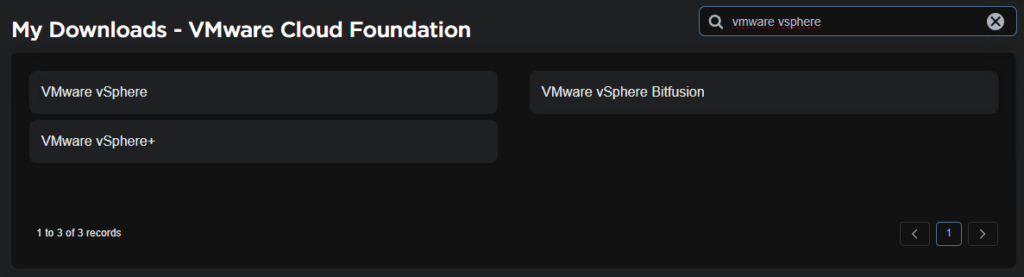
Select the version you are entitled to
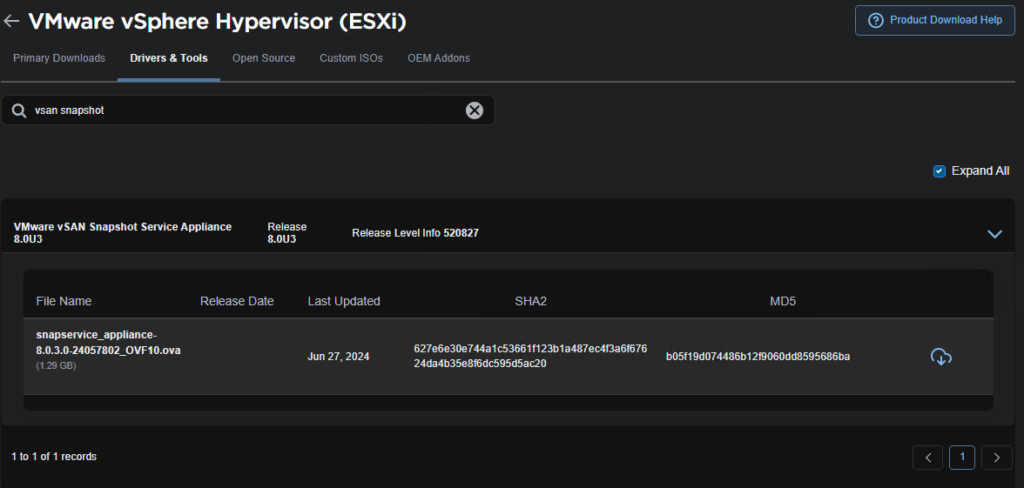
Click View Group on ESXi

Then under Drivers & Tools, we can search for “vSAN Snapshot” and see the appliance to download
I did get a few DNS issues with my vCenter causing the plugin failure

This was a DNS issue and you need the search path properly added to vCenter
You can check this by accessing the vCenter with SSH and using the shell command to get to the bash shell

Then run
/opt/vmware/share/vami/vami_config_netPress 0 to show the current config
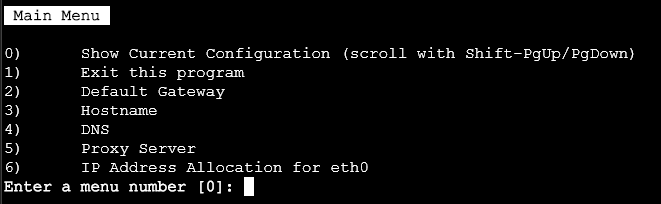
Ensure the search path is populated

If its not, use option 4 to set DNS, and set the correct fields, dont worry if DNS server 1 is 127.0.0.1, just use your normal DNS servers like so

This will use WilliamLam’s script as it consistently works and using the UI is a little difficult with exporting the vCenter certificate, and even when I could get it deployed, the plugin kept giving me a ‘No Healthy Upstream’ in the menu within vCenter, so I would recommend using this script
You can find his article and the script link here
First you need to use PowerCLI for this
It can be installed with
Install-Module -Name VMware.PowerCLIYou can then check its installed with
Get-Module -Name VMware.PowerCLI -ListAvailable
First, opt out of the CEIP with
Set-PowerCLIConfiguration -Scope User -ParticipateInCEIP $falseThen set PowerCLI to ignore certifications being untrusted with
Set-PowerCLIConfiguration -InvalidCertificateAction Ignore -Confirm:$falseThe connect to your vCenter with
Connect-VIServer -Server <vCenter-FQDN> -User <admin-Username> -Password <password>An example with my vCenter is
Connect-VIServer -Server lab-vsan-vcenter.leaha.co.uk -User [email protected] -Password <password>Then allow running of any script with
Set-ExecutionPolicy UnrestrictedWe’ll need to open and edit the script to match our environment
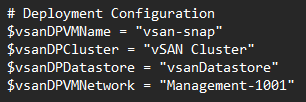
Add the OVA path at the top, I moved it into the same folder for ease, as I had issues pulling it directly from my SMB share

We need to set the following
Change the vsanDPVMName to whatever you want the VM name to be in vSphere
Change the vsanDPCluster to the name of your cluster in vSphere
Change the vsanDPDatatsore to match the vSAN datastore name you have
CHange the vsanDPNetwork name to the port group you want to deploy it too
Then we need to edit the OVF properties
Set the root password to the root password for the appliance, it needs to be 15 characters with capitals, numbers and a symbol
The hostname should be the fqdn of the appliance in DNS
Then the IP address of the appliance
The subnet prefix
The gateway
DNS Servers, comma separated
DNS domain
DNS search
vCenter fqdn
vCenter administrator username
Administrator password
SSO domain

Then do not edit any further, save the script and browse to the directory in PowerShell its located
I have mine under C:\Scripts so I ran
cd C:\ScriptsThen execute the script with
./deploy_vsan_data_protection_ova.ps1And press R if this prompt comes up

Once thats done, the appliance should deploy and automatically configure its self, the script will also have this output

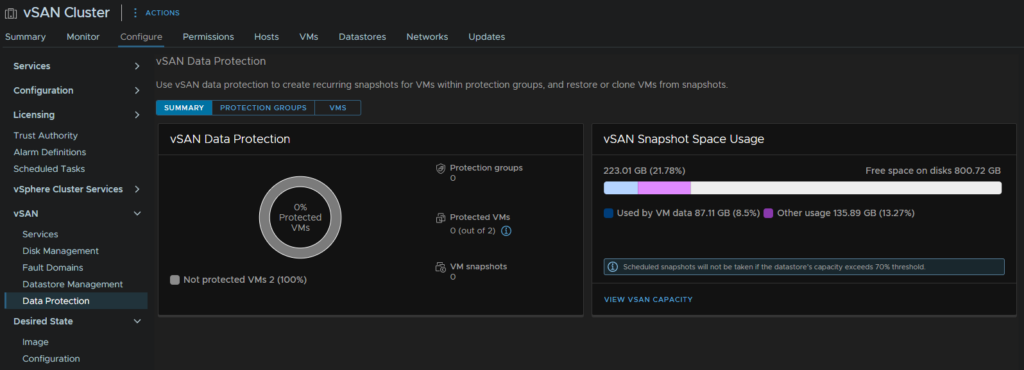
Click your cluster and head to Configure/vSAN/Data Protection and we can see the plugin is ready to use
7.2 – Creating Protection Groups
Now we have the service deployed, we can use it to take periodic snapshots on VMs to restore to, the idea here is that this is meant to me like volume level snapshots on a traditional SAN, except better as its per VM meaning you dont have to restore the entire VM
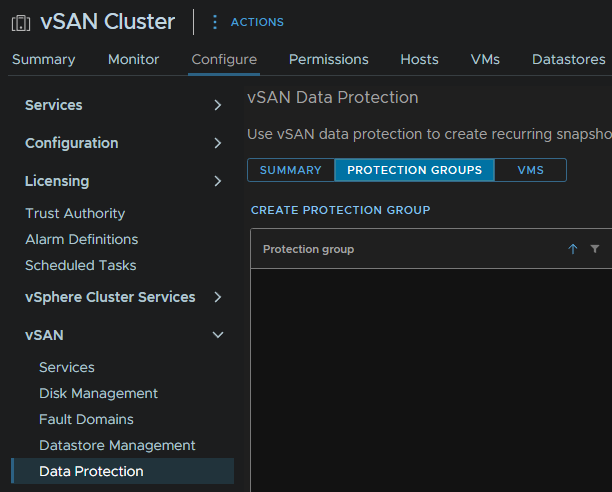
Click your cluster, and head to Configure/vSAN/Data Protection/Protection Groups and click Create Protection Group
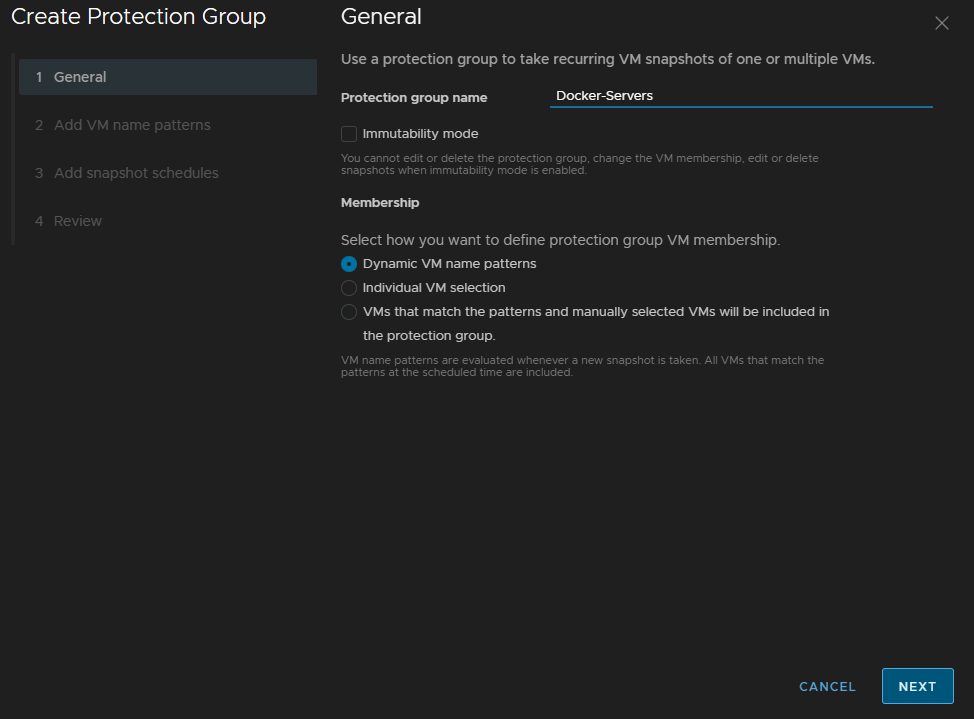
Lets create a group for docker servers
Give the group a name, you can enable immutability, however you need be very very careful not to overfill the vSAN capacity, over 70% and snapshots will start failing
You cannt edit or delete the group with immutability, this includes adding VMs, if you use a naming pattern it will add them, but you still cant remove them other than deleting the VM from disk, and there is no way to remove the group, so once you set it, its there to stay, so maybe only use this for your absolute most critical VMs, but you should have immutable backups with something like Veeam, so its not a must
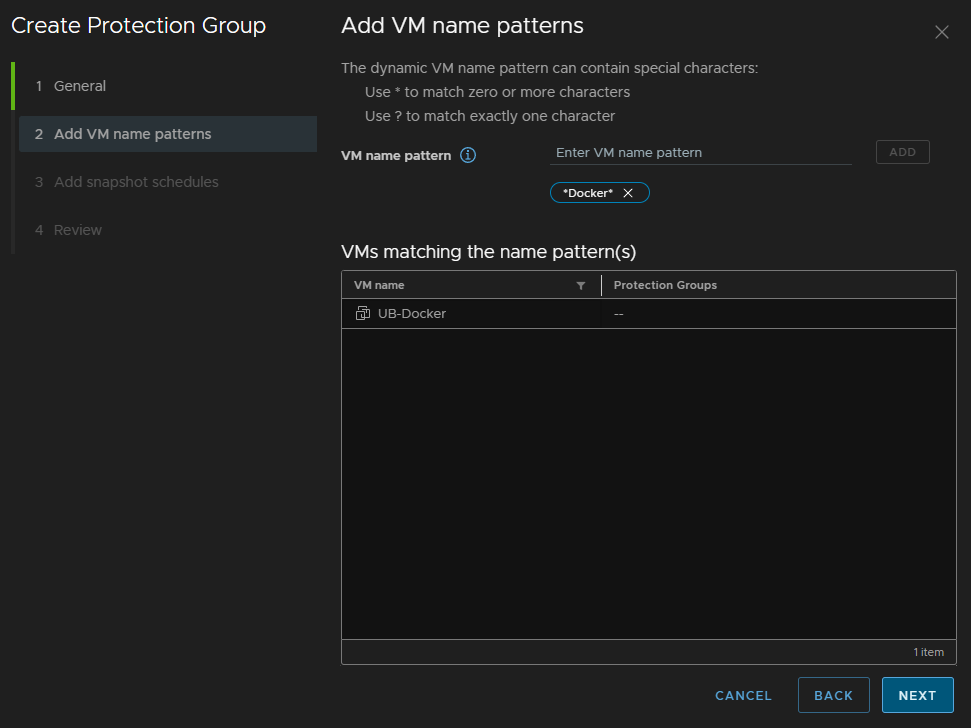
And for this, we will use Dynamic Naming, then click Next
Add your naming scheme, this will include anything with Docker in the name, and click Add
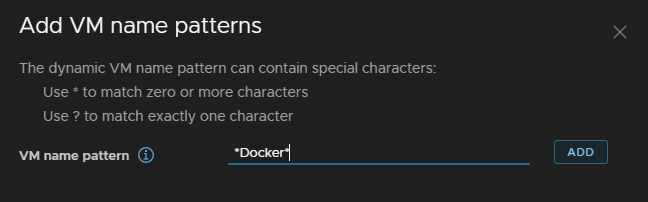
That has then populated ok, click Next
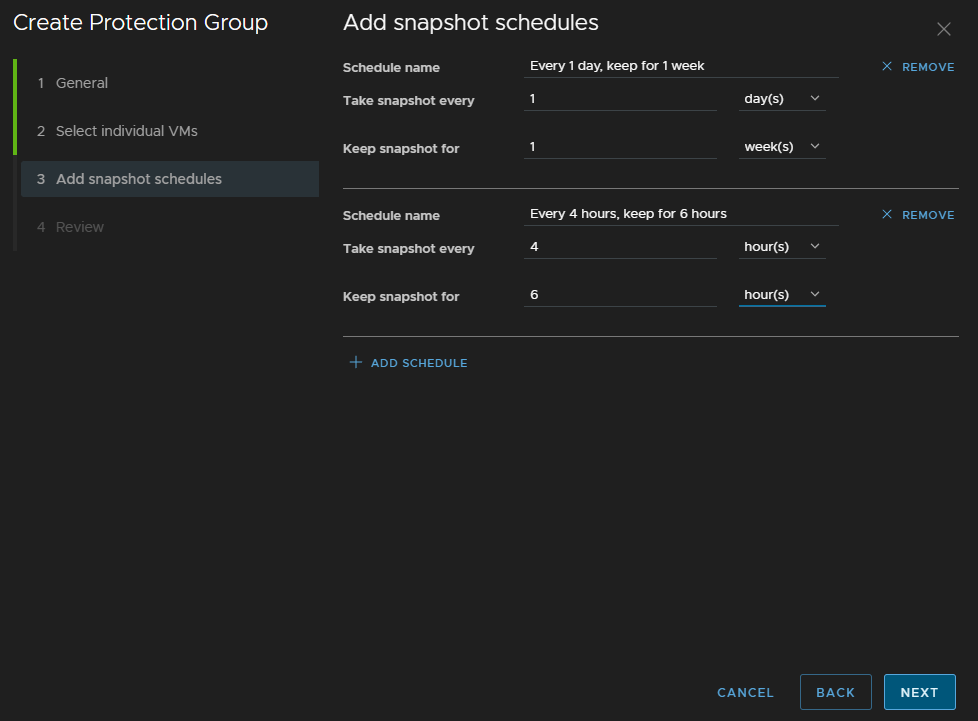
Then we can add our policies, the default I like to go for on a SAN has two policies
- 1 daily snapshot, keep for 7 days
- 1 every 4 hours keeping for 6 hours
We can create the same rule here by also clicking Add Schedule for the second, then click Next
And click Finish
If you deploy new VMs after the group has been created, and it matches a naming scheme in a protection group, it will be added on the next snapshot run automatically which is a huge benefit
7.3 – Managing Snapshots
When snapshots start being made on your schedule, they appear on their own tab on the VM under Snapshots/vSAN Data Protection/Snapshot Management
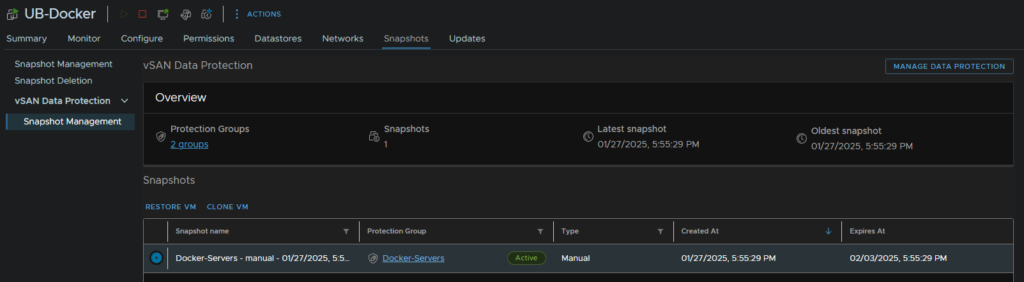
From here you can see all your snapshots, restore them, or clone it to a new VM if you need
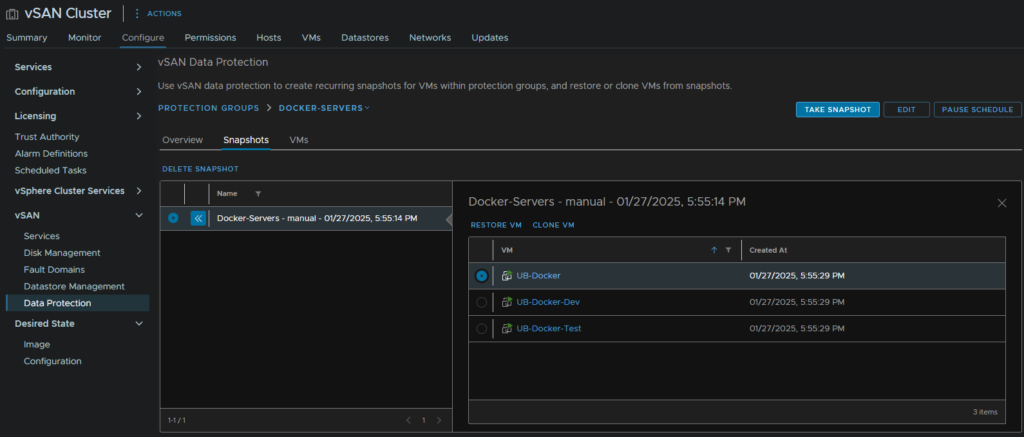
We can also manage this from the cluster then Configure/vSAN/Data Protection/Protection groups and selecting your group
Here you can remove the snapshot for all VMs, click the VM and have the same restore/clone options
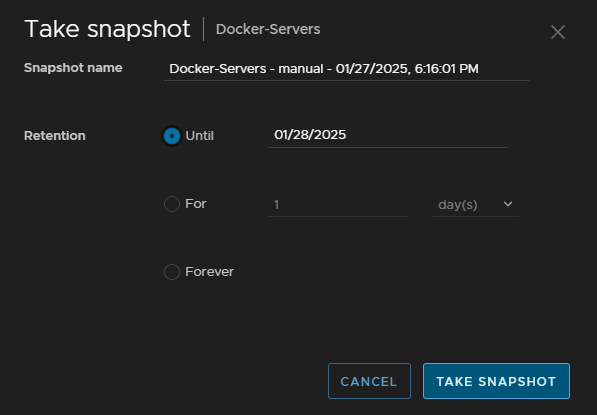
You can also manually take a snapshot, helpful for patching rounds, edit the group, if its not immutable, or pause the schedule
If you want to restore a VM, as maybe something went wrong, you can click Restore, then Restore again on this pop up
This will take a new snapshot, then revert to the old one, the key benefit here is that with the new snapshot, you can go back to the original state before you starting restoring anything
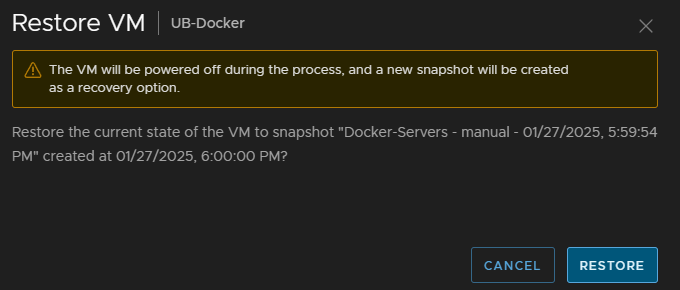
You will need to ensure the system snapshot has been created, the group will show a new snapshot only applied to that VM, the VM will be powered off, so once this is taken, you will need to manually power the VM back on

And when I test on my server, I can see its reverted and a test file has gone
I can revert the GUID style snapshot above to revert to before I started editing things, though this snapshots the VM and powers it off again, so it does get a little messy, but I can see my other test file is now back
When you have done reverting VMs and are sure you dont need the other snapshots created as part of a restore, you’ll want to select them and click Delete Snapshot to keep things tidy
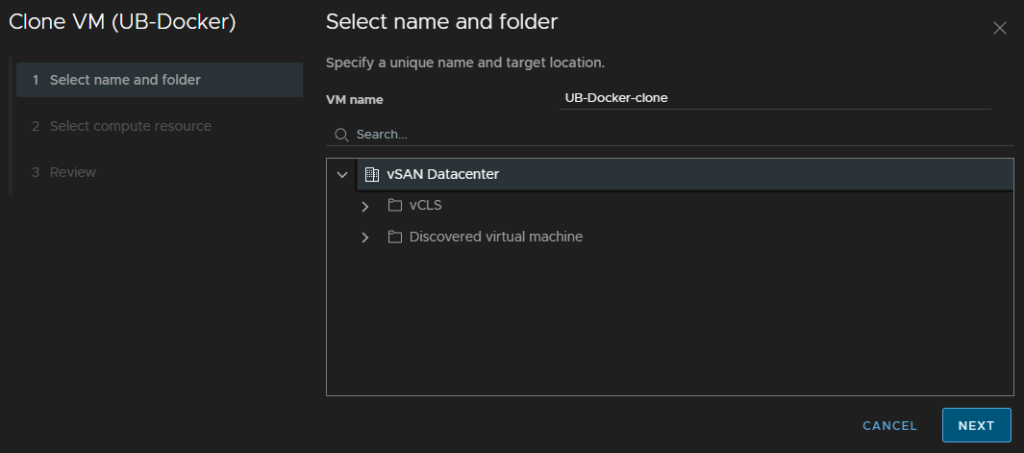
If we go down the Clone route, we can create a clone VM, this may be helpful for testing on a problematic VM where you want to test on a copy, should the worst happen
Enter a VM name, I left mine as default, the select a folder and click Next
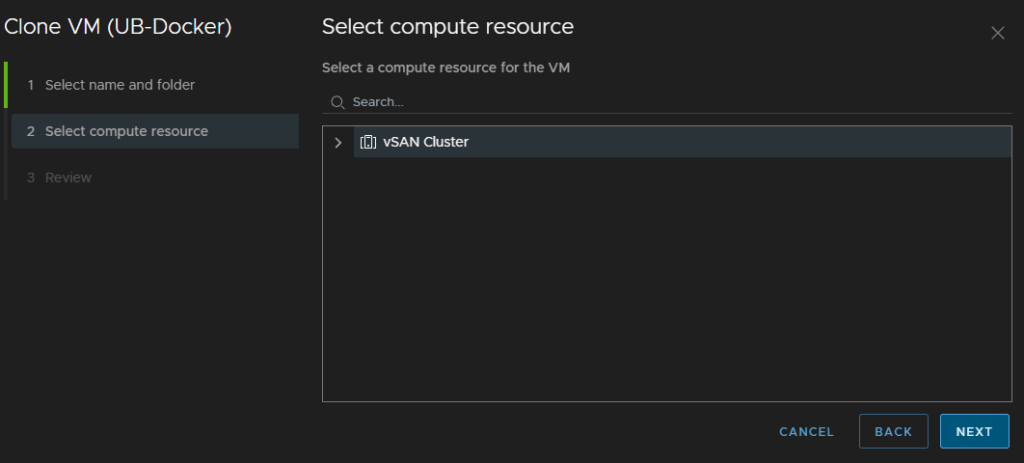
Select the cluster for compute and click Next
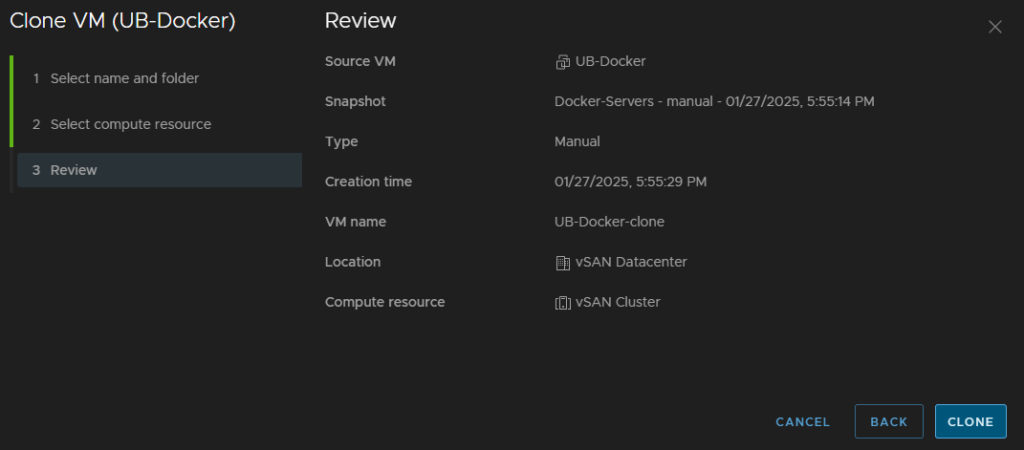
Then click Clone
Once its cloned, we can shutdown the original machine and power the clone on, once its up, we can access it like the original but at the point in time the snapshot was taken
And I can see in the guest via SSH, my test files are gone as this clone was from a snapshot before the files were created
For the option on manually taking a snapshot from the protection group menu we can add a name, and specify when this snapshot should be automatically deleted
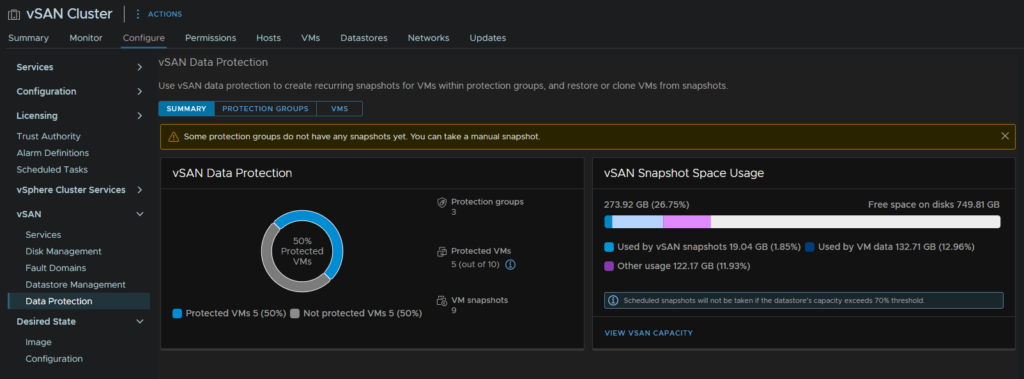
As we use this more, the initial dashboard from the cluster under Configure/vSAN/Data protection will update with how many of our VMs are protected, and the storage space vSAN and the snapshots are using