Deploying an NSX lab requires a lot of setup and there are a few pre requisites you’ll need first
This will give you a good idea on how to deploy an NSX environment
Firstly, lets make sure we have enough lab space to deploy NSX
You’ll need a lab with
- 30 vCPUs and ~86GB RAM – make sure your top level ESXi host is under 4:1 vCPUs:pCPUs else you get a lot of scheduling issues
- 2 vCPU and 2GB RAM for an OPNsense router
- 6 vCPU and 24GB RAM for a Medium NSX Manager
- 2 vCPU and 4GB RAM for a Small Edge node – You’ll need 2 of these
- 4 vCPU and 20GB RAM for an ESXi host – You’ll need 2/3 of these, they only use RAM that’s assigned, so they use ~3GB on their own, NSX wont install with less than 12, and can be difficult with 16
- 2 vCPU and 2GB RAM for an Ubuntu/Windows VM to test connectivity – You’ll need 1/2 of these
- 2 vCPU and 14GB RAM for a vCenter Server
Important – By continuing you are agreeing to the disclaimer here
1 – Setting The Router Up
Now that we have the requirements out of the way we need a router that’s able to support VLANs and BGP that we can deploy so everything will work ok with the NSX config, you may one already, or if you are using a home lab, you will need to deploy one
For this I am using OPNsense as it is lightweight, supports everything I need and has a webgui making any configuration a lot easier
We need to deploy the OPNsense router with its own separate LAN, lets use 192.168.2.0/24 as its separate from my physical 192.168.1.0/24 network, to help keep things manageable
1.1 – Lab Router Setup
In order to put a OPNsense behind your physical network, but separate, with full routing you need a specific setup under ESXi
You will want two vSwitches on your ESXi hosts
vSwitch 1 – This is the standard vSwitch that’s already on your host and has all your VMs on and has the physical adapter attached that connects to your physical network, like this
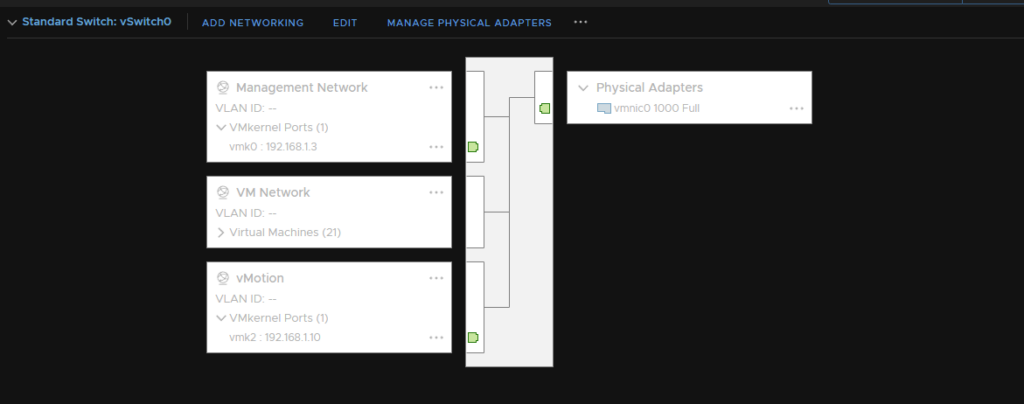
OPNsense has one NIC in the VM network so it has internet access like any other VM would
This NIC needs to be your WAN network on OPNsense
vSwitch 2 – This is your Lab vSwitch that any VMs you want to route through OPNsense need to be on, OPNsense also needs a NIC on this switch, and this wants to be the LAN port on OPNsense

This vSwitch does not need any physical adapters assigning as all routing will go via the NIC on OPNsense that’s connected to your other vSwitch giving them access to the physical network
The easiest way to do this, is to configure the VM with 1 NIC, your WAN NIC, and set that up with OPNsense, and leave the LAN setup, then power the VM off, add the LAN NIC and configure that after to make sure everything is in the right place
The console should show something like this after installation with the WAN IP being on your physical network on a free, static IP, and the LAN being its own separate network

The physical network, on the VM Network port group, is 192.168.1.0/24, the IP given to the WAN is 192.168.1.13/24, a free static IP on the physical network
The logical network is 192.168.2.0/24, this is to separate it and keep track of what’s on it, its very confusing if you chose 192.168.1.0/24 and it messes with the routing
The WAN Gateway is set to the physical router, most likely your ISP router, for me this is 192.168.1.254
You then also want a static route between your physical router and the OPNsense VM else traffic wont flow between them
In my case the WAN IP on the physical network is 192.168.1.13/24 and the OPNsense LAN network is 192.168.2.0/24
It should look something like this, but can vary between router providers

We need to do a few more bits specifically for the lab router setup, be careful with opening up the WAN settings like below if this is not a lab router, as the WAN port is internal we want this, but if this were an external router, this would be a huge security risk
Make sure Disable Reply-To is disabled under Firewall/Settings/Advanced


Make sure Block Private Networks on the WAN interface is disabled under Interfaces/WAN


Also make sure the gateway is setup properly for an internet connection under System/Gateways/Single
Where 192.168.1.254 is your main physical router, like my Netgear


Then make sure the WAN interface is set to use this under Interfaces/WAN


You can test everything is working by deploying a Windows VM into the Lab vSwitch that’s been setup, it may need a static IP setting up, but test it can get to the OPNsense portal on the LAN, it can ping machines on the physical network and get to google for external access
1.2 – VMware Tools
Now that the router is setup, as this is a VM installed under VMware, we need to install VMware tools, this is managed by a plugin, to install this go to System/Firmware/Plugins

And install os-vmware

1.3 – Setting The router Hostname
You may also want to configure the hostname for the lab router, to change the system host name go to System/Settings/General

And edit the hostname tab

1.4 – DNS
If you have a custom DNS server for your home/lab, you will want to point the lab router to this, this will help with the NSX deployment with being able to use DNS name, so I recommend it, but it isn’t 100% necessary
To change the DNS server of your OPNsense machine go to System/Settings/General

And edit the DNS servers list

1.5 – Domain
You can add the domain for the router, if you have one, this is entirely optional, I have done this for completeness, but it isn’t needed
To change the domain of the device go to System/Settings/General

And edit the domain tab

1.6 – BGP
We will want to enable BGP for use later with NSX, as this will allow the OPNSense router and the NSX T0 Gateway uplinks, the logical part of NSX that talks to your physical network, to communicate and exchanging routing tables, so you dont need to set static routing, this make the deployment significantly easier
By default OPNsense doesnt have BGP enabled, you need to install a plugin for it
Go to System/Firmware/Plugins

And search for FRR, and install the package

Then go to Routing/General and enable the routing protocol and click save


Then go to Routing/BGP, enable it and save the config


1.7 – Setting Ups VLANs
Lastly, we will need some VLANs setting up for NSX, you will want to configure them with an MTU of 9000, as well as the LAN interface
We are going to want to setup the following VLANs
– Edge TEP VLAN – (10)
– Host TEP VLAN – (11)
– Management VLAN – (12)
– Edge Uplink VLAN – (13)
To setup a VLAN go to Interfaces/Other Types/VLAN

Add a VLAN and fill out the info depending on how you want your VLAN to be and have the parent be the LAN interface, hit save and then apply

Now an interface needs assigning
Go to Interfaces/Assignments

Add in the VLAN

Click on the Interface, EdgeUplinks in this case, to edit it

Enable the interface

Set IPv4 to static

Configure the IPv4 network

Dont forget to tag any port groups connected with the right VLAN
Lastly, depending on your setup you may want to allow the VLANs to communicate with each other, in which case you will need a allow rule adding in the firewall under
Firewall/Rules/Your-Interface

I setup an allow all rule as for my NSX deployment I want all VLANs to be able to communicate

2 – Deploying The VMware Lab
Now we have the router, the basis is setup so we can deploy the VMware lab
Here we will deploy the following onto the Lab vSwitch which is connected to OPNsense
2.1 – ESXi Setup
This vSwitch has two port groups, Lab-VMs, a general trunk group with VLAN 4095 to allow tagged traffic at the virtual host level and Lab-Management, for the management side, as this is tagged at the port group level, there is no need to tag the ESXi management config
here is an example of the Lab vSwitch I have which is being router by the OPNsense VM
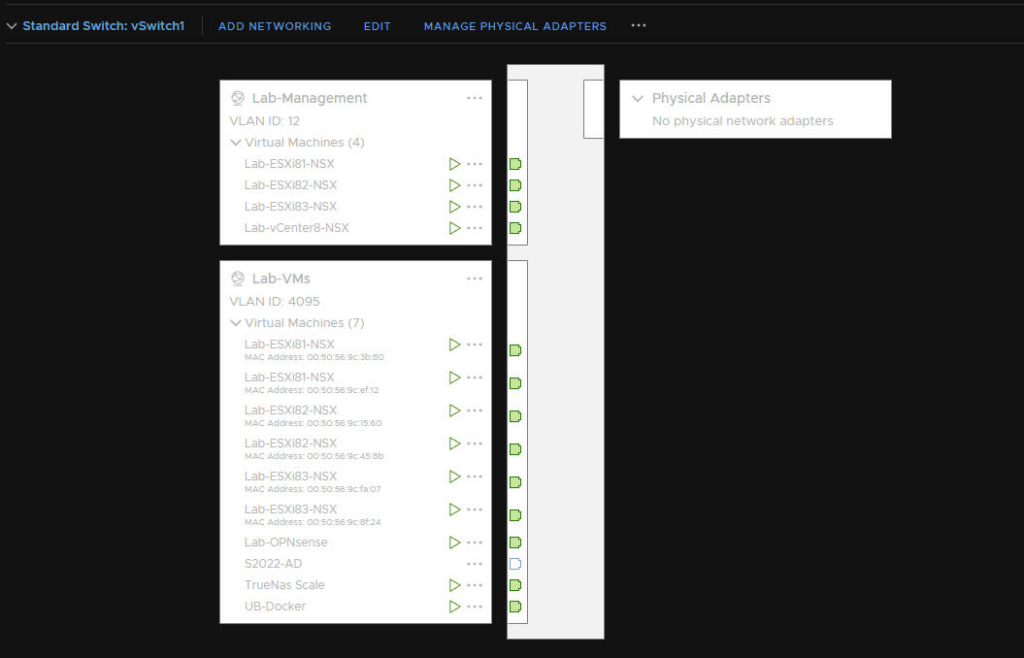
2.2 – Lab ESXi Setup
Now that we have the vSwitch port groups setup and configured, we can deploy the hosts, I will be deploying 3 ESXi hosts for this each with 4vCPUs and 20GB of RAM, 1 vNIC will be assigned to the Lab-Management port group and 2 more vNICs to the Lab-VMs, when deploying ESXi make sure the ESXi management vmkernel is bound to the Lab-Management vNIC, there is no need to edit the VLAN on the nested host, the port group will handle that
If you have physical hardware then the spec is going to be dependant on what you have, I recommend 4 cores and 16GB of RAM as an absolute minimum else NSX has some installation issues
You also dont need to worry about this part, as there is some extra config you need to do if you are nesting virtual ESXi hosts like I am
One advanced parameter needs to be setup on the hosts to allow the Edge VMs to install properly, and EVC needs to be disabled on the cluster
Under the advanced config for the VM, this location varies between vSphere 7 and vSphere 8
FOr example on 8, its a seperate tab

You will want to add a custom attribute here with the following
Name – featMask.vm.cpuid.pdpe1gb
Value – Val:1
This allows the nested host to use 1GB page files needed by the Edge, without it you wont be able to install Edges from my experience
This isn’t needed on physical hardware
And of course, dont forget to expose hardware virtualisation to the nested host under the CPU tab when editing its settings

Once you have your hosts you will also want to add a vCenter and import the nested hosts into that
2.3 – NSX Manager Deployment
Now that we have the basis on a cluster setup, we need to get the NSX manager deployed
To do this you will need the OVA file for the manager, its this one you want

Where you deploy this is up to you, for the best overall performance, I recommend deploying this onto the top level host that has the nested cluster running on it, but it can be deployed into the nested cluster its self, you can use a port group on the vSwitch with the vNIC in the Lab-Management port group to use the management network
In this example we are deploying this to the top level host, meaning it will get added directly to the Lab-Management port group
Upload a new OVF template selecting the local file

Give the Manager a name and select a folder for the VM

Select the ESXi host to deploy too

You will need to ignore these, then click next

We want a medium deployment, this is the default size VMware recommend for a live deployment, plus it will use the 16GB of RAM in small easily, so this way you dont get any issues

Select a datastore for the VM

Select your networking, as I am deploying this on my top level host I am adding it into the Management port group

Set a GRUB password, you can leave timeout blank, the passwork needs to have at least 14 characters

Set a root password

Set an admin password

Set an audit password

Configure the CLI admin and audit usernames, leaving optional parameters blank

Setup the management network and select the NSX manager role

Configure IPv6 if you are using it

Set a DNS server

Enable SSH and root login if you want them, and leave Internal Properties alone

3 – Prepping NSX
Now we have an NSX manager setup we need to get the environment prepped
To log into the NSX portal go to
https://ip
https://fqdn
3.1 – Licensing NSX
Before we can do anything, NSX needs licensing, for lab use VMUG is a great way to get enterprise VMware licenses, though it cannt be used for a live environment
To add one go to System/Licenses


And add your license key

Once they key has been added, NSX is licensed
3.2 – Adding vSphere To NSX
Now that we can use the manger and its licensed we need to add our lab vCenter in as a compute manager
Go to System/Fabric/Compute Managers and add a compute manager

Add a name for this compute manager, the FQDN of the vCenter, a description, if you want one and credentials for the administrator@vsphere.local account

You can create a service account if you need one, I havent set one up as this is a lab

Enable the trust to the vCenter

Then click add, this will take a while to add into NSX and get all the details
Once that’s been added it should look like this, this may take a little while though

3.3 – Transport Zones
You will want to create your own Transport Zones when configuring NSX rather than using the default ones
To do this go to System/Fabric/Transport Zones

Then add a zone, we need an Overlay and a VLAN zone creating


3.4 – TEP Pools
Now we need a TEP IP pool, one for Edge TEPs and another for Host TEPs on their VLANs, which we setup earlier with the router
Host TEPs should be in a different VLAN to Edge TEPs
Go to the IP Address Pool section under Networking from the Web GUI and add an IP pool

Name the pool and give a description of what it does, then add a subnet by clicking ‘Set’

Add an IP block/range, here I will be adding a range

Configure the range, CIDR, DNS and Gateway settings, these IPs are needed for the ESXi hosts, so the IPs need to be on a range they can access

Repeat for your Edge TEP VLAN


3.5 – vSphere VDS
NSX requeires a VDS to be setup, you cant use standard vSwitches in vSphere for the NSX deployment part, management for the host is fine though, and I would always recommend keeping ESXi management off a VDS
To create a new VDS right click the datacenter, then add a new distributed switch

Give it a name, I am using mine for NSX, so I have named it for that

Select your ESXi version, I am using 8

Configure any settings you may need, I will keep the default port group as is and change the uplinks from the default 4 shown, to 2

Under the networking tab you can see the new VDS
Now it needs adding to the hosts, to do this right click the VDS and add and manage hosts

Add hosts

Select all the hosts who you want to be able to access the new VDS

Assign uplinks, you want two for redundancy, I have NIC0 on the standard management switch so I will use NIC1 and NIC2

You can then ignore any config with vmkernels here

You can migrate VM networking, but I dont have any yet
Now the VDS is available to all hosts
You can check the topology to see its all been applied ok
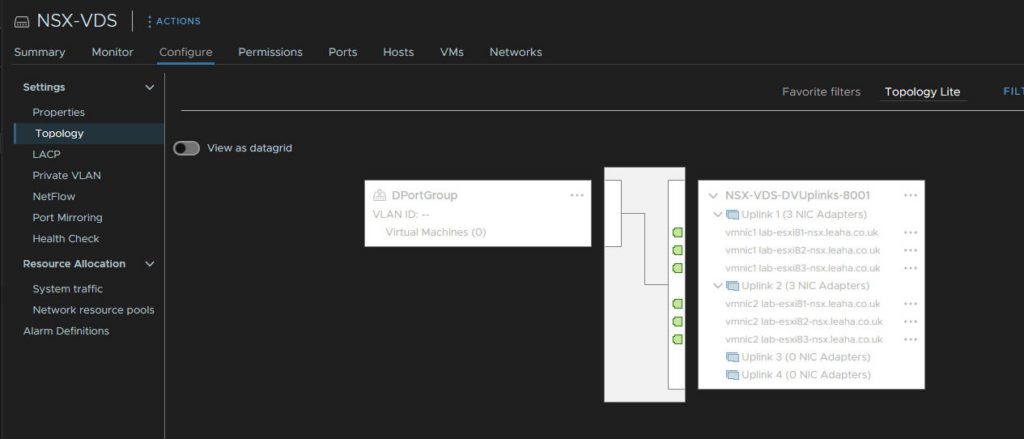
Lastly, the VDS needs an MTU of 9000 setting, right click the VDS and edit the settings

Go to advanced and set the MTU to 9000 here

3.6 – Uplink Profiles
We then need some uplink profiles creating for the hosts and edges
To create an uplink profile go to System/Fabric/Profiles and add a new profile

Name the uplink, I will be creating one for Hosts, we can leave LAGs empty

Add in both the uplinks for the hosts, for redundancy

Then add in the VLAN, I am using VLAN 11 for host TEPs

Reapeat for the edges

Add in uplink 1

Then configure the VLAN, the Edge’s are using VLAN 10 for their TEPs

3.7 – Transport Node Profiles
We also need a transport node profile creating for the hosts
To create a transport node profile, go to System/Fabric/Hosts/Transport Node Profile and add a profile

Give the profile a name and then click ‘Set’ to add the host switch

Add a host switch

Then add in your vCenter server, the new transport zones you created for overlay/VLAN, the host uplink profile, the Host TEP pool and the 2 uplinks
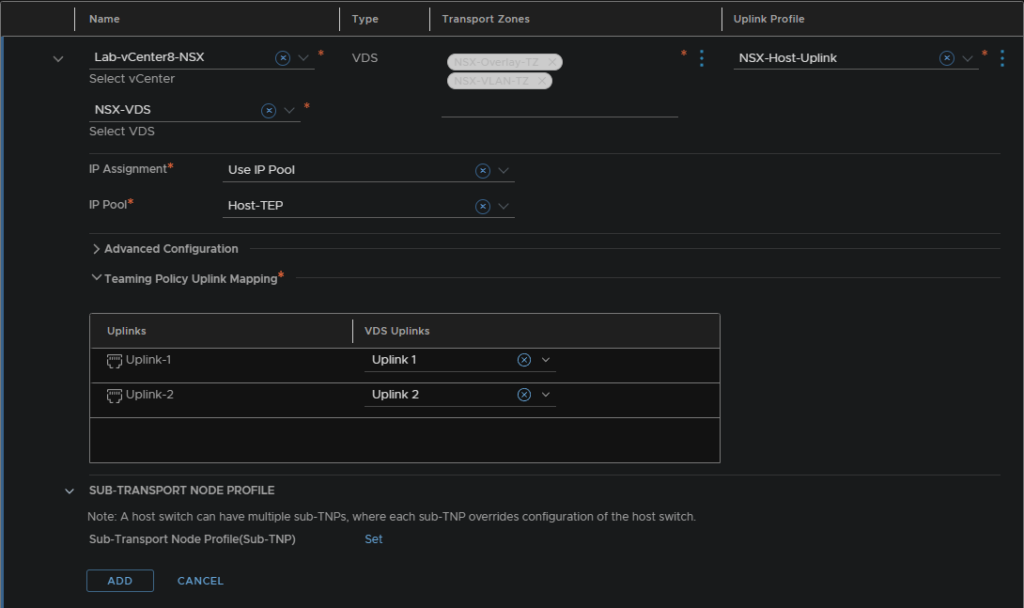
Then hit save
3.8 – Deploying NSX To The ESXi Hosts
Now we can deploy NSX to the hosts in our lab cluster
Go to System/Fabric/Hosts, select the cluster and lick configure NSX
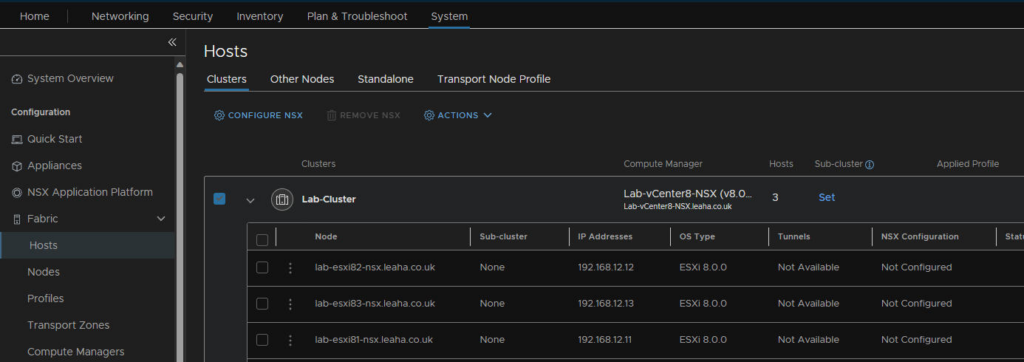
Select the profile

And NSX will be configured across all hosts
It should then look something like this

3.9 – Trunk/Uplink Segment
We need to setup a Trunk/Uplink segment for the Edges and the networking to work properly
Go to Networking/Segments and add a segment

Dont connect this to a gateway or a subnet and set the VLAN to 0-4094
Then hit save
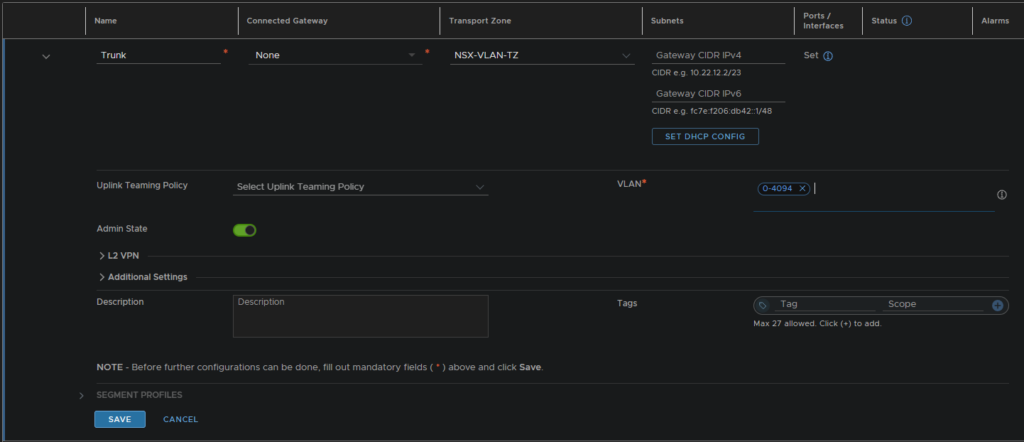
We then also need to setup an uplink segment
Configure this to not be connected to a Gateway, have your VLAN TZ set
Leave subnets empty and set the VLAN of your physical network, set this to the vLAN of your Edge uplinks, in my case VLAN 13
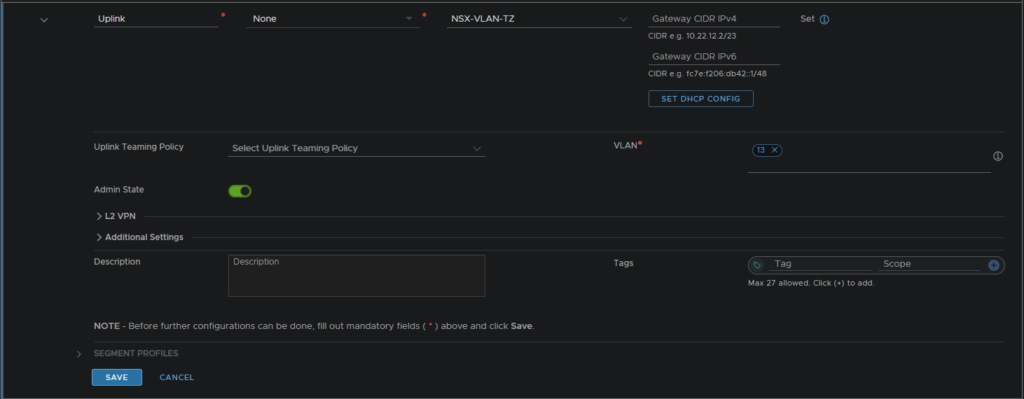
4 – Edge Deployment
Now we have most of the framework for NSX lets get some Edge appliances deployed, we are going to want two for a HA setup in an Edge cluster
The deployment for the lab has an extra step here, as the main management sits out side of the lab environment and the Edges must be within the environment, we need a port group added onto the VDS with our management VLAN, 12, this will pass through ok as the VDS is connected to the trunk vSwitch on the physical host
We then need two Edge nodes deploying
NSX-Edge-01
NSX-Edge-02
4.1 – Deploying An Edge
To deploy a new NSX edge node go to System/Fabric/Nodes/Edge Transport Nodes and add an edge node to deploy a new one

Fill out the info for naming your Edge node, mine is for my T1 gateway, also add a description so you know what its for, by default you need a medium or higher, Small is more proof of concept

Setup the admin/root credentials and enabled SSH if you want it

Then select the Compute Manager, Cluster, Resource Pool, I am using the default one, and a Datastore for the Edge node

Configure the networking for the management side, the switch can be any switch for the, I am using the VDS port group for my Management on VLAN 12

Then configure NSX with an Edge Switch name, add your Overlay and VLAN TZs, select an uplink profile, single NIC is fine for my lab
Assign a TEP IP using your TEP pool and have the uplink be the trunk segment


Set the uplink mapping to a VLAN segment type and then select your Trunk Segment

4.2 – Creating An Edge Cluster
Now that we have out Edge nodes we need to create an Edge cluster
To setup an Edge Cluster go to System/Fabric/Nodes/Edge Clusters and add a new cluster
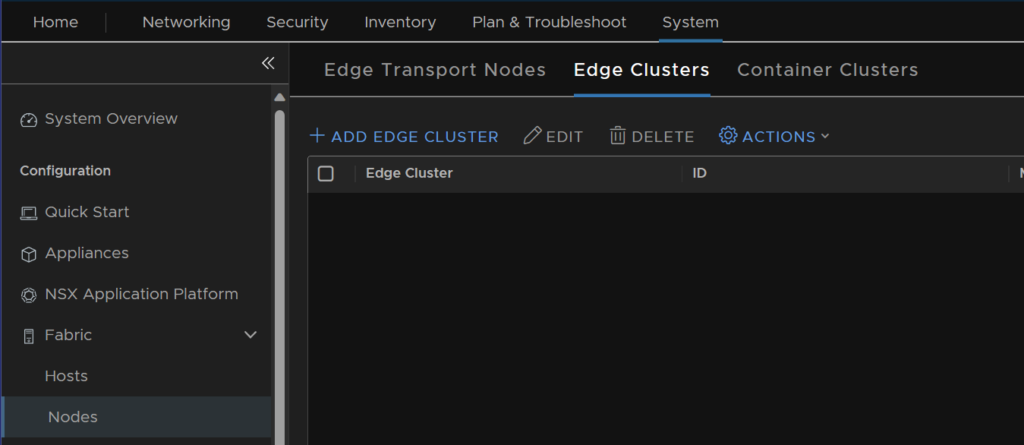
Give your cluster a name and description, and you’ll see free Edge nodes listed on the bottom left
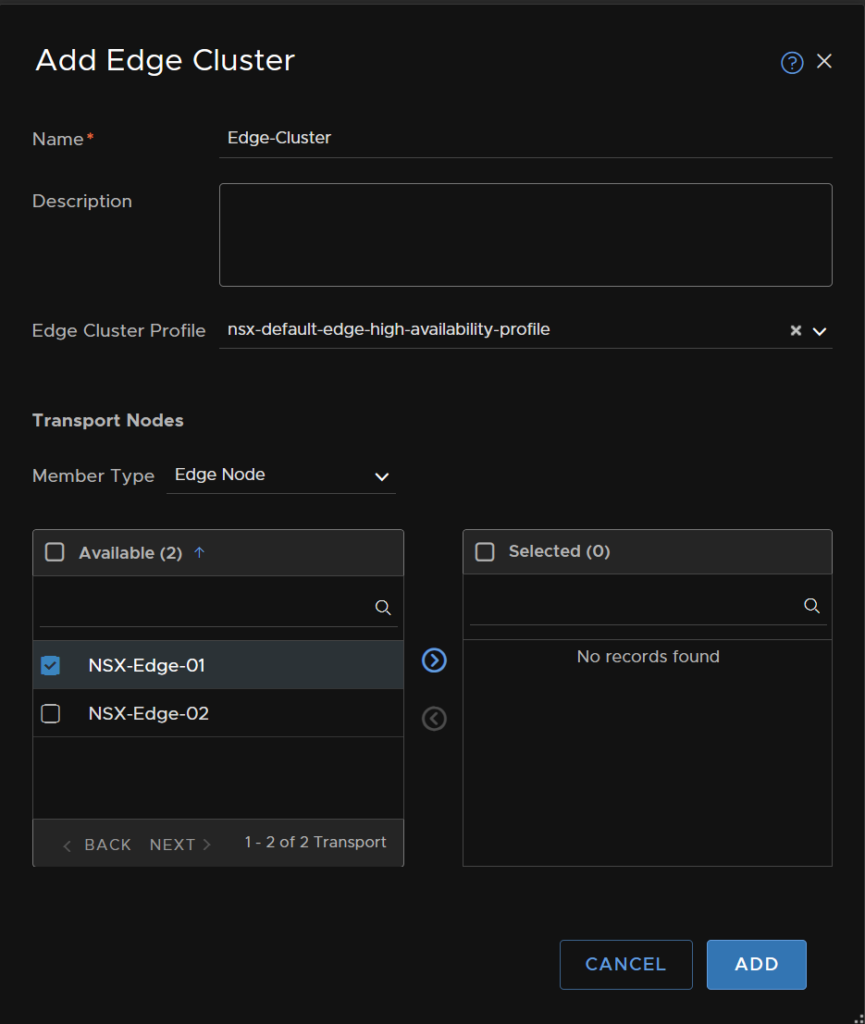
Move the Edge nodes you would like in this cluster to the right

Then click Add
Now we can see our new cluster

5 – Gateways/Segments
Now that the core infrastructure is setup we need gateways deploying so everything can talk to each other and allow VMs to be put on Segments and access the overlay/physical network
5.1 – Tier-0 Gateway
First we need to get a T0 gateway setup, go to Networking/Tier-0 Gateways and add a new gateway

Then Tier-0

Give the GW a name and select the Edge cluster to assign to it, then click save

Then, lets set up an interface

Then add an interface, give it a name, an IP on the physical network the Uplink segment, VLAN 13, connect it to and connect an Edge node, and set the MTU to 9000 and save and apply
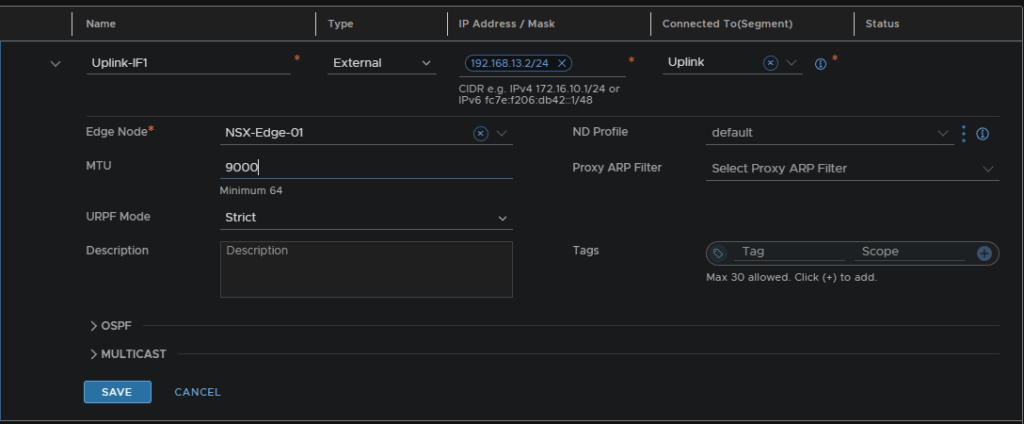

Repeat for Uplink-2 for Edge-02, I used 192.168.13.3
You should now have an interface setup

5.2 – Tier-1 Gateway
The T1 gateway does all routing for the internal NSX network and be configured to communicate with the T0 gateway for external internet access
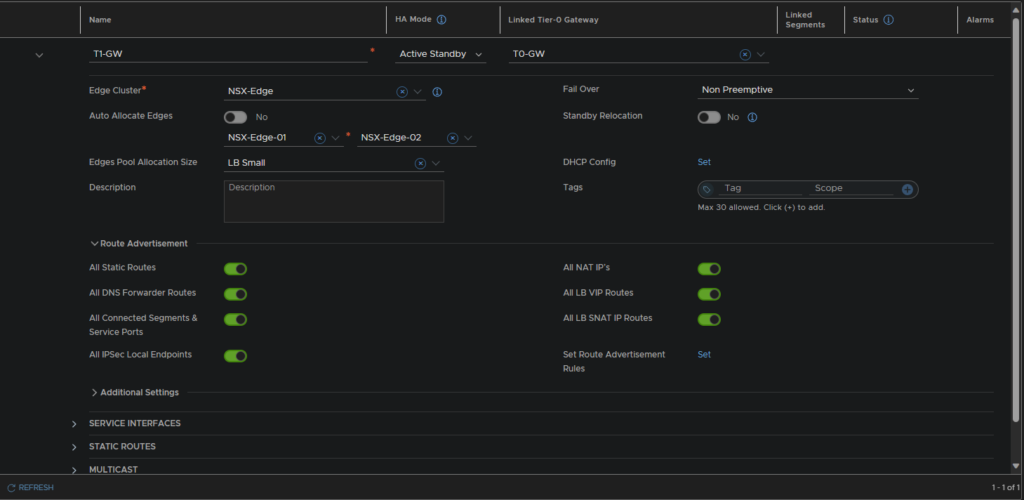
You can create a new gateway under Networking/Tier-1 Gateways

Name the gateway, link a T0 gateway, assign an Edge cluster, set the Edge allocation pool size and make sure Segments/Local endpoints are advertised as routes
5.3 – T0 BGP
Then we need to configure BGP between the T0 gateway and the OPNsense router
Edit the T0 gateway and enable BGP with the following config, you will need a local AS number, this doesnt really matter what it is, but as some numbers are reserved, I recommend one that isnt, if you are unsure, use 65535 for the lab

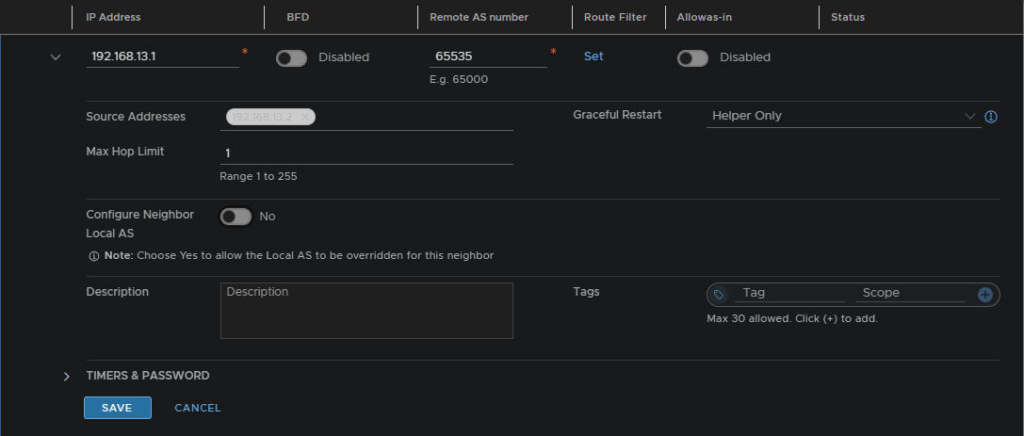
Now we need to set the BGP neighbor

Then add the VLAN 13 gateway IP, select the remote AS number for the OPNsense router, it should be the same as NSX, and add the source address, which should be the interfaces we configured earlier, though I have justed added 192.168.13.2 address for now, but you can add both

Now we need to advertise the routes
Enable route re-distribution on the gateway

Add a new route re-distribution selecting all route options

Select the BGP protocol

5.4 – OPNsense BGP
Now that NSX is configured for BGP, we need to configure OPNsense for BGP to fully establish the connection and for full routing exchange
Go to routing/BGP

Enable BGP if its disabled, set an AS number, this needs to be the same as any neighbors, add any networks you might need, but this can be blank and add any route distributions
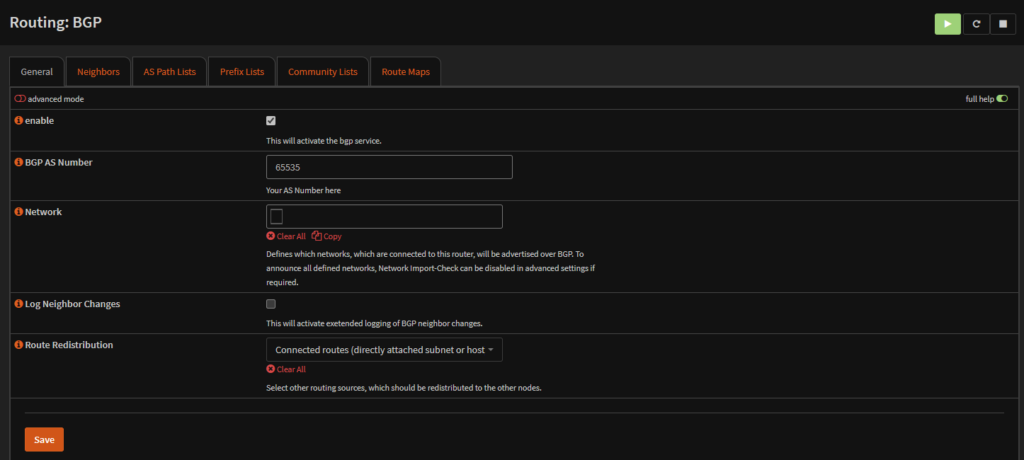

Then, we need a prefix configured like so

Then a route map needs setting up which will use our prefix

Lastly we need to setup our neighbor, 192.168.13.2
Give it a description, so you know what it is, add in the peer IP, mine is 192.168.13.2, add the remote AS, 65535, and the update-source interface
This is the interface which is connected to the peer, mine is the EdgeUplinks VLAN which is the 192.168.13.0/24 network

And add in the prefix and route map at the bottom

5.5 – Testing/Segments
To test everything is working we need to add some overlay segments using the Overlay, I have setup this one for 10.1.1.1/24 with GW 10.1.1.1, and another for 10.1.2.1/24 with GW 10.1.2.1
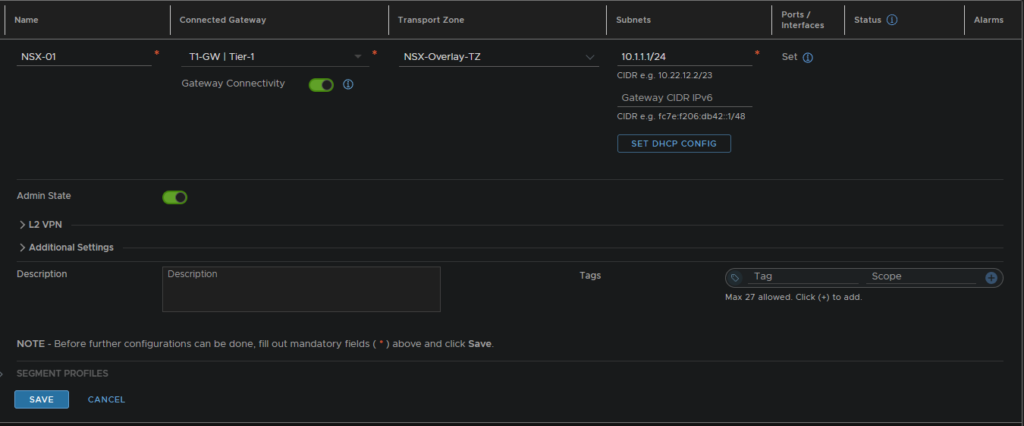
It will take a few mins to sync over, but to confirm we can go to Routing/Diagnostics/BGP to see the routes, here the 10.1.1.0/24 and 10.1.2.0/24 networks have been added from my BGP peer

You should see your routes listed on the 10.1.1.0/24 and 10.2.1.0/24 networks
5.6 – NAT
With everything else done, spinning up a VM on the new overlay segements will find those machine shave full local network access, but no internet access, this issue here is 10.1.0.0/16 isnt managed by OPNsense so its doesnt NAT the IPs to its WAN address, meaning the local IP goes out to the internet and is dropped by your ISP
To fix this, we are going to be configuring NAT in OPNsense, this can also be done via the NAT service in NSX if you wanted to
To configure this go to Firewall/NAT/Outbound

Change the mode from Automatic to Hybrid so you can add custom NAT rules without removing the automatic ones

Now we need to add a rule
You will want this rule to have the interface set to WAN

Any protocol

Set your source address, mine is the 10.1.0.0/16 subnet, which is all NSX overlay segments

Source port, destination address and destination port need to be any

The translation target needs to be the WAN IP, we want all local IPs mapped to our public IP

The save and apply the new rule, it might take a few mins to kick in on your VM
I have added NSX-01 and NSX-02 as two different gateways and connected a Windows server to each segment
Make sure you disable the Windows firewall else pings will likely fail
For NSX-01, which is 10.1.1.0/24 the gateway is 10.1.1.1/24
So windows is configured on 10.1.1.3 with GW 10.1.1.1/24
Now with this config the Windows VMs on the segments now have access to my local network and the internet

good stuff
Good work. What are the specs of your lab hardware?
I had a Dell T620, with 2x 2697v2s and 256GB RAM and 1TB local storage and 2TB done via NVMe on TrueNas over iSCSI
Though I have upgraded and gone custom built with a new server running an Epyc 7402P and 384GB RAM, same storage
Thanks. Would be an interesting blog post to read more about the build
Yeah? I might look to put up a lab tour then
Have wound up with a lot, across ~35 containers in docker, Live NSX environment, Aria and more haha