Last updated on June 3rd, 2026 at 15:30
In this article we will focus on VKS, vSphere Kubernetes Solution, often also called Tanzu, and how to configure/use it after its been deployed
You will have this deployed with Avi Essentials/Enterprise or the Foundations load balancer in VVF 9, or you may have NSX for the load balancer in VCF 5.2/9
Generally, the features are the same no matter the deployment however there is one key difference that separates VVF and VCF deployment and that is vSphere pods, so what are they
vSphere pods is where the K8S pods are run directly on ESX using a Spherelet, which is a micro VM with a minimal kernel specifically optimised for running container workloads, this requires NSX networking, you can use NSX/Avi for the load balancer
Its worth noting, the loadbalancer is generally fixed, there is an appliance to migrate from the NSX loadbalancer to Avi, however if possible I would strongly recommend setting this up initially with the loadbalancer of choice
The idea with VKS is to have an upstream K8S platform allowing you to run your workloads along side traditional VMs offering much easier management from within vSphere instead of another platform, like Rancher, while operating just like any other K8S cluster
The only thing that may cause some issues is Pod Security Admission, this is a standard rule set for ensuring greater security within K8S cluster and should be enabled, as such it doesnt always play nicely with some basic containers in the docker repository, but this isnt an issue with the platform, just the K8S feature
This guide will focus on configuring the vSphere side and getting K8S clusters deployed, there will be a few demos using the guest clusters and vSphere pods in VCF, but how to use and interact with K8S isnt the focus here, but it is the same
Demos have been excluded from section 1, please see section 2 for now – I will be adding some better ones as I move my apps to K8S, so there will be real deployments rather than examples
Important – By continuing you are agreeing to the disclaimer here
1 – VCF/vSphere 9.1
This section focuses on VCF and vSphere 9.1, the vsphere-kubectl tool for the CLI has been replaced with the VCF CLI and is used to create contexts in the VCF tool, you’ll need to install kubectl on your system, but with it, the VCF CLI will also create the required kubectl contexts so it can be used
1.1 – Scaling Up/Out The Supervisor
If more Supervisor resources are needed, the cluster can be upscaled, but its worth noting, it can not be scaled back down
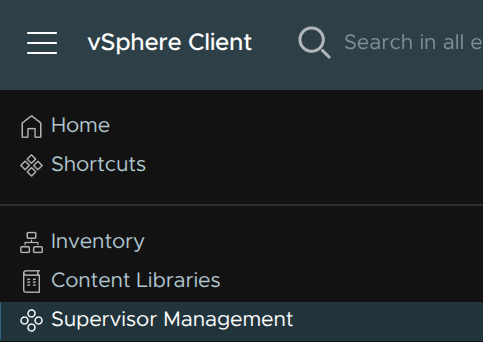
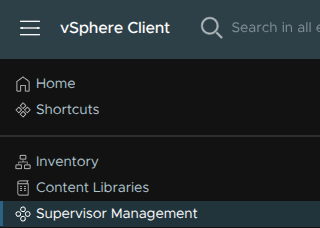
To do this, in vSphere click the three lines and click Supervisor Management

Click Supervisors and select your Supervisor, in my case, Ashflare

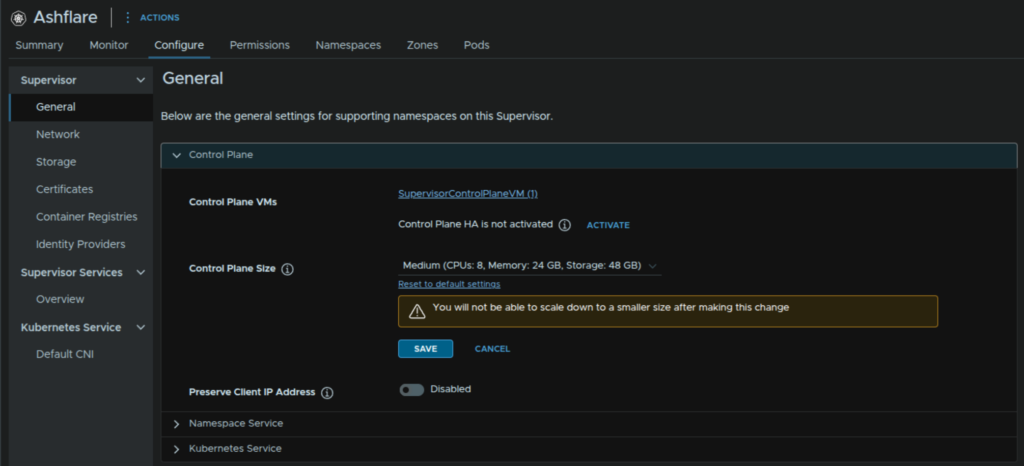
For scaling out to a three node cluster, if you deployed a single node cluster, you can activate HA, or for scaling up click Edit
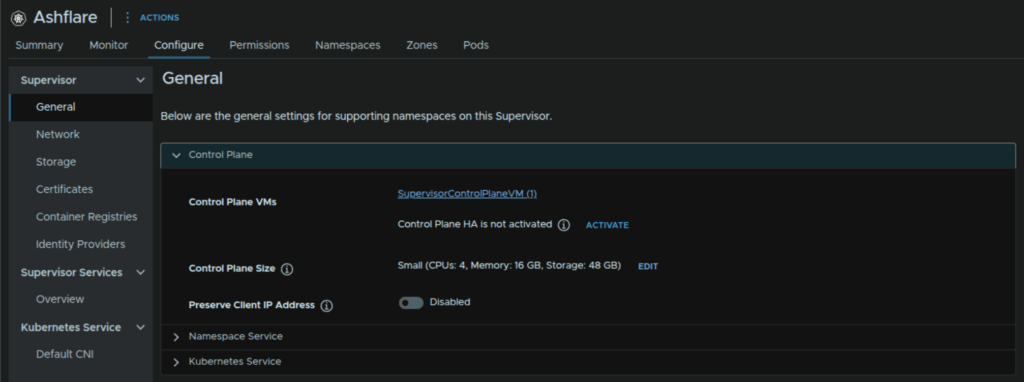
Select the new size and click Save
1.2 – Installing Additional Services
1.2.1 – Supervisor Management Proxy
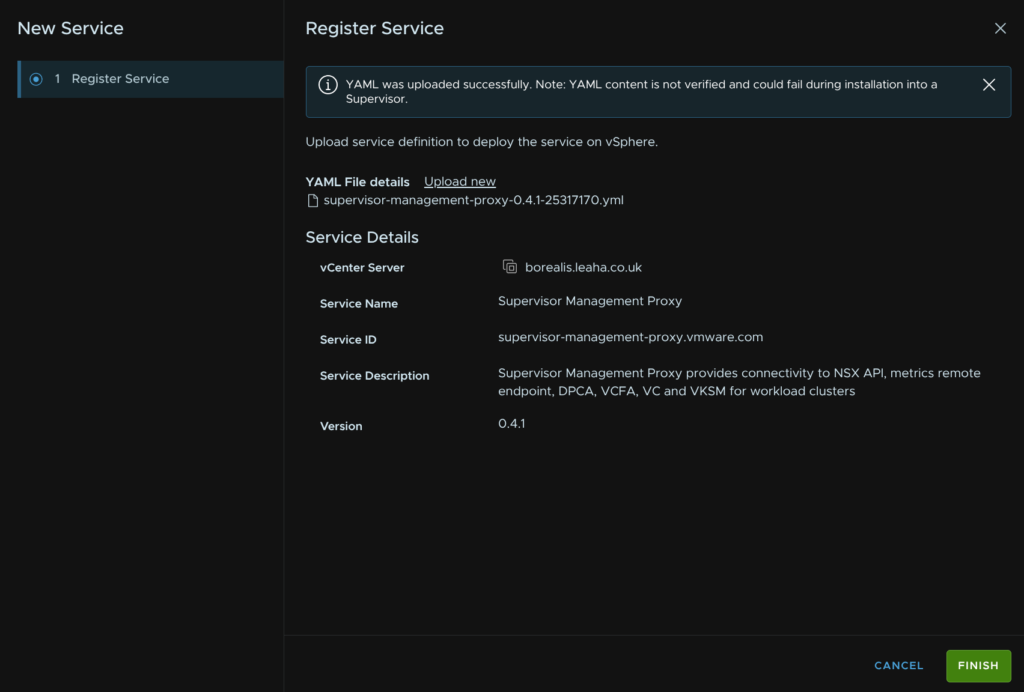
We first need the YAML file from the Broadcom Portal, find and click vSphere Supervisor Services
Expand and select the latest release of the Supervisor Management Proxy, in my case 0.4.1

Then download the YAML for the the proxy service, we wont need the data values as I’ll have them below

In vSphere, click the three lines in the top left and click Supervisor Management
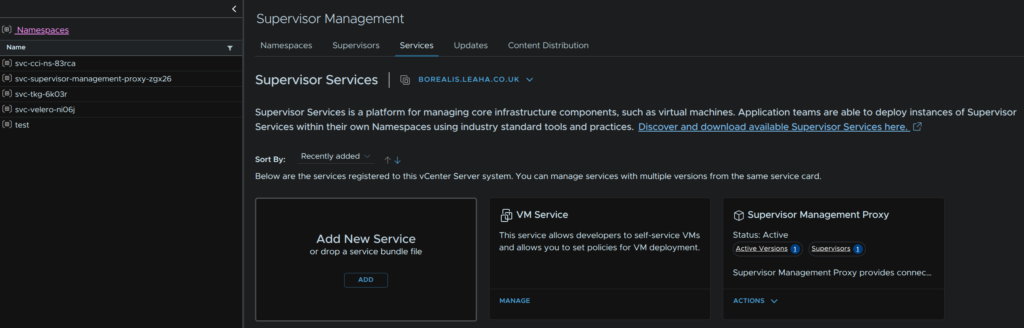
Click Services, and on the Add New Service widget, click Add
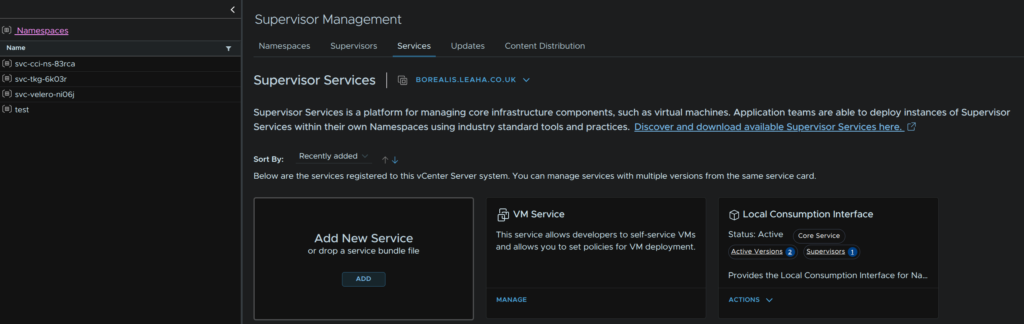
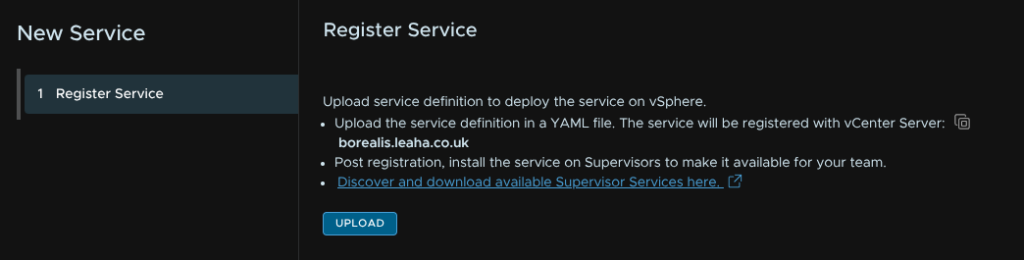
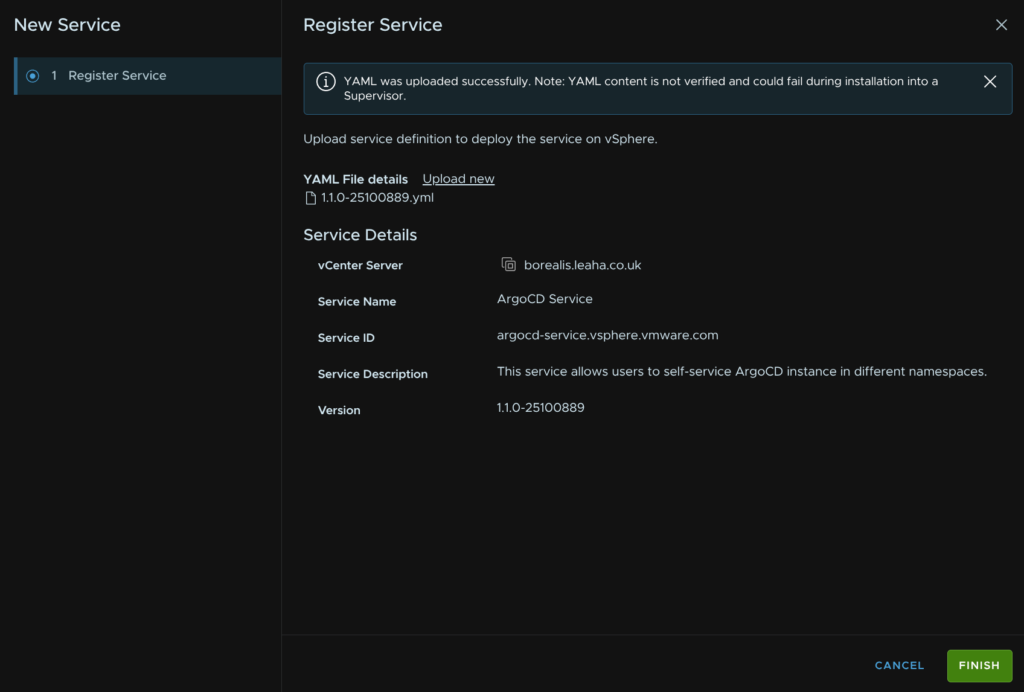
Then click Upload

Double click our downloaded YAML

Then click Finish
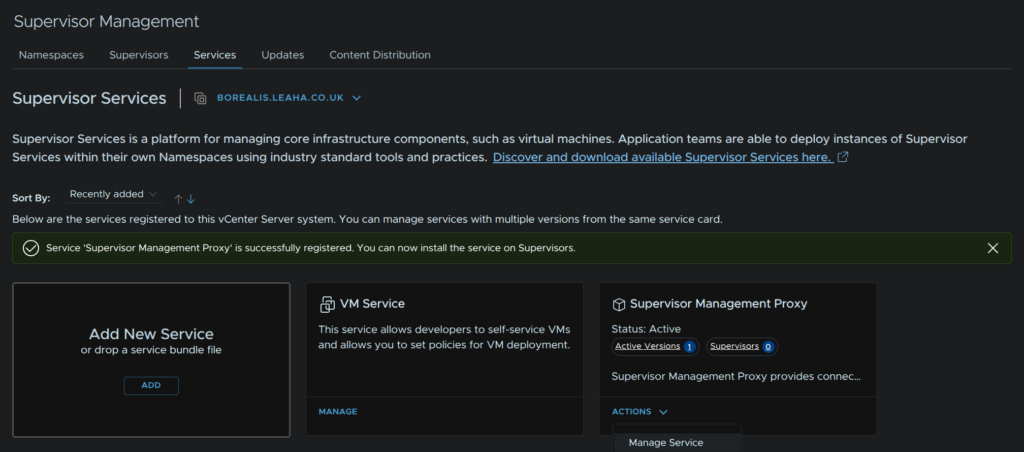
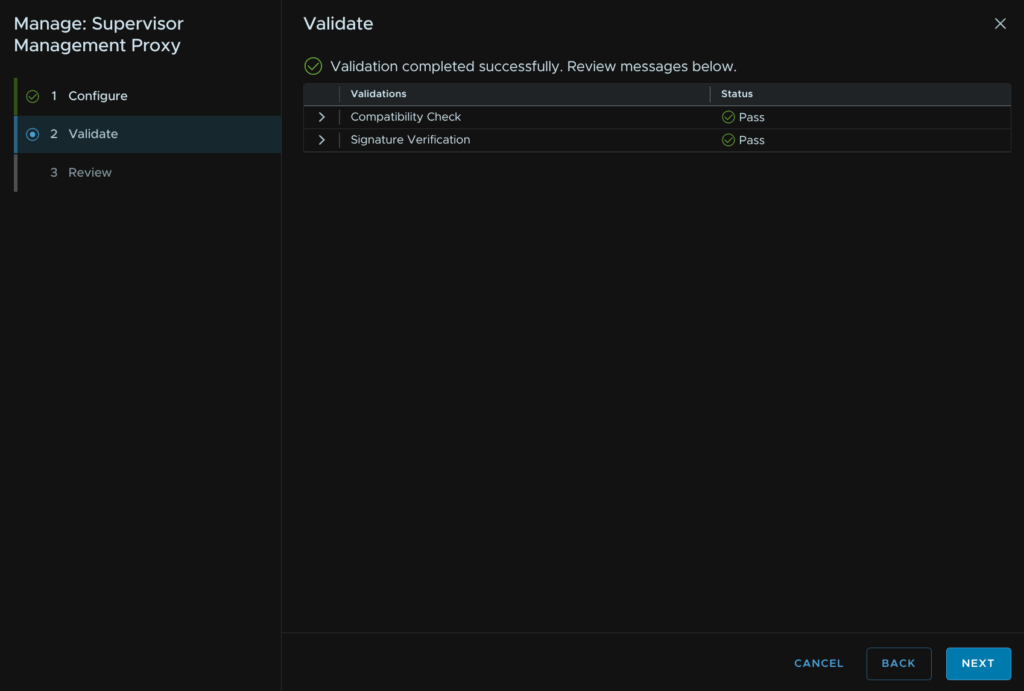
To enable it, on the widget for the Supervisor Management Service, click Actions/Manage Service
Select the Supervisor and click Next
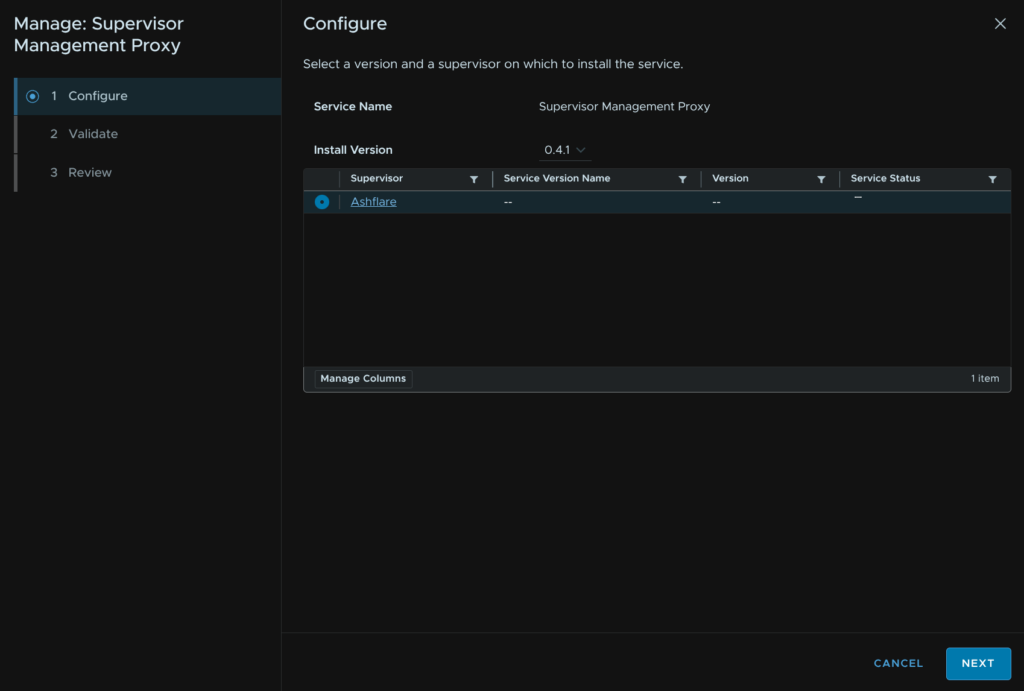
Once the compatibility has passed, click Next
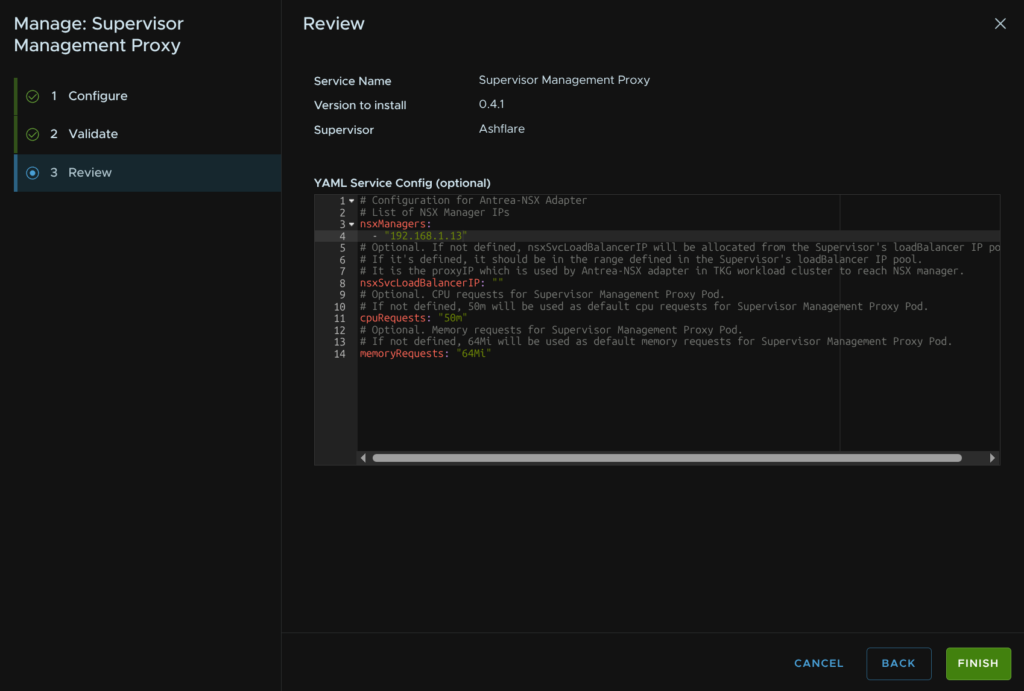
For the YAML Service Config, we need to input our NSX Managers, not the VIP, they
For a three node NSX Manager cluster, use this
# List of NSX Manager IPs
nsxManagers:
  - "<NSX-Manager1-IP>"
  - "<NSX-Manager2-IP>"
  - "<NSX-Manager3-IP>"
# Optional. If not defined, nsxSvcLoadBalancerIP will be allocated from the Supervisor's loadBalancer IP pool.
# If it's defined, it should be in the range defined in the Supervisor's loadBalancer IP pool.
# It is the proxyIP which is used by Antrea-NSX adapter in TKG workload cluster to reach NSX manager.
nsxSvcLoadBalancerIP: ""
# Optional. CPU requests for Supervisor Management Proxy Pod.
# If not defined, 50m will be used as default cpu requests for Supervisor Management Proxy Pod.
cpuRequests: "50m"
# Optional. Memory requests for Supervisor Management Proxy Pod.
# If not defined, 64Mi will be used as default memory requests for Supervisor Management Proxy Pod.
memoryRequests: "64Mi"
For a single node NSX Manager use this
# List of NSX Manager IPs
nsxManagers:
  - "<NSX-Manager-IP>"
# Optional. If not defined, nsxSvcLoadBalancerIP will be allocated from the Supervisor's loadBalancer IP pool.
# If it's defined, it should be in the range defined in the Supervisor's loadBalancer IP pool.
# It is the proxyIP which is used by Antrea-NSX adapter in TKG workload cluster to reach NSX manager.
nsxSvcLoadBalancerIP: ""
# Optional. CPU requests for Supervisor Management Proxy Pod.
# If not defined, 50m will be used as default cpu requests for Supervisor Management Proxy Pod.
cpuRequests: "50m"
# Optional. Memory requests for Supervisor Management Proxy Pod.
# If not defined, 64Mi will be used as default memory requests for Supervisor Management Proxy Pod.
memoryRequests: "64Mi"
As I have a single NSX Manager, I opted for the latter, when you are happy, click Finish
1.2.2 – ArgoCD Service
In the Broadcom downloads portal, click vSphere Supervisor Services
Expand ArgoCD Service and click the latest release
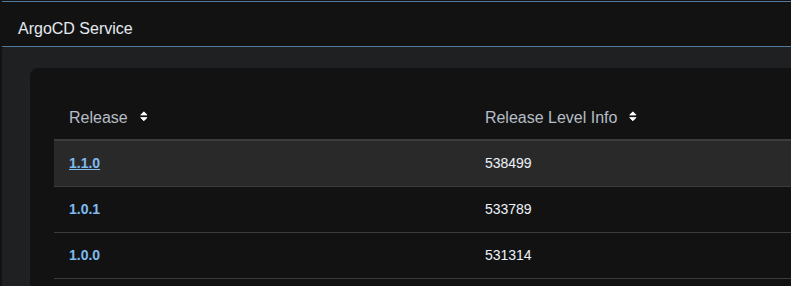
Download the Service YAML file

There is also this file, which as far as I can see is the exact same file looking at the SHA2 results

Also download the CLI package, as we’ll need this for later, I am doing this on Ubuntu, so I am downloading this package

In vSphere, click the three lines in the top left and click Supervisor Management
Click Services, and on the Add New Service widget, click Add
Click Upload
Double click our YAML
Then click Finish
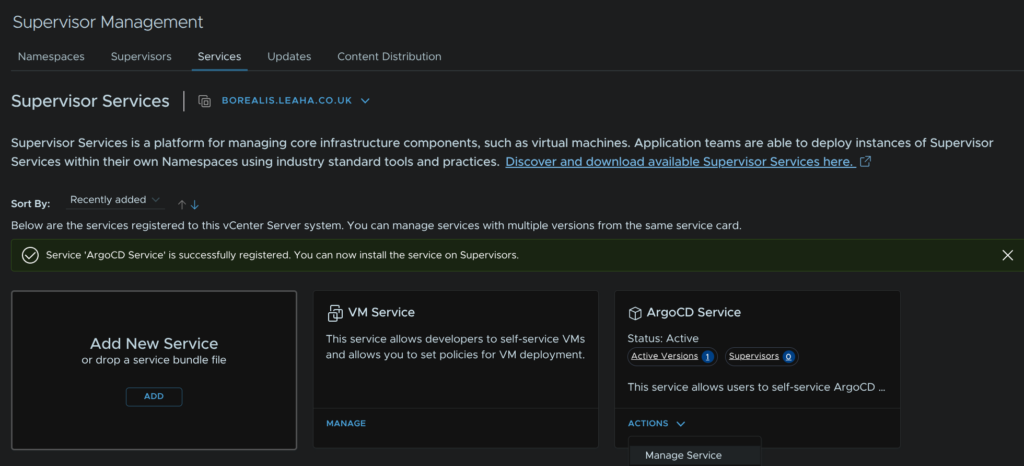
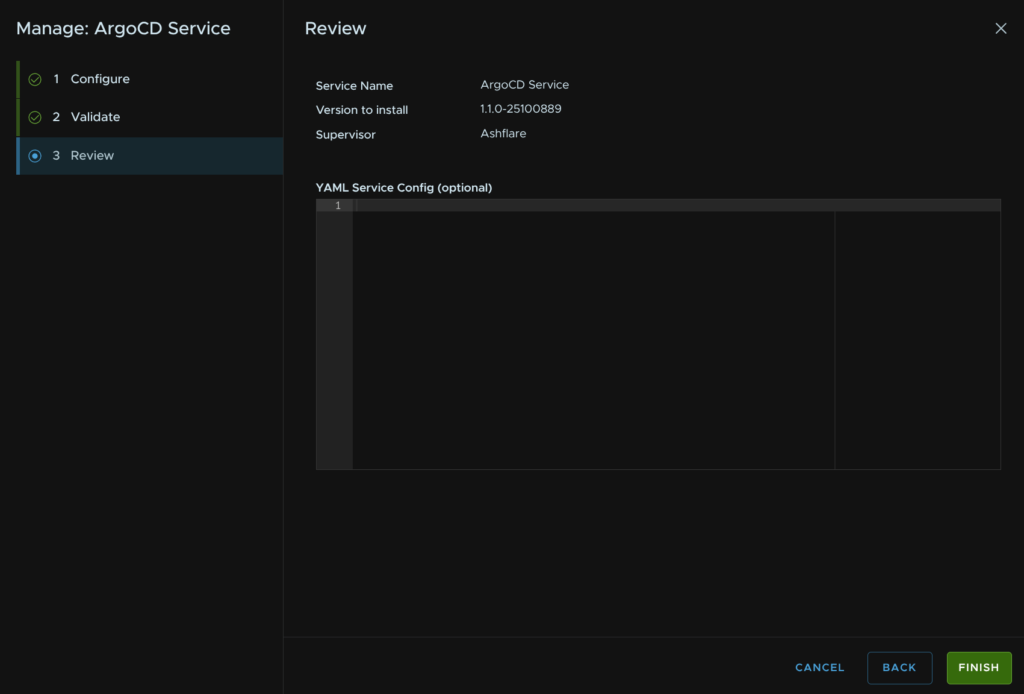
Now, on the new ArgoCD widget, click Actions/Manage
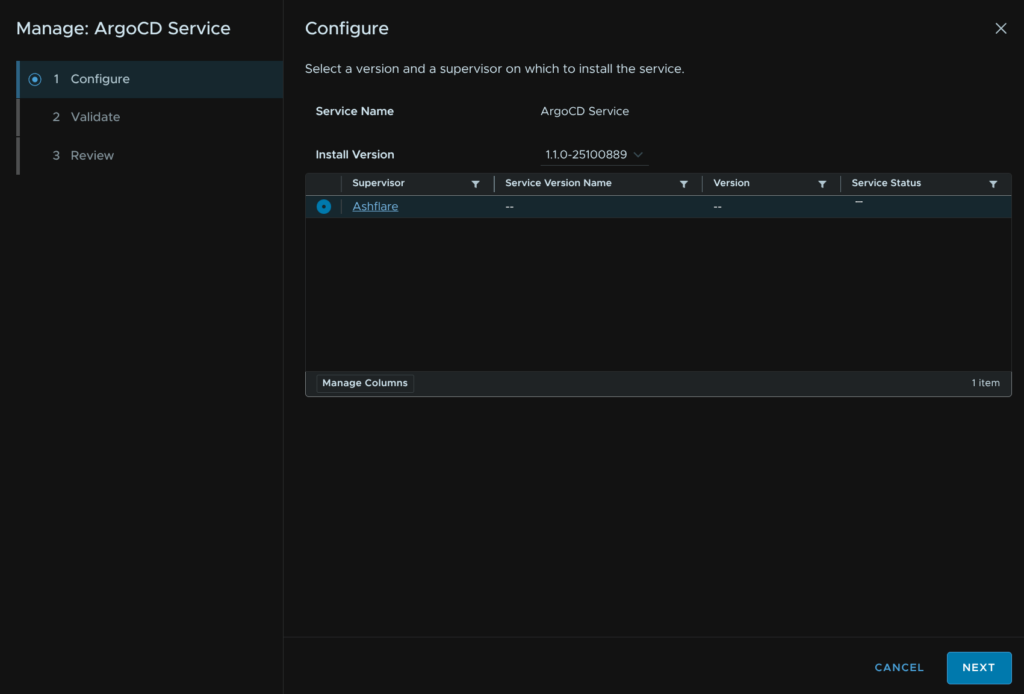
Select our Supervisor and click Next
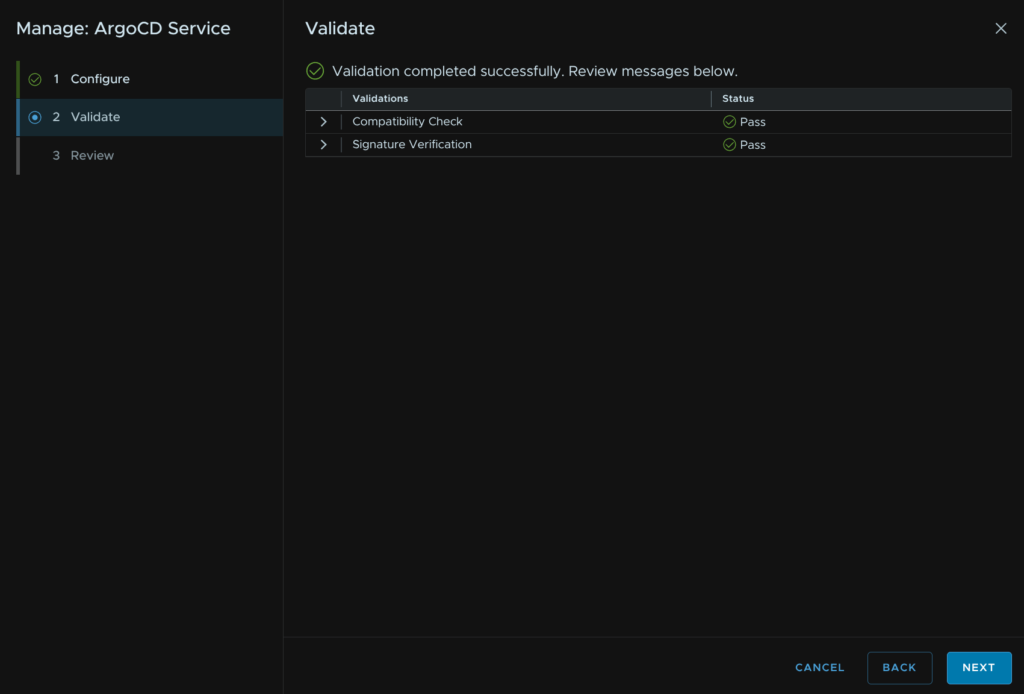
Once the signature and compatibility has been validated, click Next
And click Finish
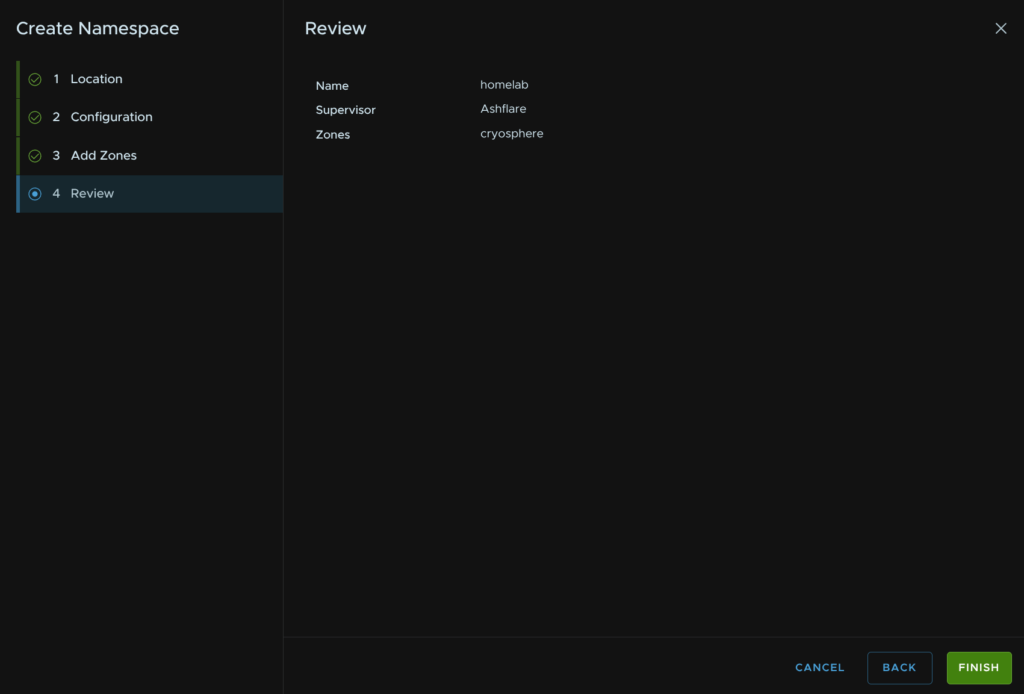
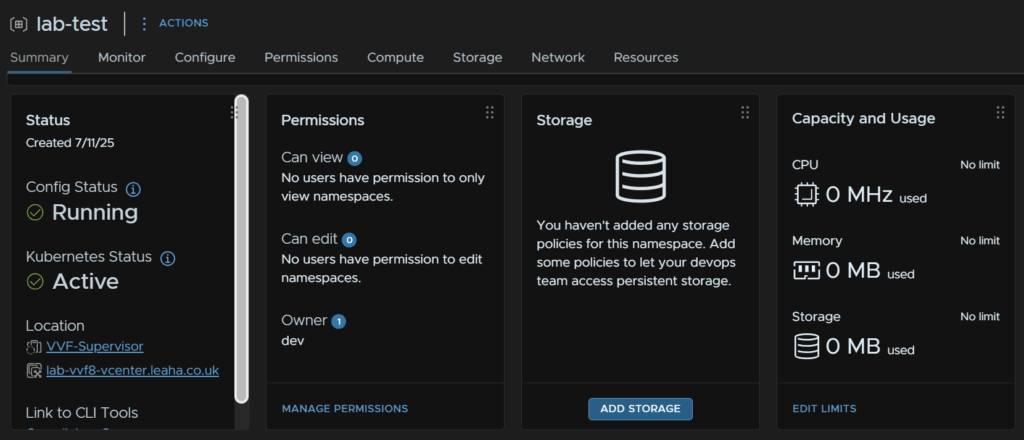
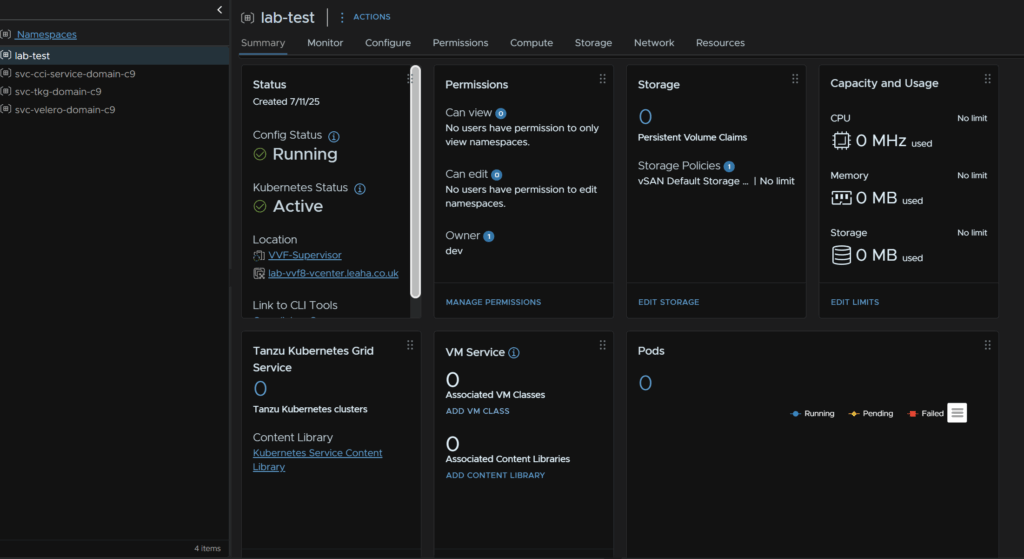
1.3 – Creating A Namespace
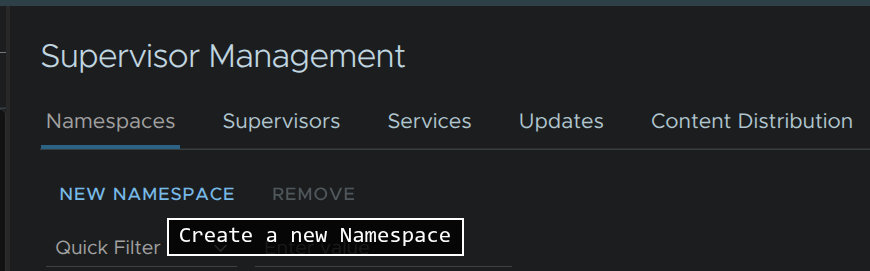
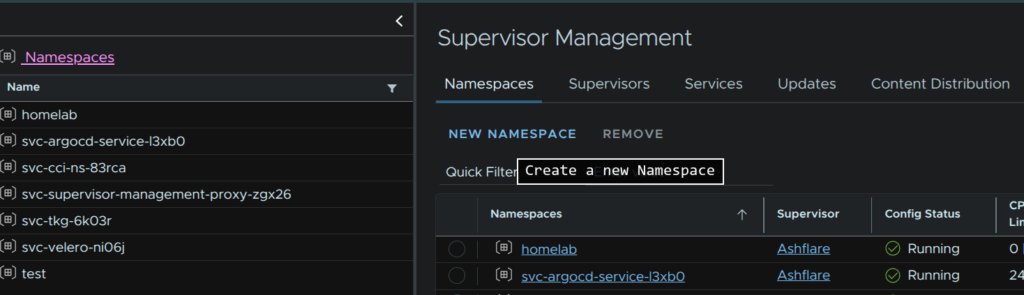
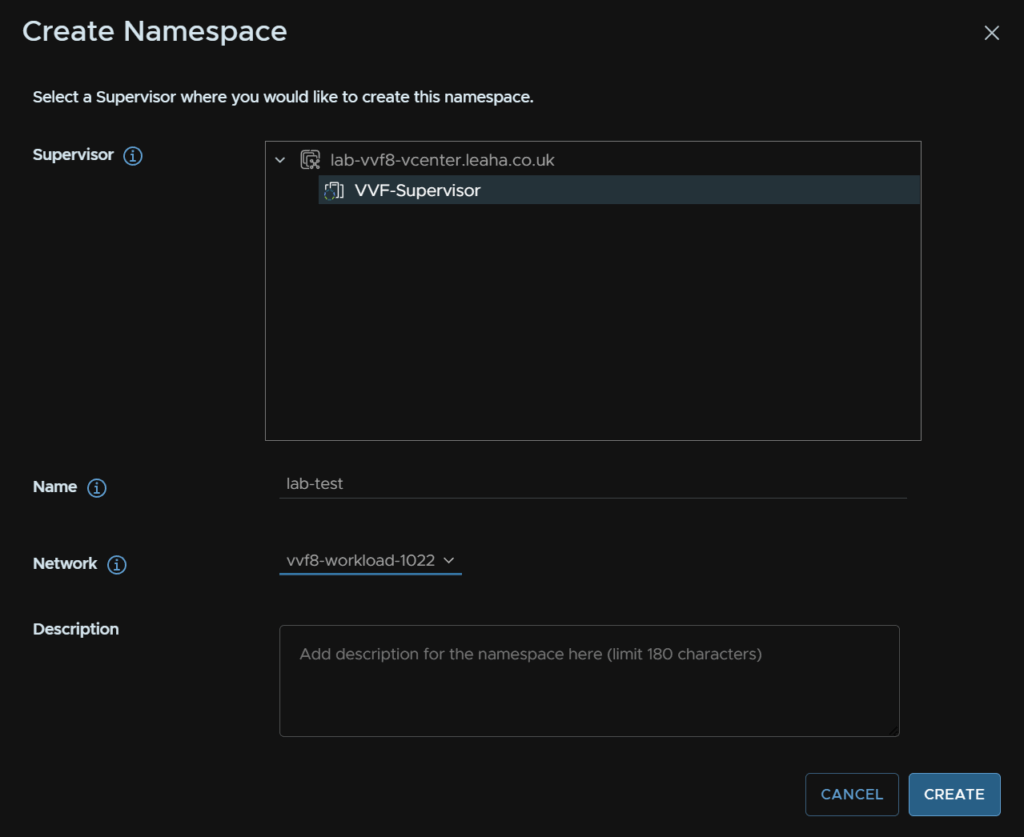
Before we can start deploying VKS clusters we need a namespace to put them in, in vSphere click the three lines in the top left and click Supervisor Management

Then click New Namespace
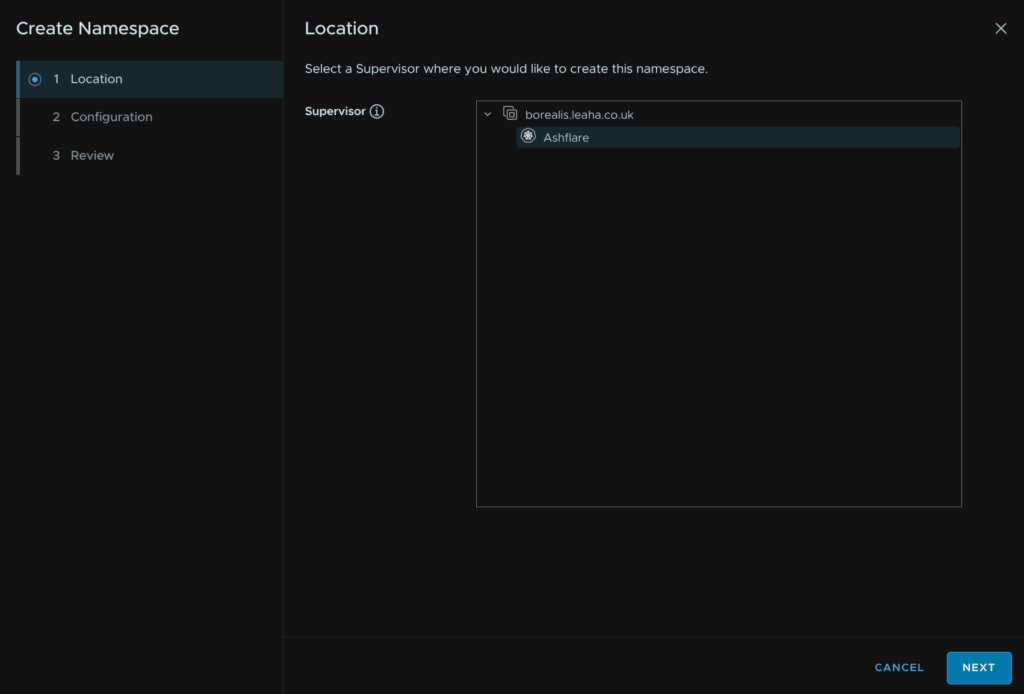
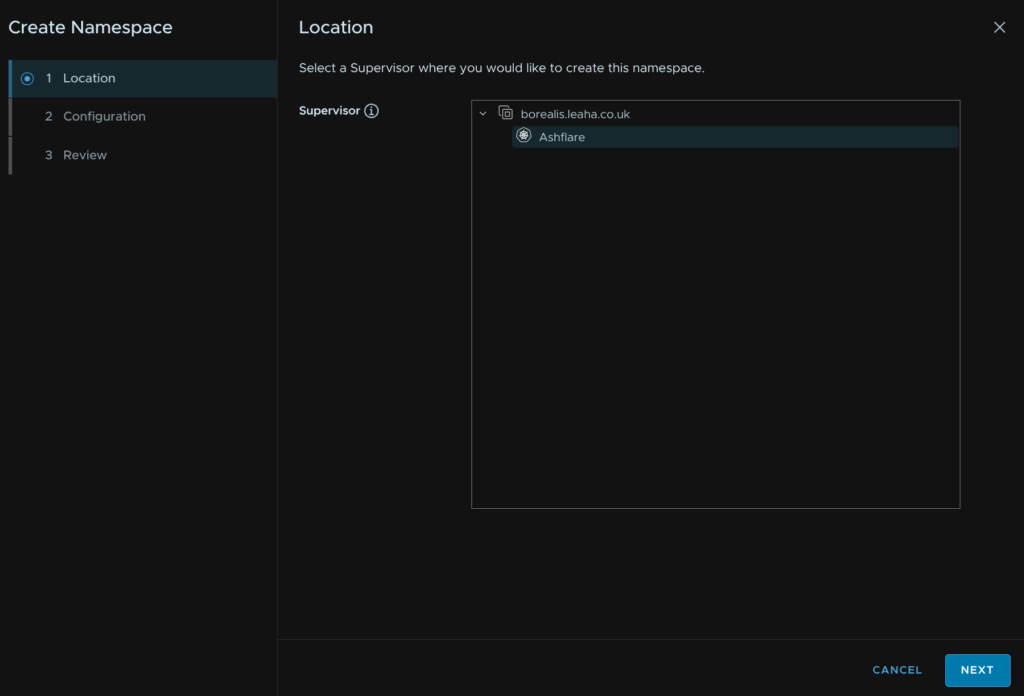
Select the supervisor and click Next
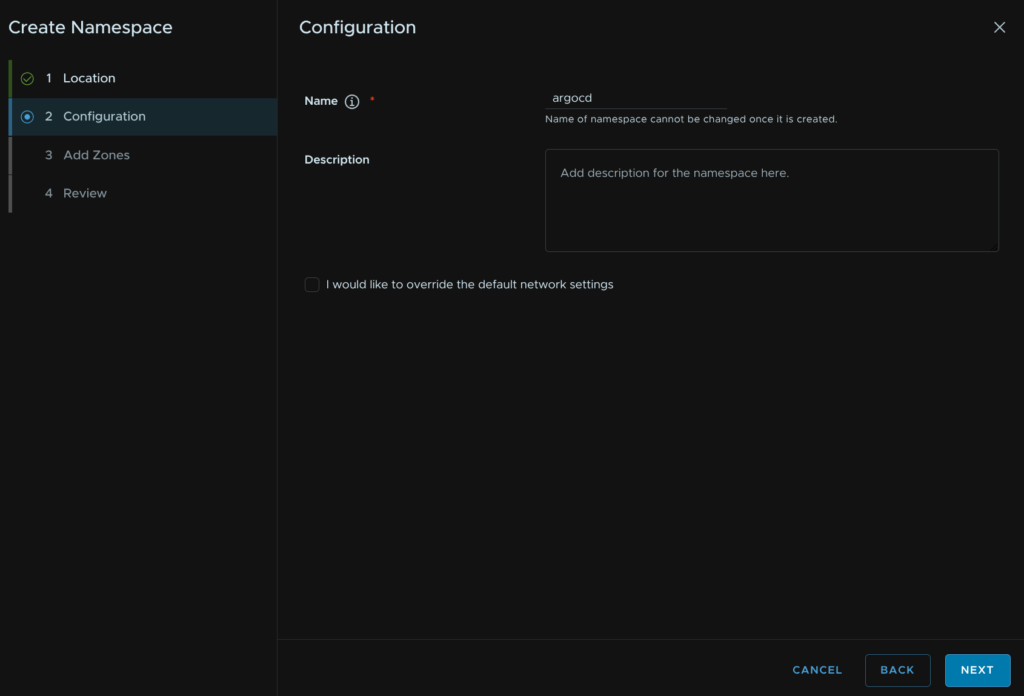
Give it a name, it must be DNS compliant, so no capitals for example

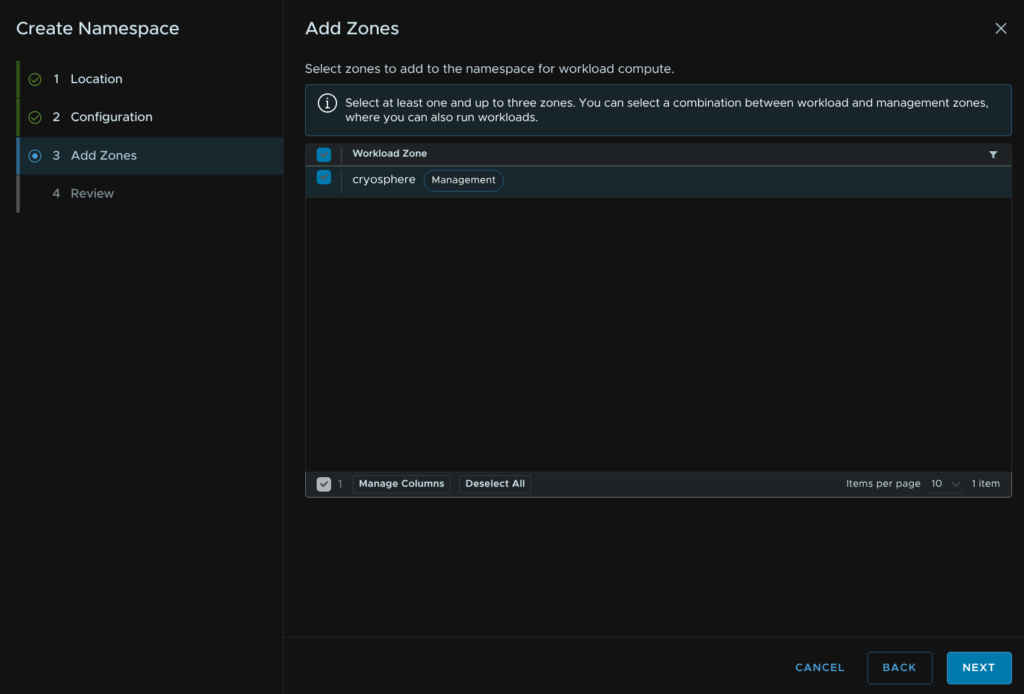
Select your zones, if you only have one like me, the default is fine, then click Next
Then click Finish
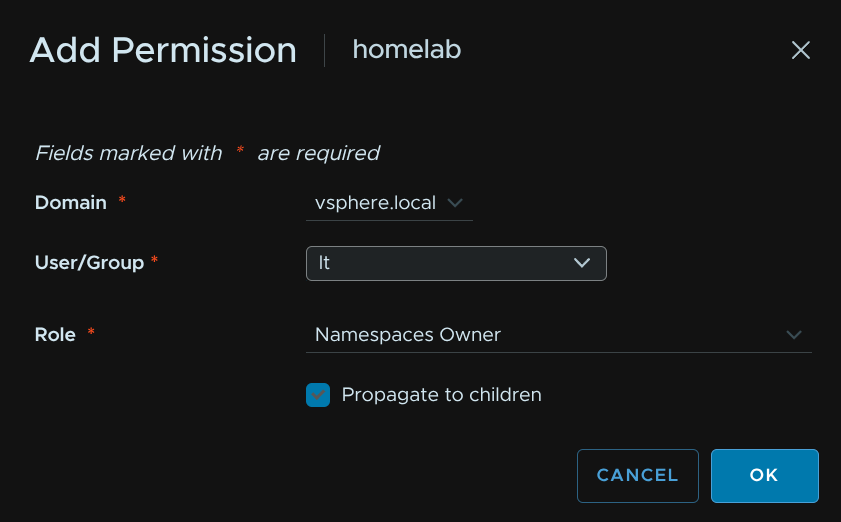
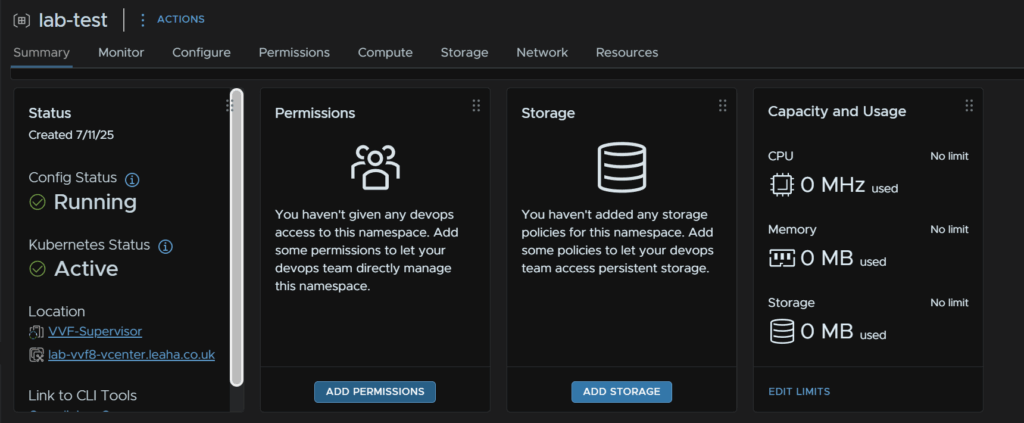
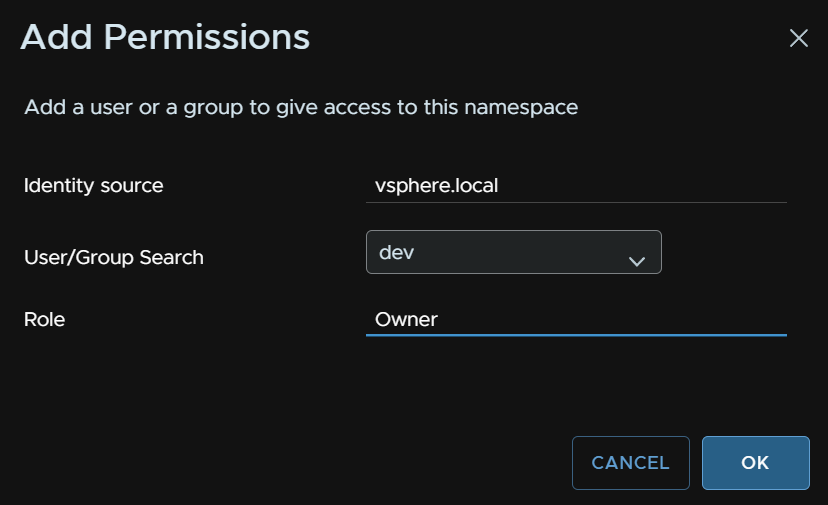
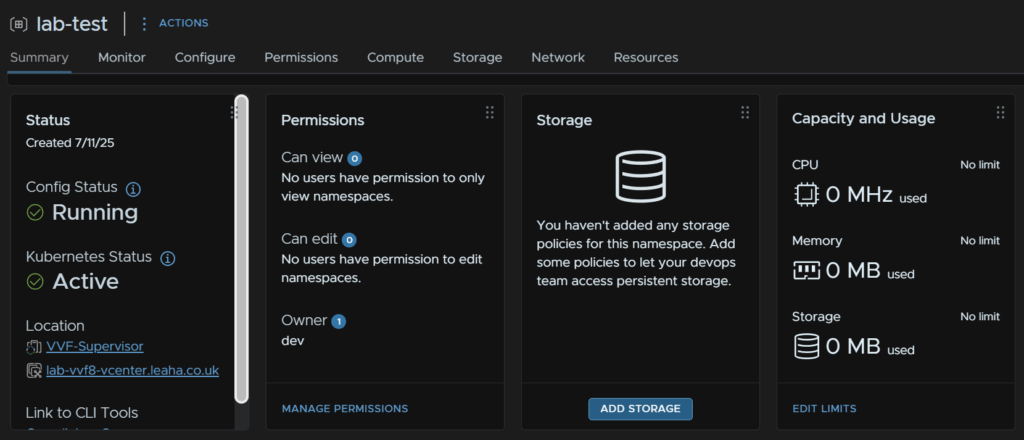
In our new namespace, we can select it on the right, on the permissions page, click Add

Select the identity source, this will want to be vsphere.local, unless you are using another, search for the user, I am giving my user owner permissions here, also enable the propagate to children option, then click ok
There are four roles, namespaces owner, view, edit and query operator
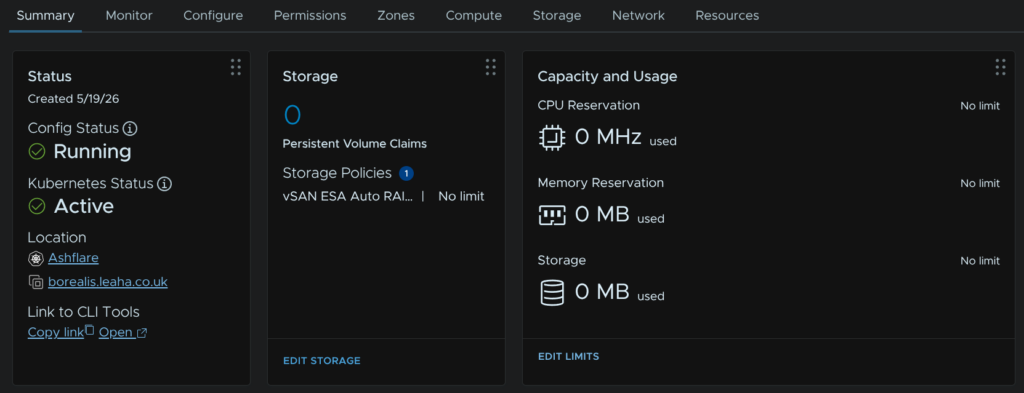
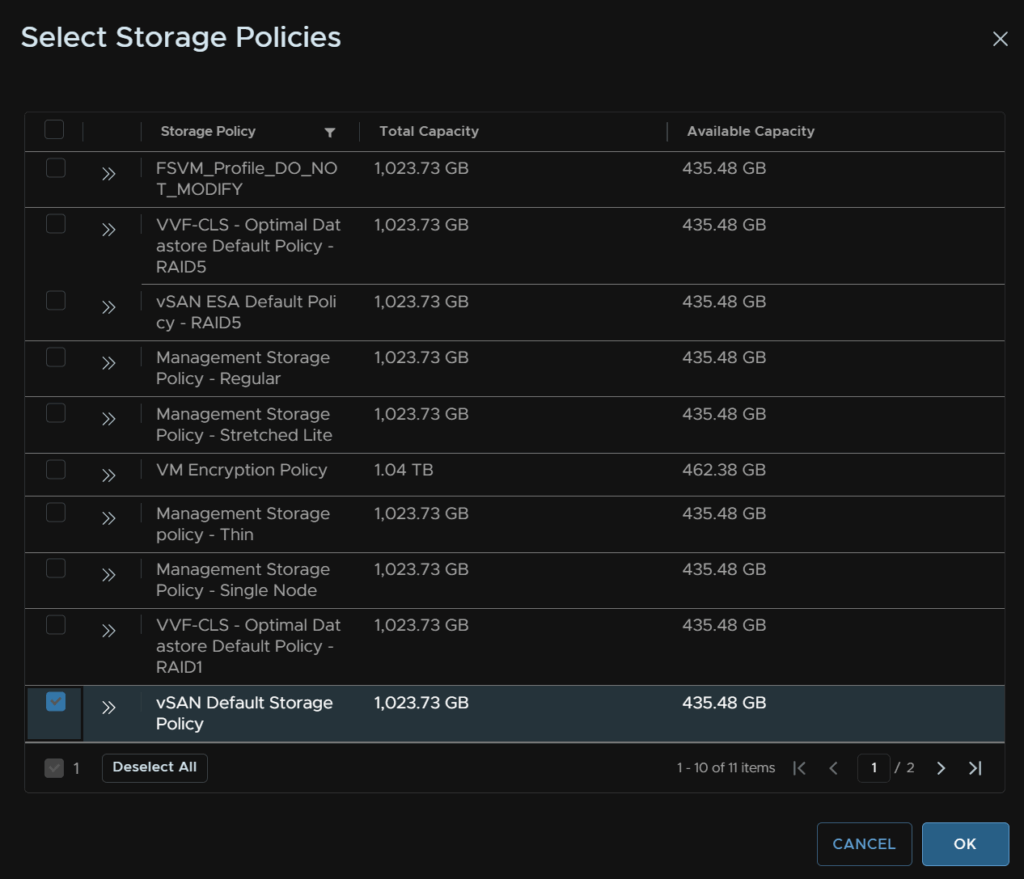
Back under Summary, on the storage Widget, click Add Storage
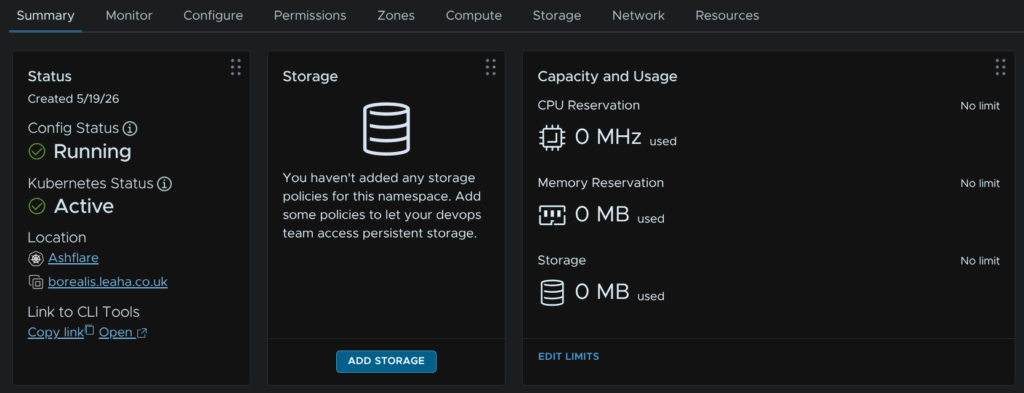
Select a storage policy, I am using the vSAN AutoRAID policy here and click ok

This is the storage policy your user wants to be using when creating Physical Volume Claims on a K8S cluster
It can be checked within the K8S CLI later with
kubectl get storageclassesIt is also worth noting the user, in the case lt, will need at least read rights to the vCenter, cluster and hosts
I have a custom role for users so they have read permissions to the those bits, so the UI will load properly, from there they can access Workload Management to manage their namespace and resources, they wont see any VMs in vSphere though
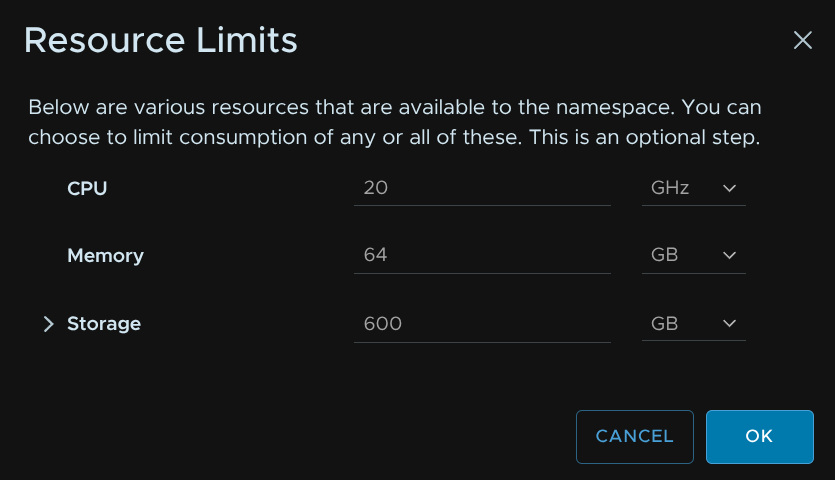
As an admin you can apply limits like any other resource groups to limit how much can be deployed
This can be done by clicking Edit Limits on the Capacity And Usage widget
And setting limits then clicking ok
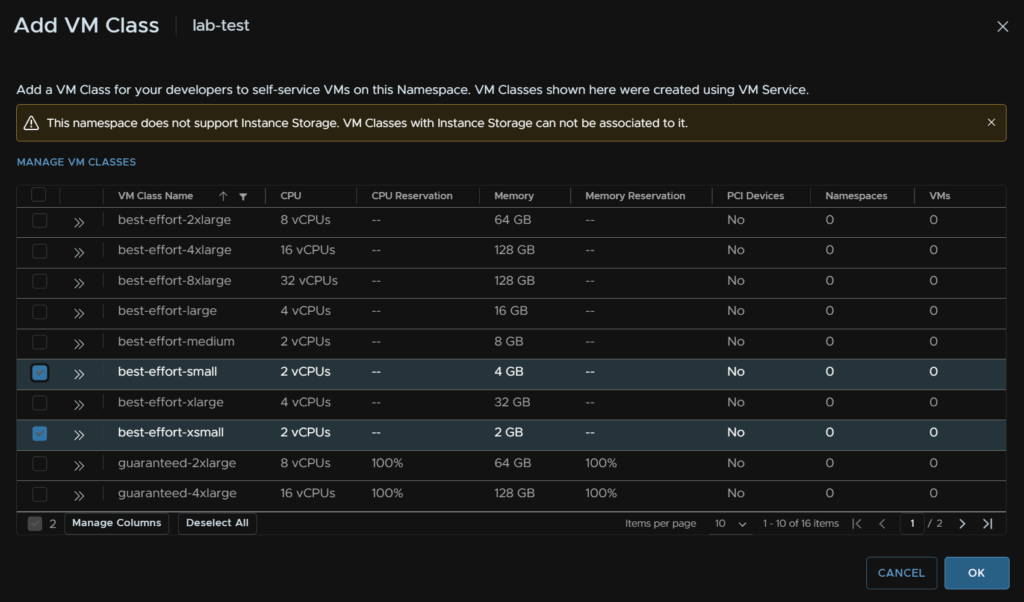
1.4 – Adding A VM Class
Next we need a VM class, else creating Kubernetes clusters isnt going to work
In our new namespace, on the VM Service widget, click Add VM Class
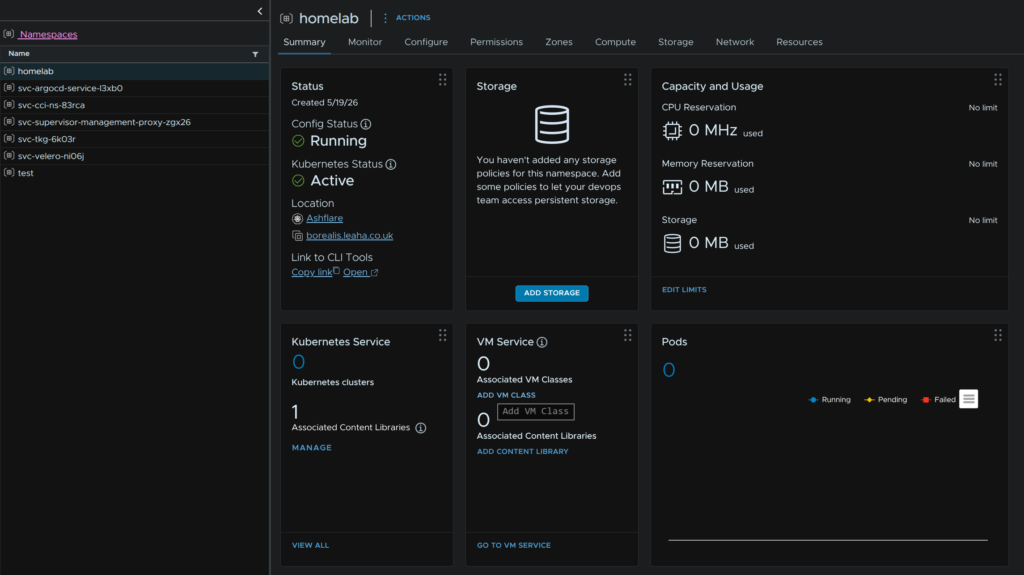
And select the VM class you’d like to be able to deploy in this namespace and click ok
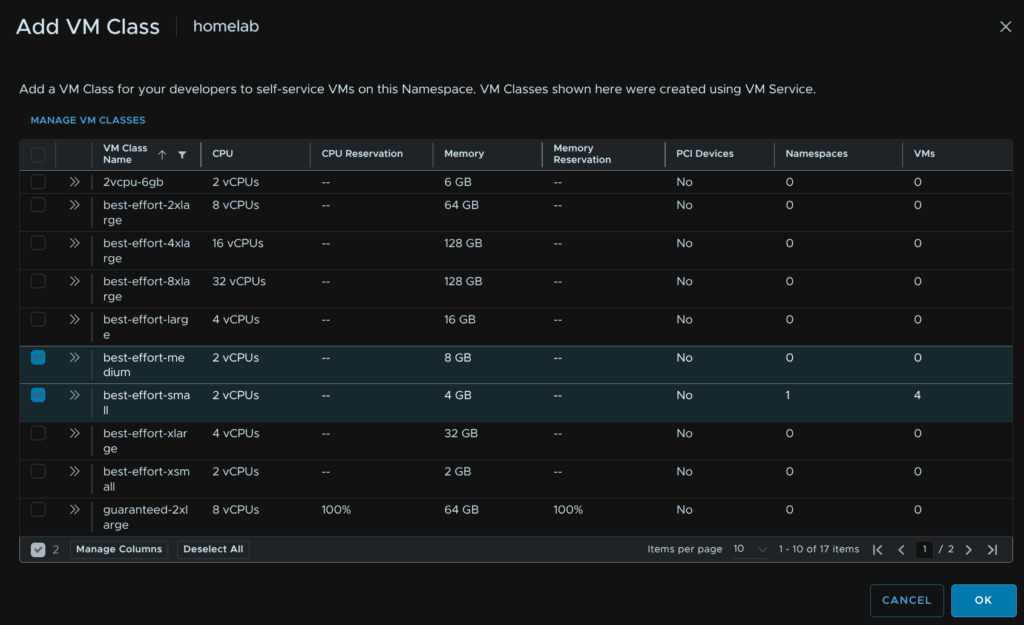
We can use these sizes to define our VKS cluster when we deploy them
If we click Go To VM Service

Then click VM Classes/Create VM Class
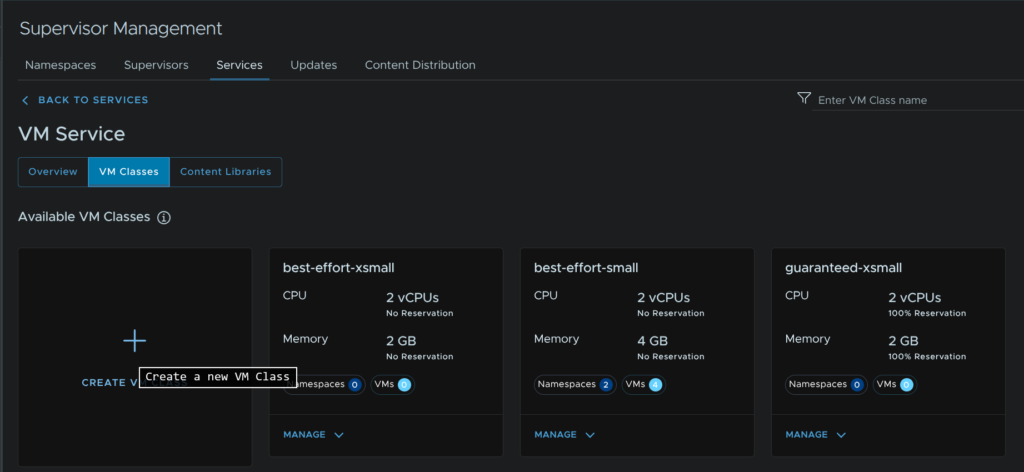
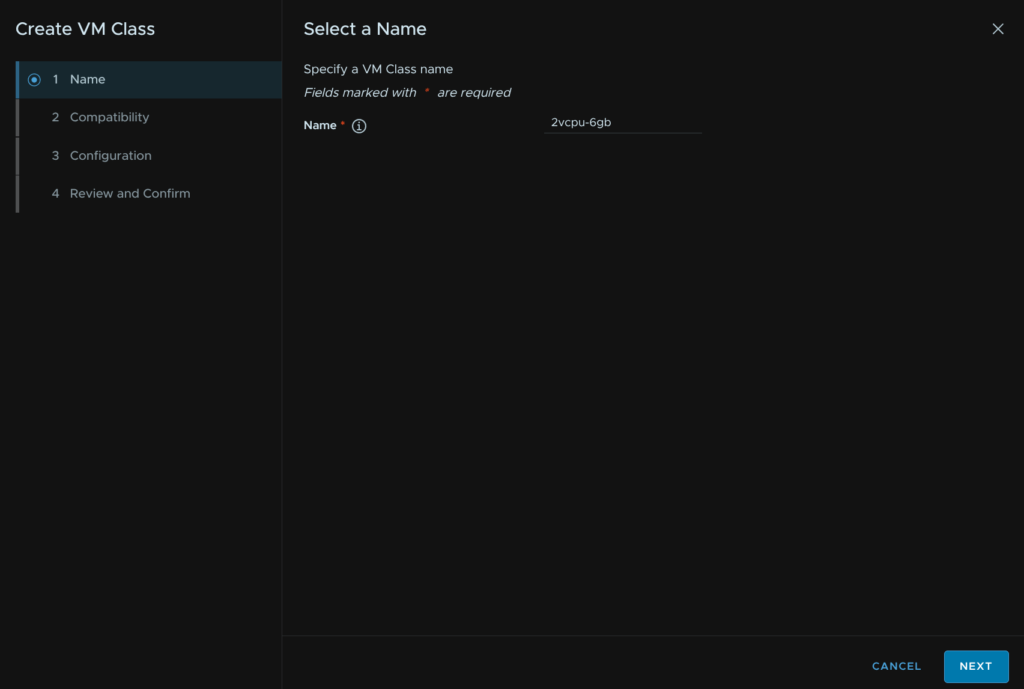
Give a name in all lowercase with no spaces and click Next
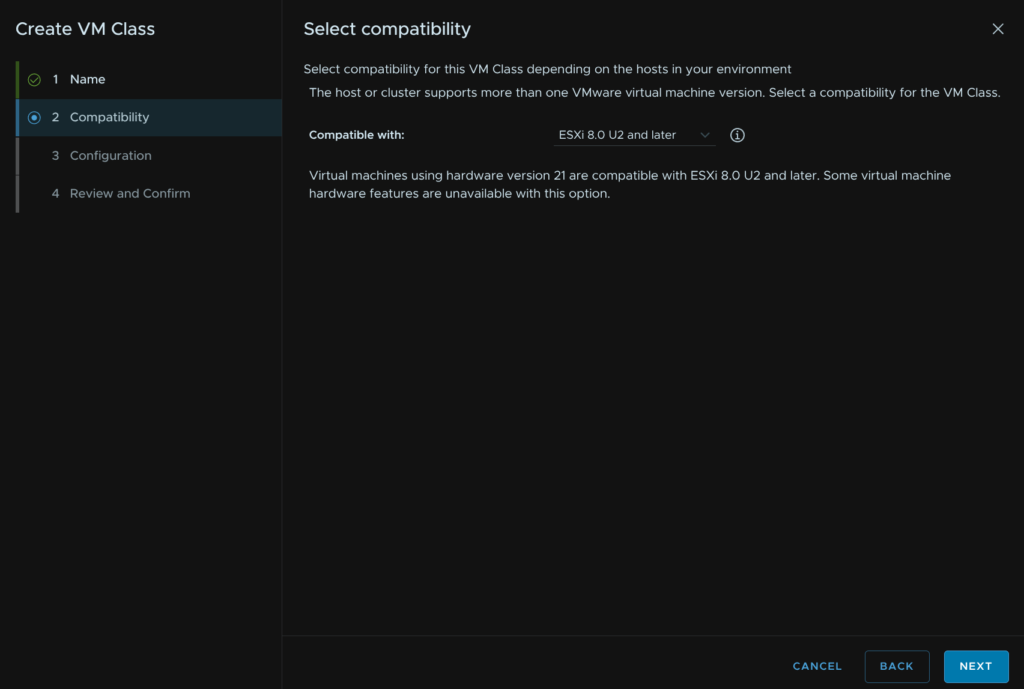
Select a VM compatibility and click Next
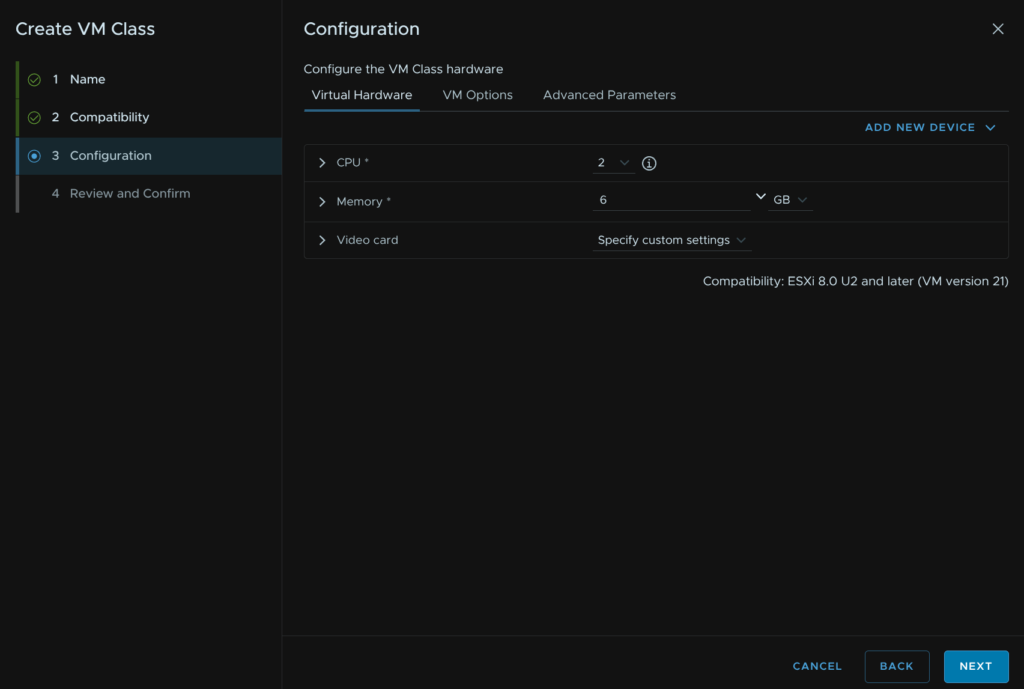
Set the vCPU and Memory then click Next
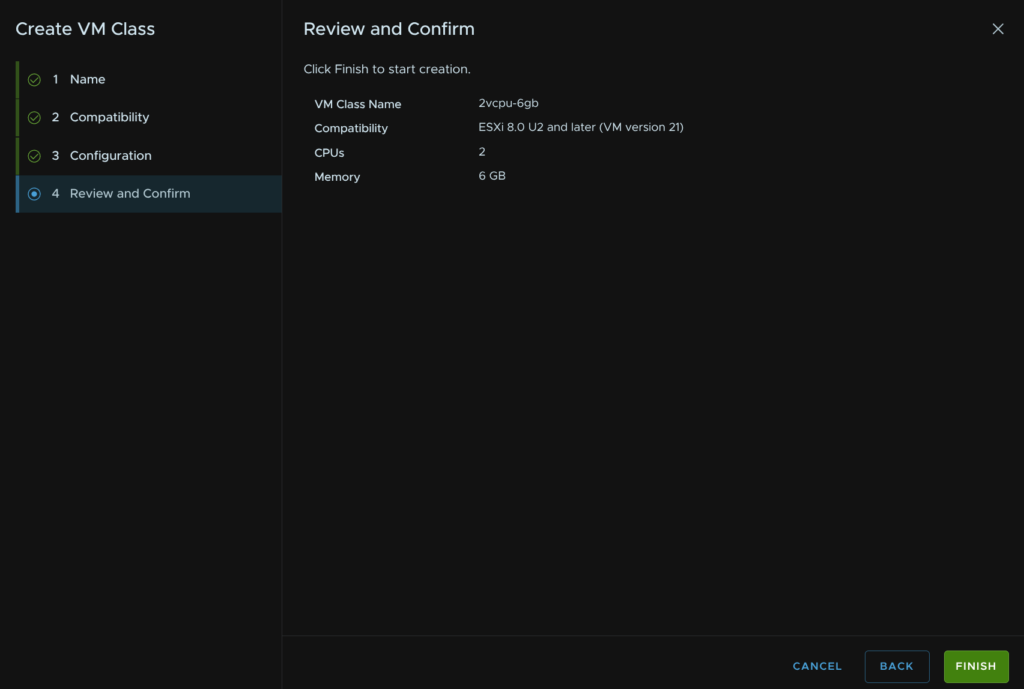
And click Finish
We can then add them to a namespace like before
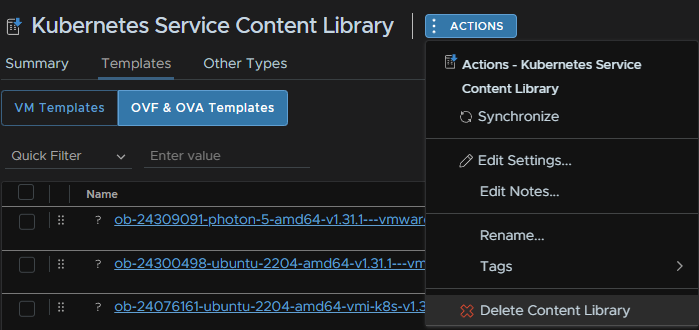
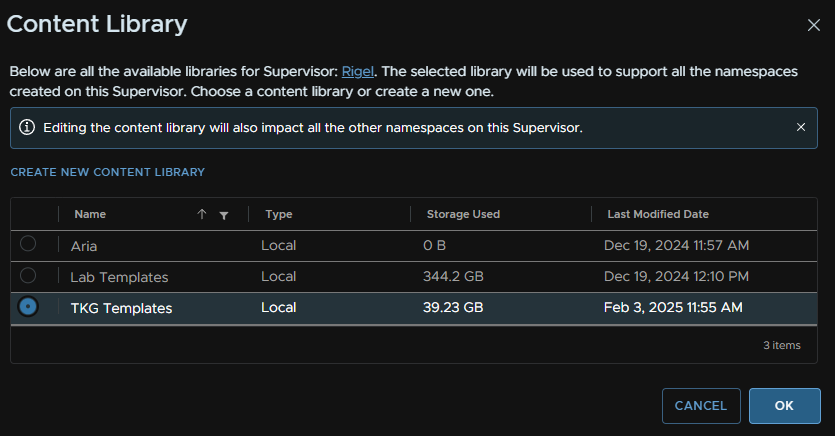
1.5 – Creating A Local Content Library
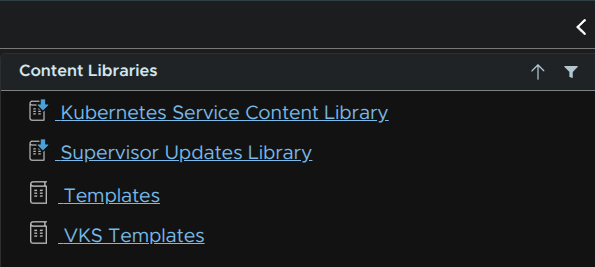
If youre like me and hate that after setting up the supervisor service, your template deployment, using content libraries is now very cluttered with Kubernetes templates, it looks a little like this
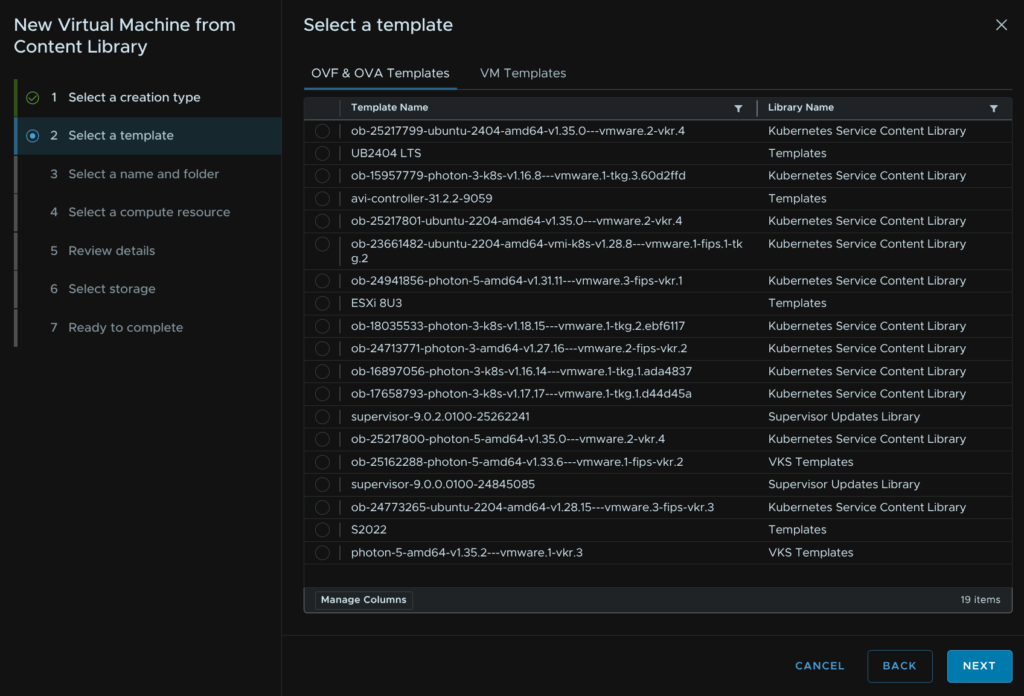
This is a nightmare to get to my old templates that were there as I need to search through everything
There is a way to deal with this by using a manual Kubernetes content library with a few images, as you likely dont need them all, to keep things simple
We will be removing the default internet subscribed content library, which you can set back up so this is reversible, and manually downloaded the right images we need
This has the draw back pf being managed by yourself for the latest releases, but de-clutters the template deployment menu
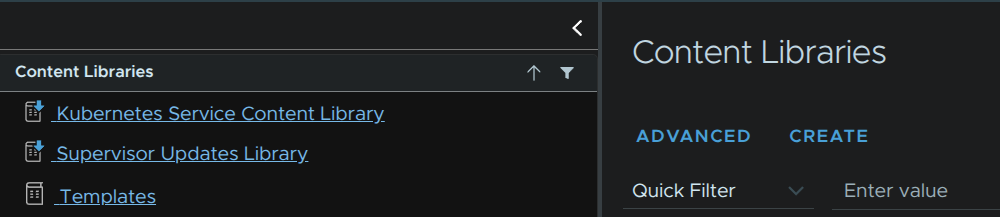
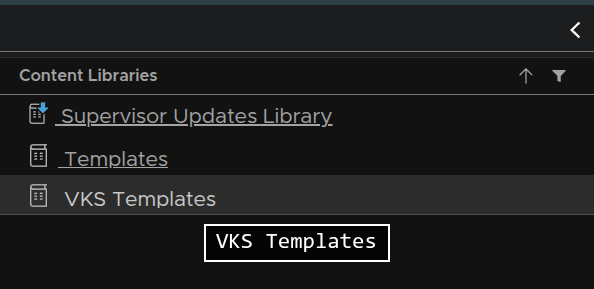
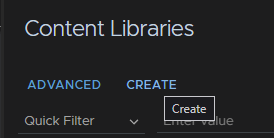
Click the three lines in the top left of vSphere and click Content Libraries

We can click Create for a new library, from the Content Libraries menu
Give it a name and click Next
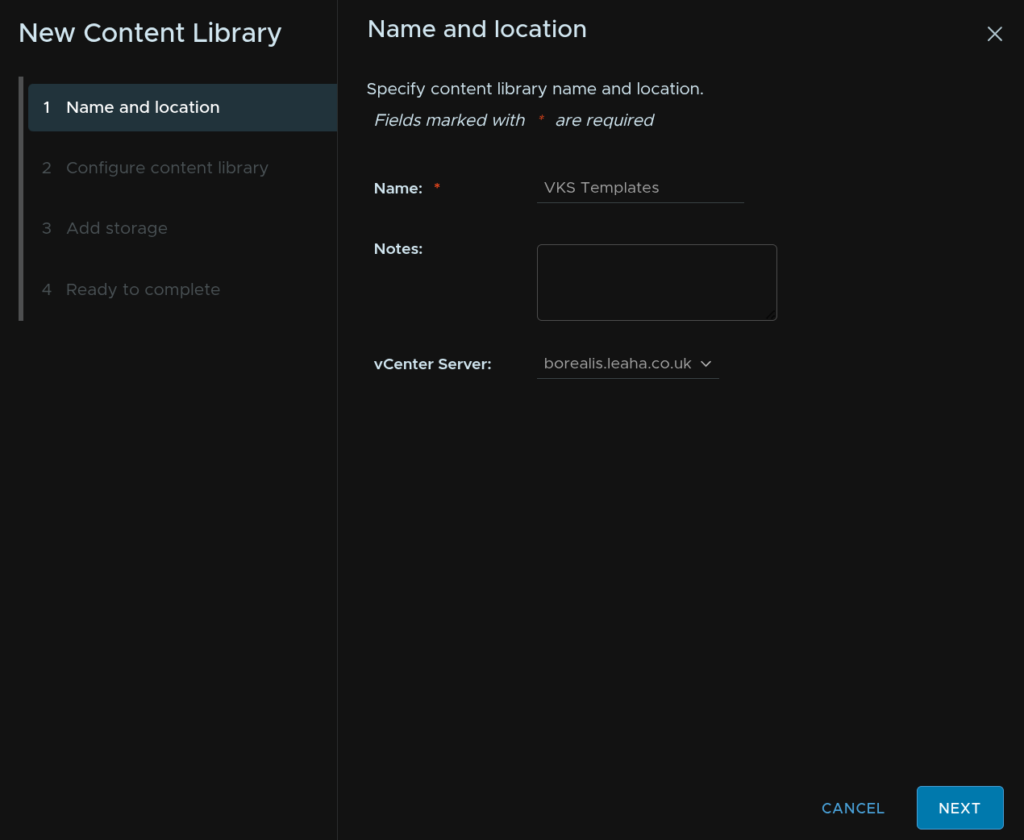
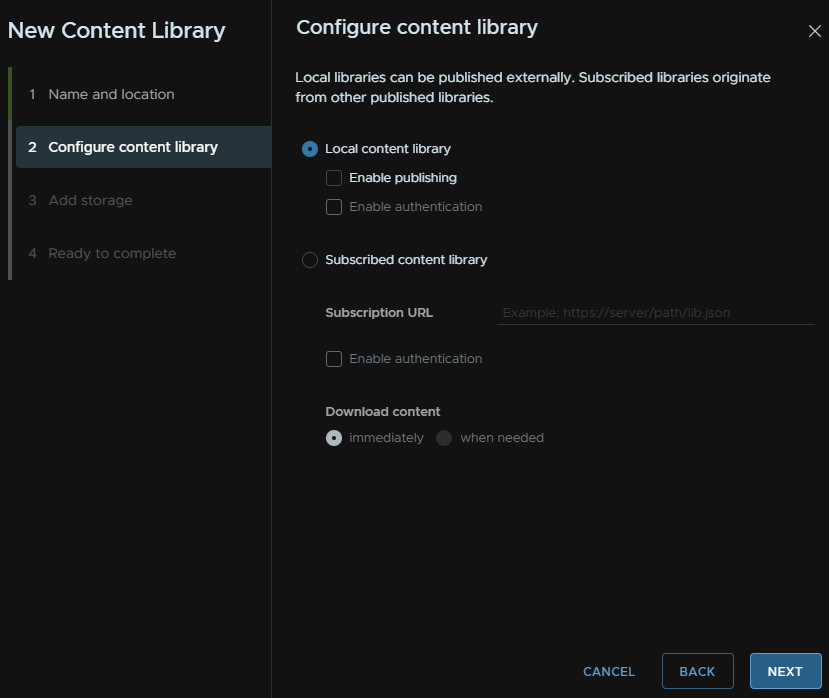
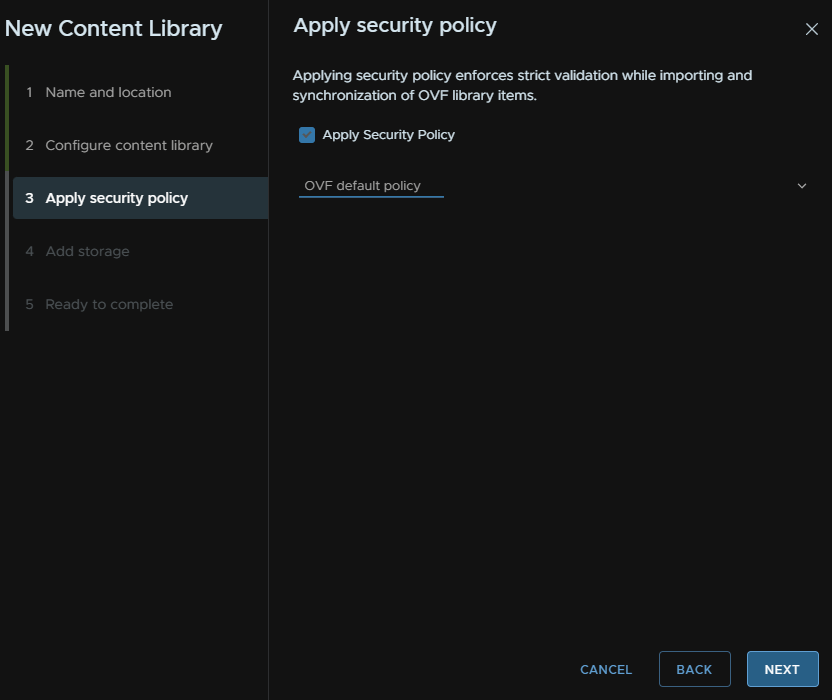
Make sure Local Content Library is selected and click Next
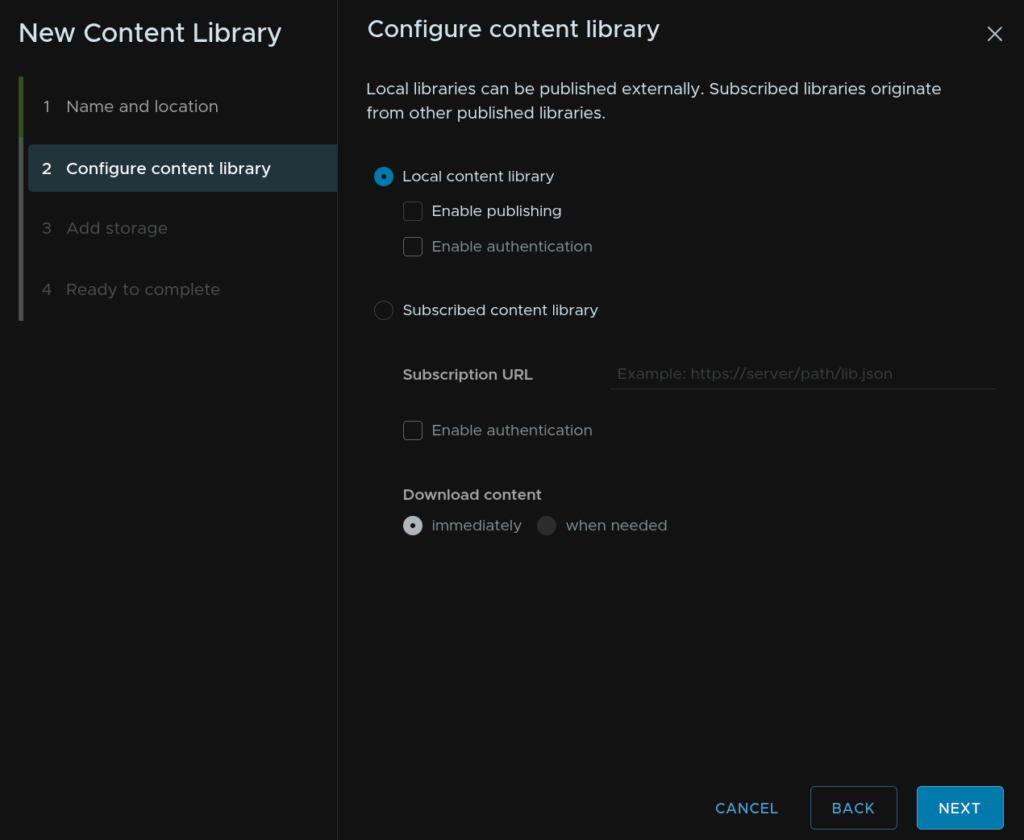
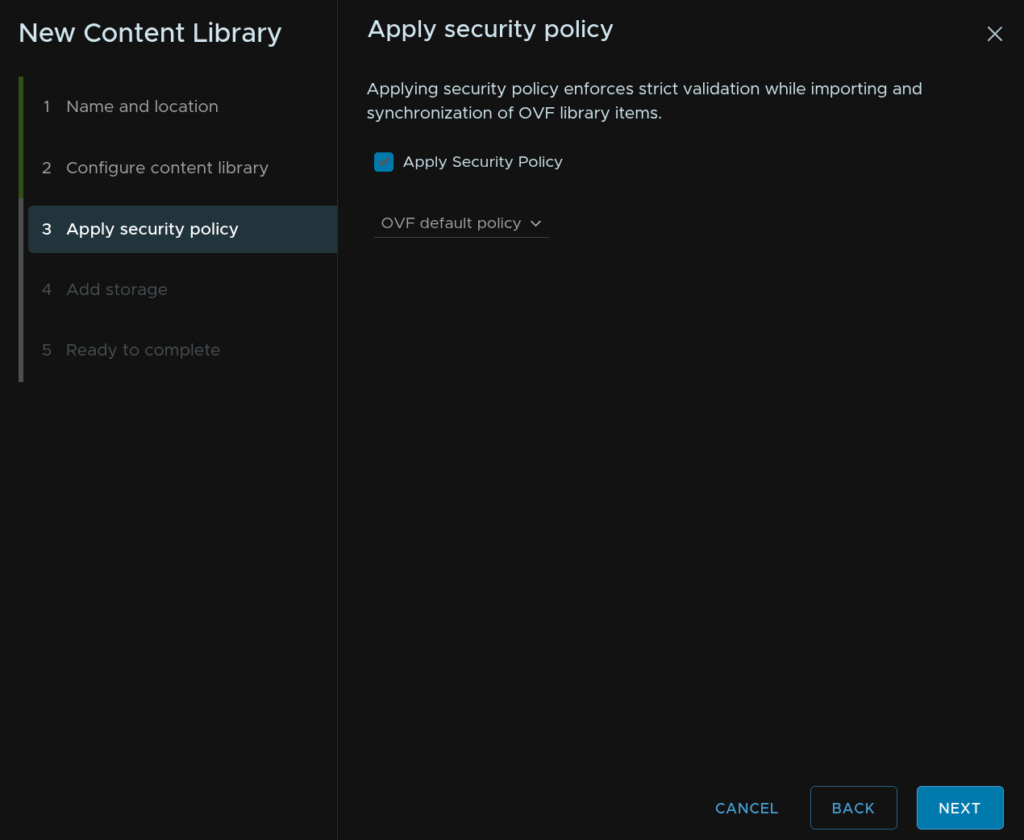
Click Apply Security Policy and click Next
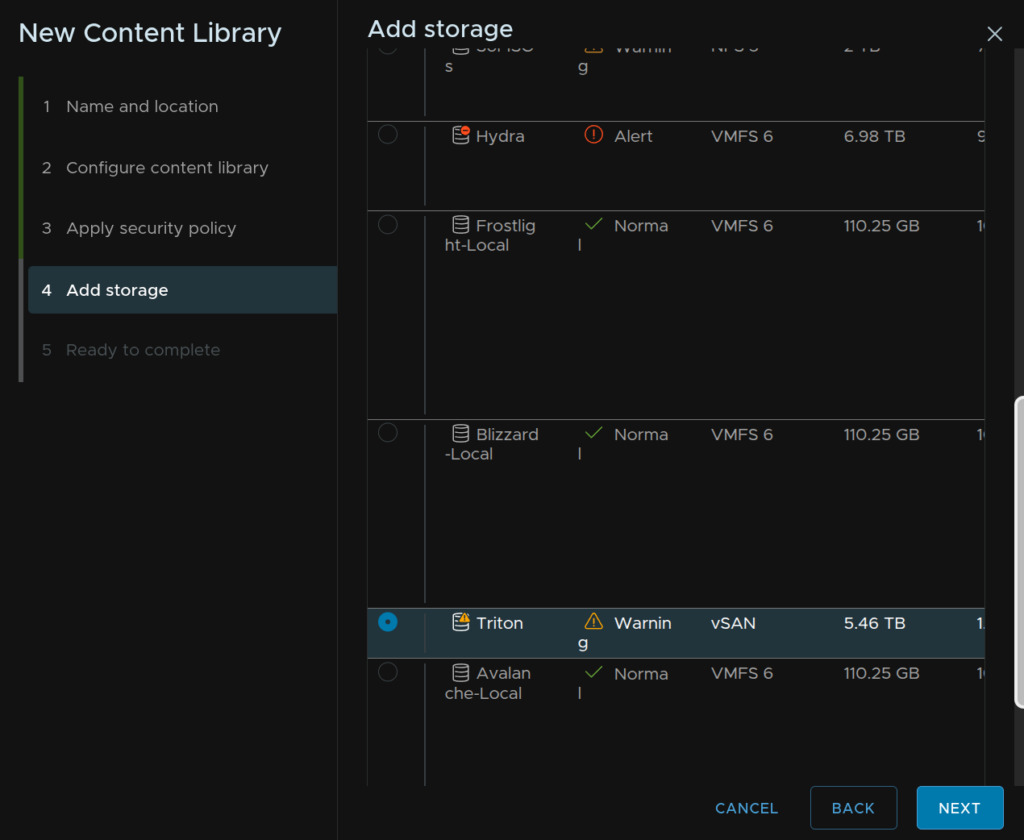
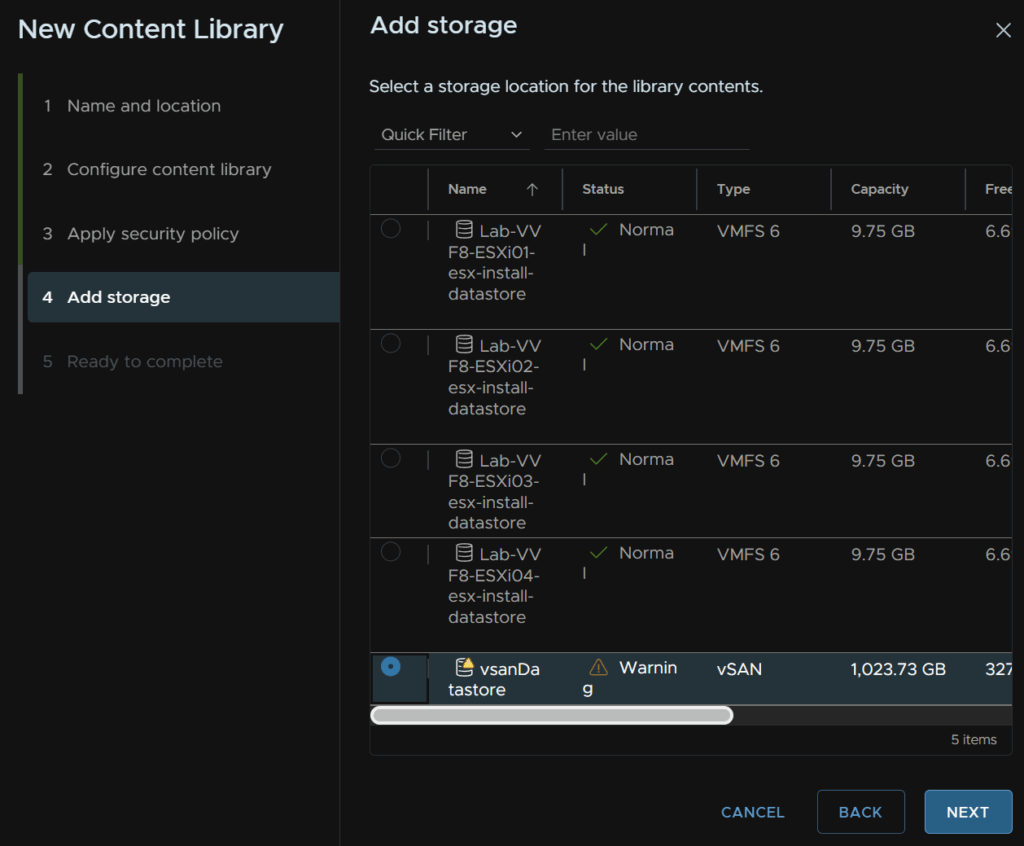
Select your datastore, if you have vSAN, this is what you should use, then click Next
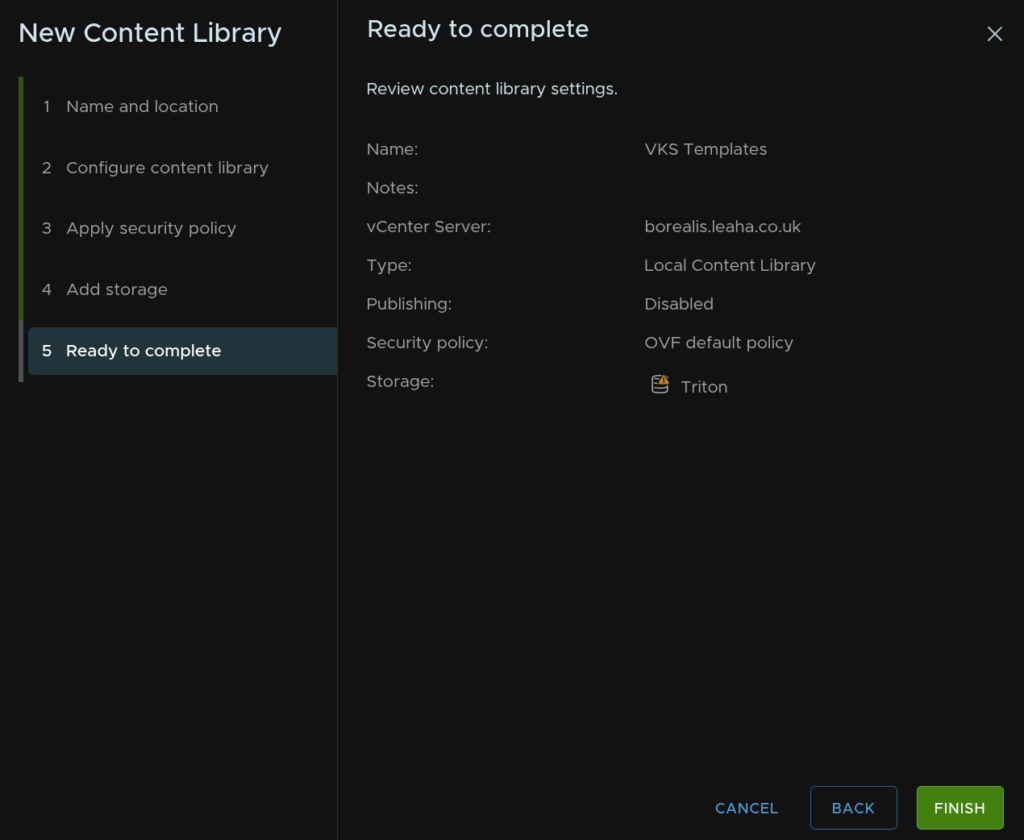
And click Finish
Now we have our library, we need to download some templates for it
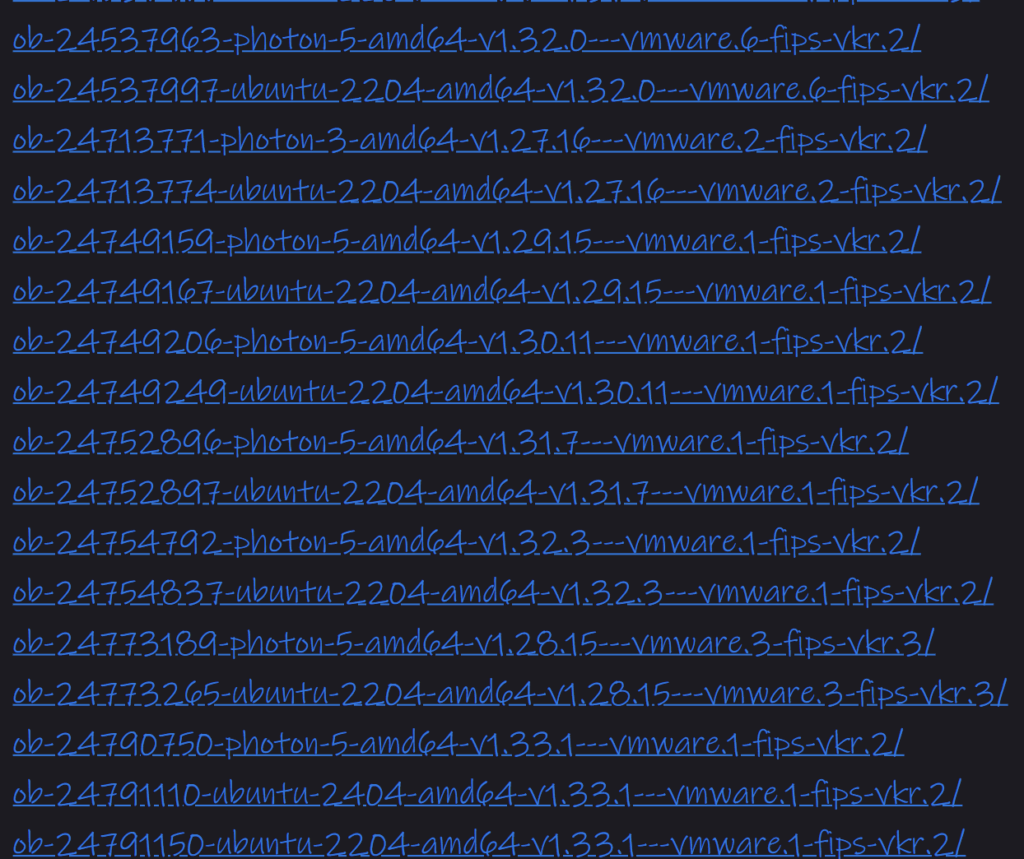
If we head to the URL the remote content library uses, we can see the images, the URL is
https://wp-content.vmware.com/v2/latest/
Here we can see all the templates and their links
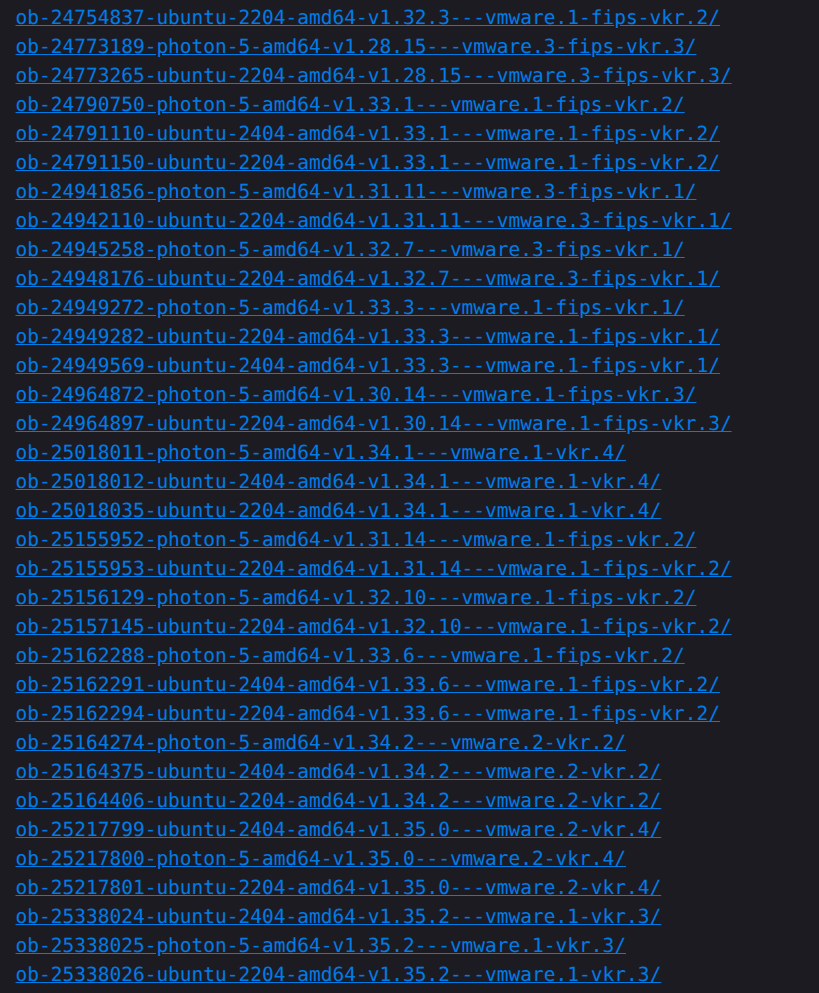
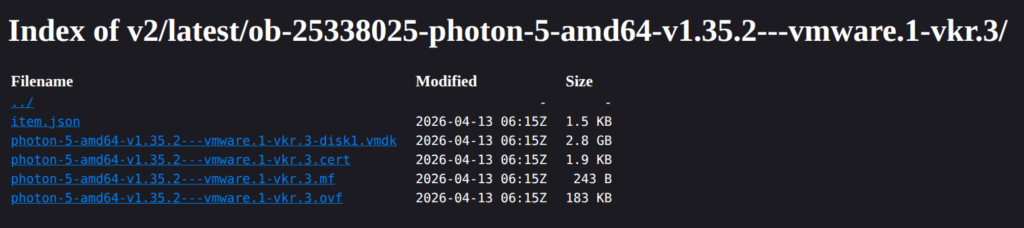
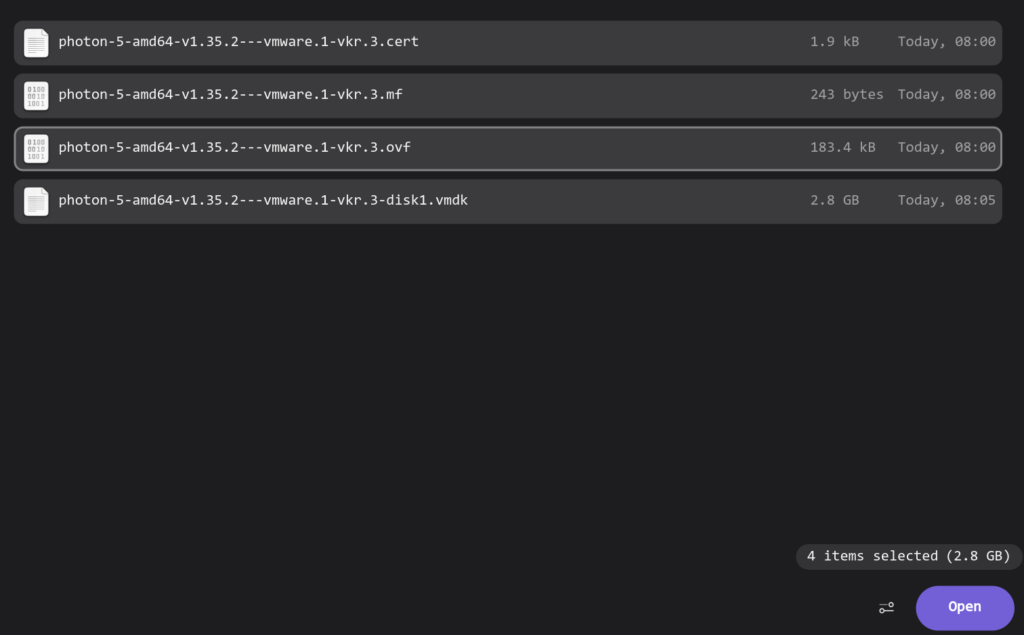
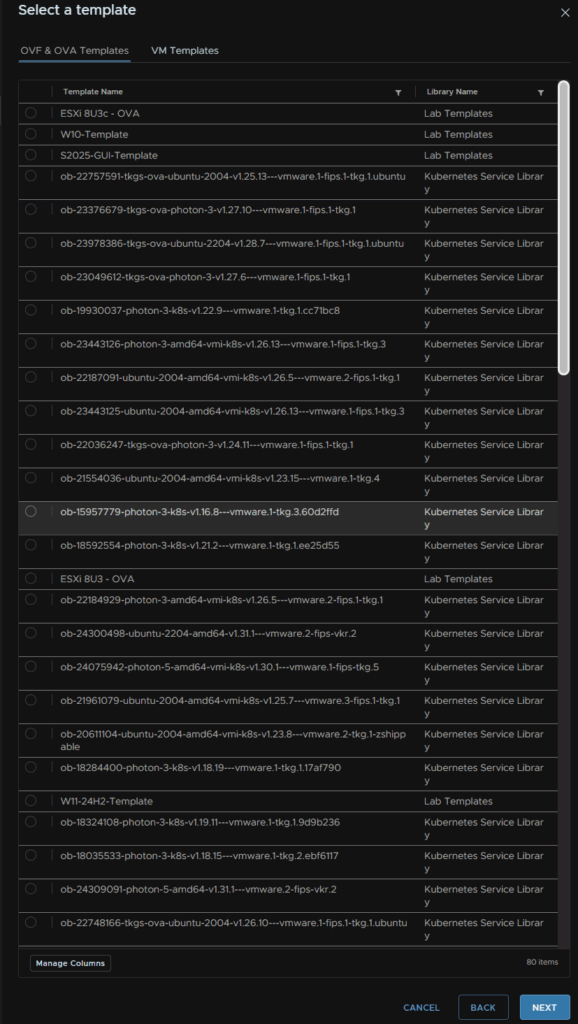
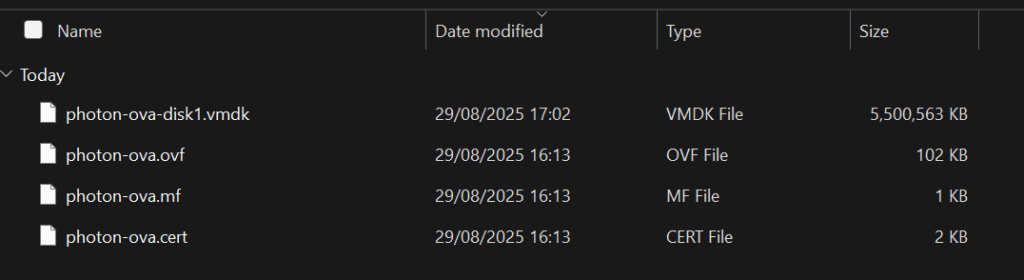
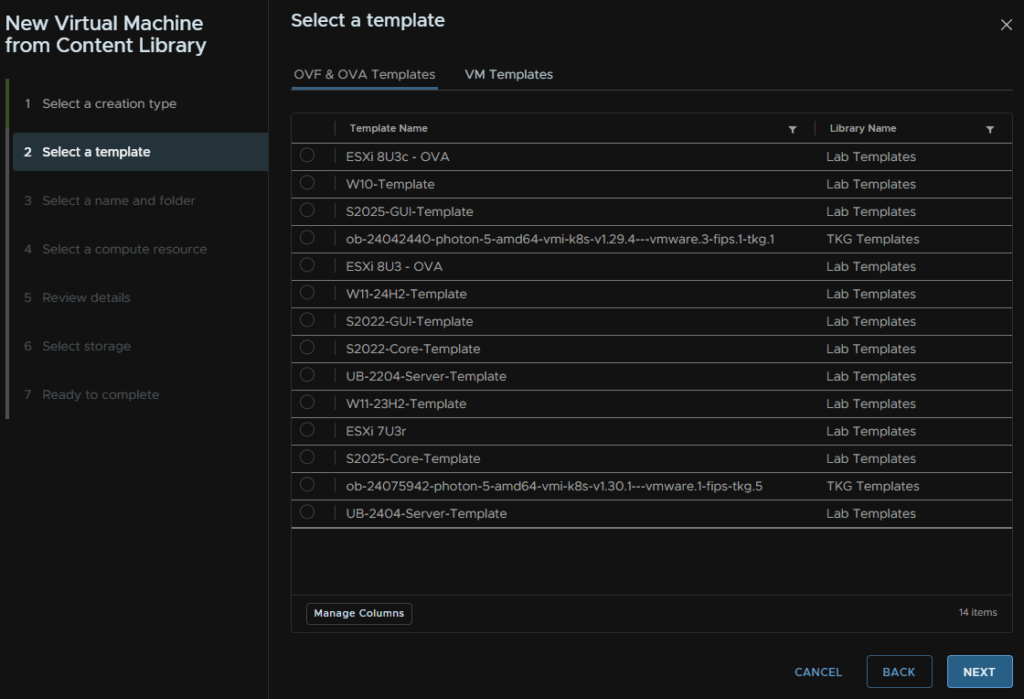
I am going to click into the last one with VKR in the name, ob-25338025-photon-5-amd64-v1.35.2—vmware.1-vkr.3, I do recommend Photon OS as they are significantly smaller VMs
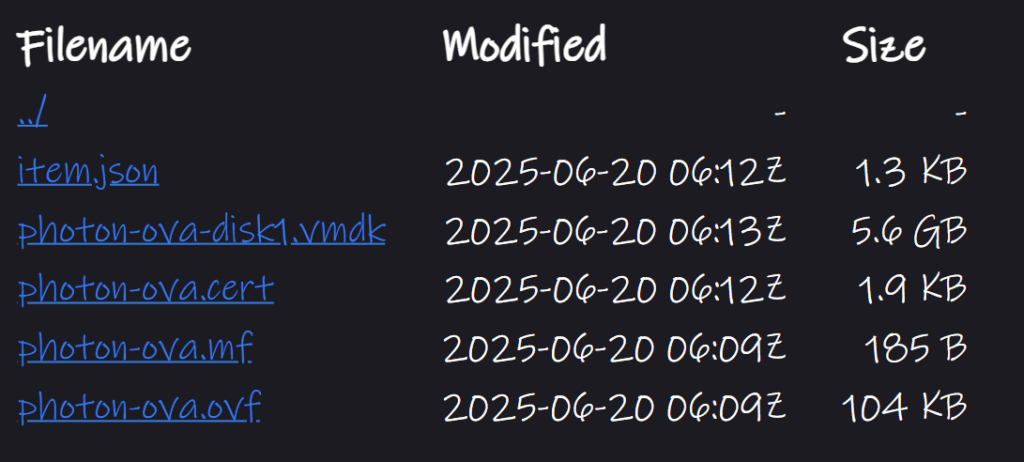
And I will create a local folder with the same name to download the files to

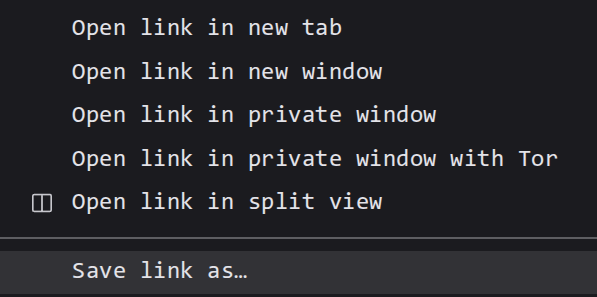
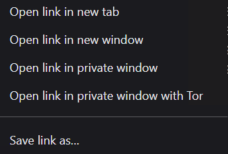
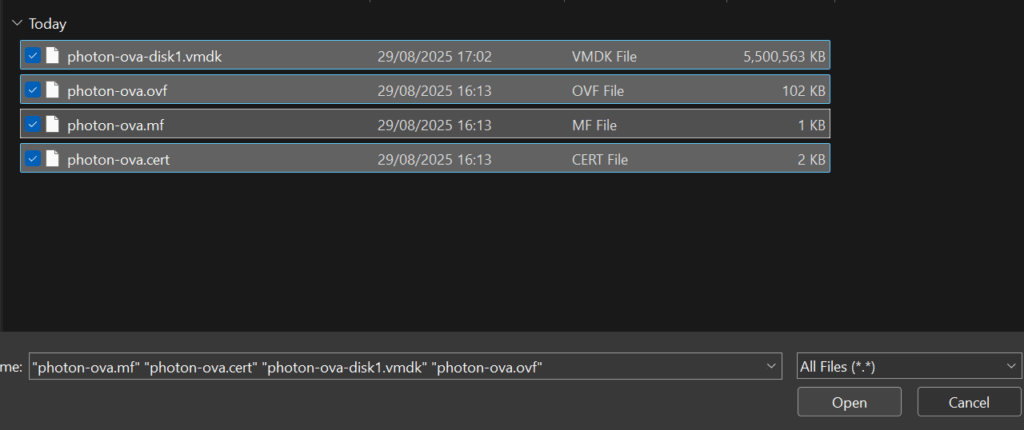
Right click all the files, except the item.json, and click Save Link As
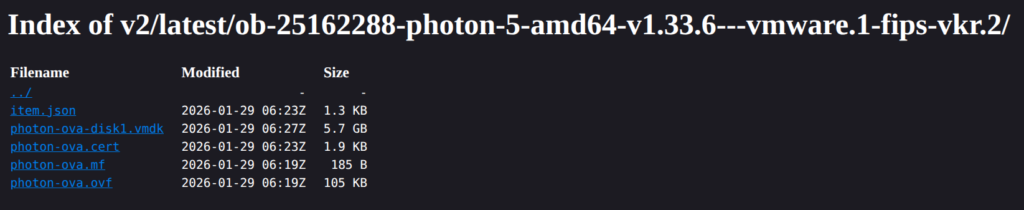
Some older images may look like this
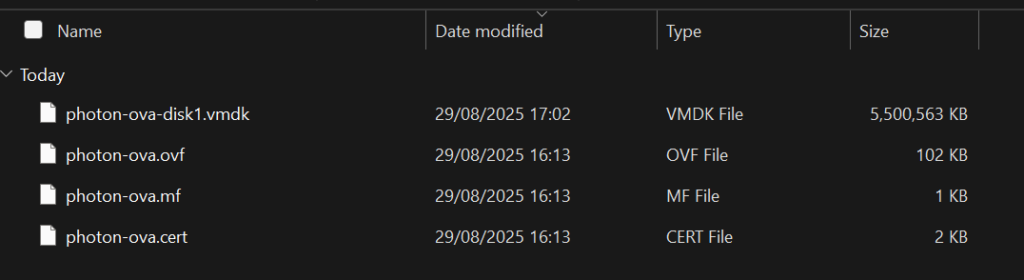
And save it to the folder we just created, matching the release name
Once you have everything, it should look like this
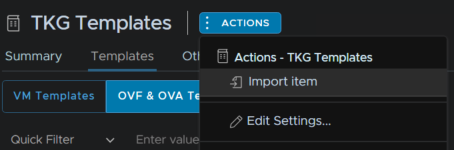
Back in vSphere, we need to select the content library
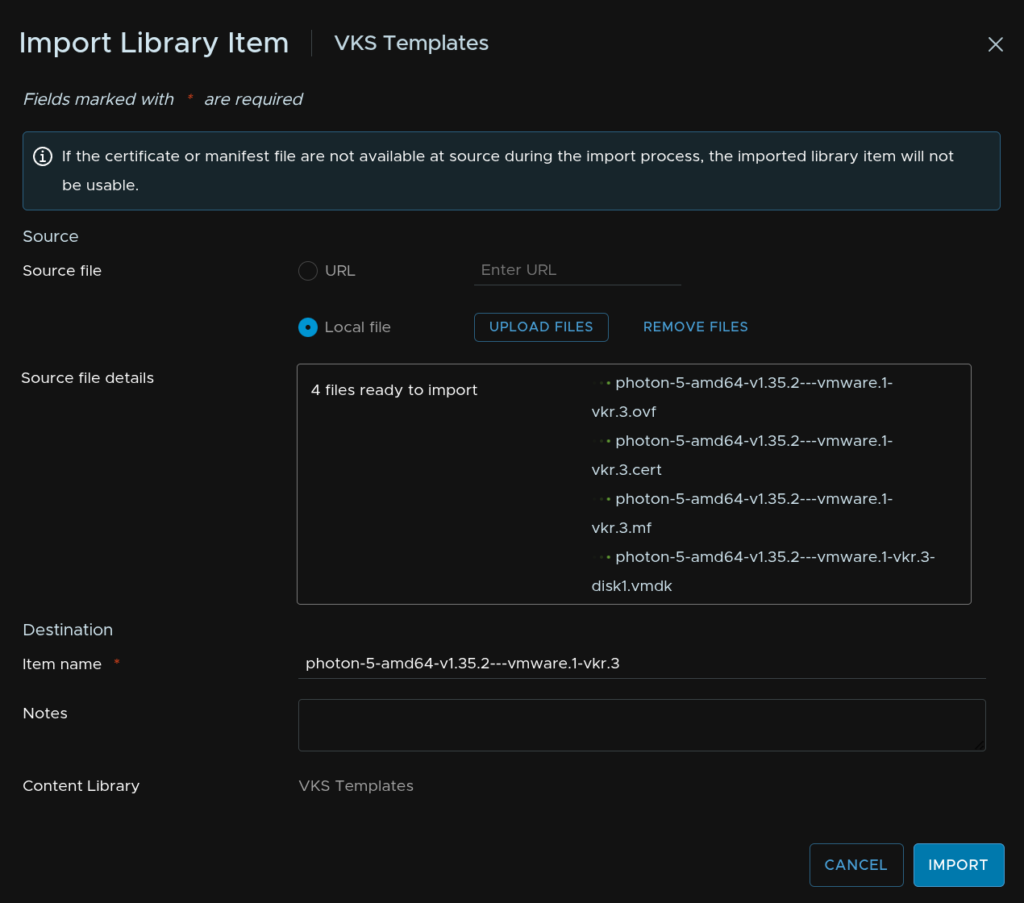
In vSphere, head to the content library and click Actions/Import Item
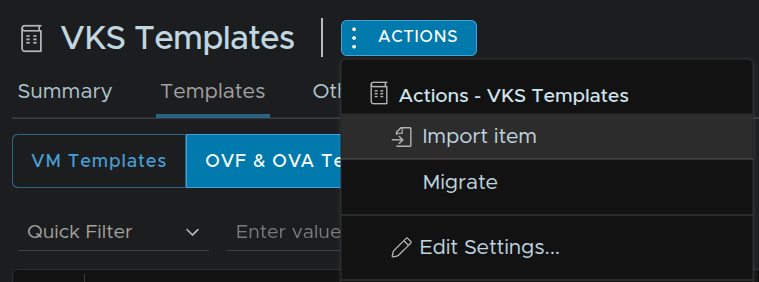
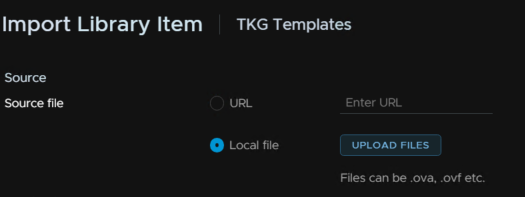
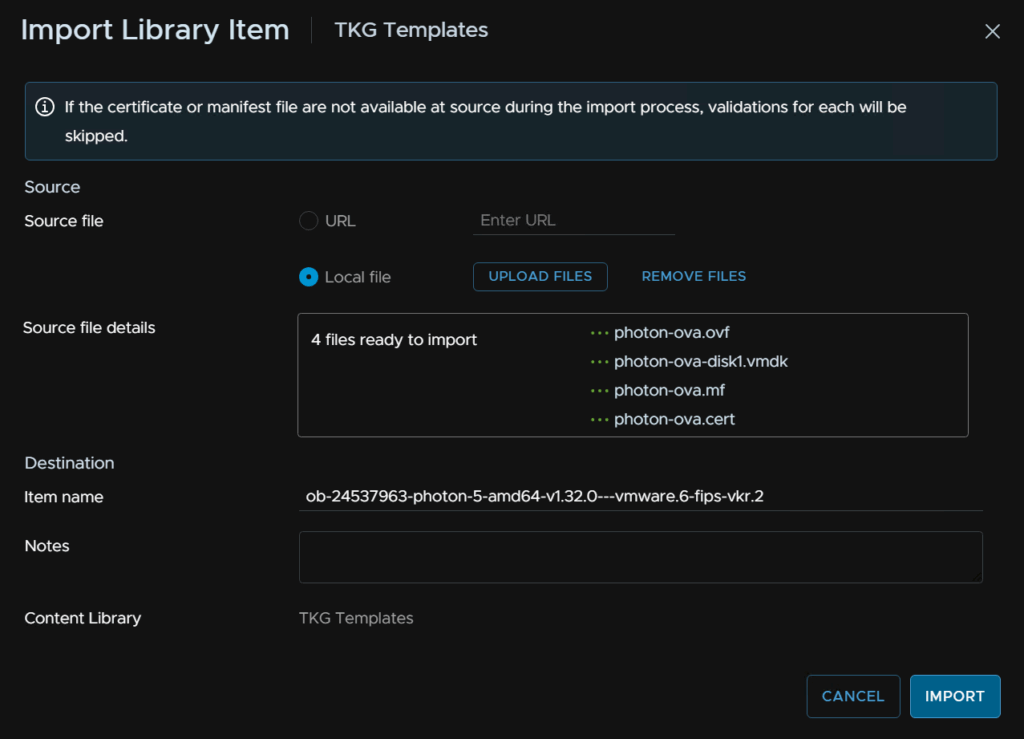
Select Local File, and click Upload Files
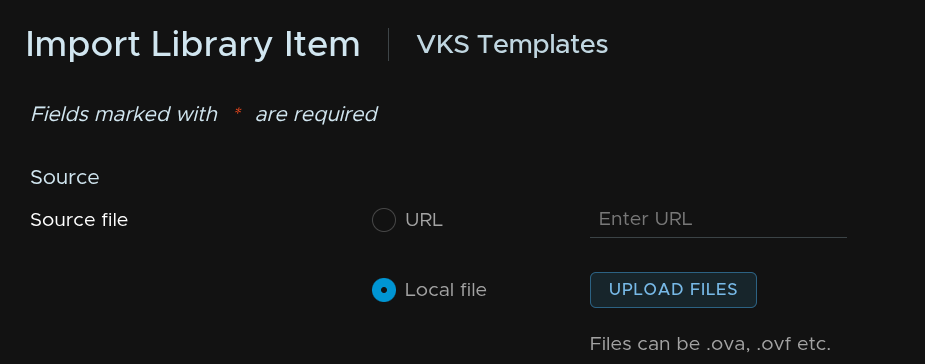
Select all four of the files in a folder from our earlier downloads and click Open
Make sure the name matches exactly whats on the website repository for this, and click Import
Then repeat for any remaining downloaded images
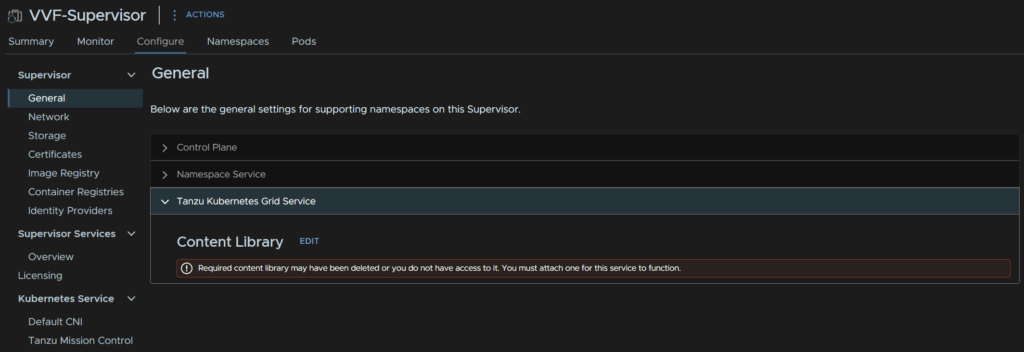
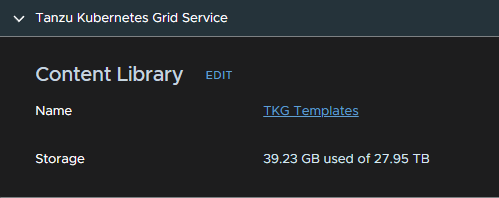
Once they have all been uploaded, we need to set the VKS default repository back up on the supervisor, as that was using the remove content library we removed
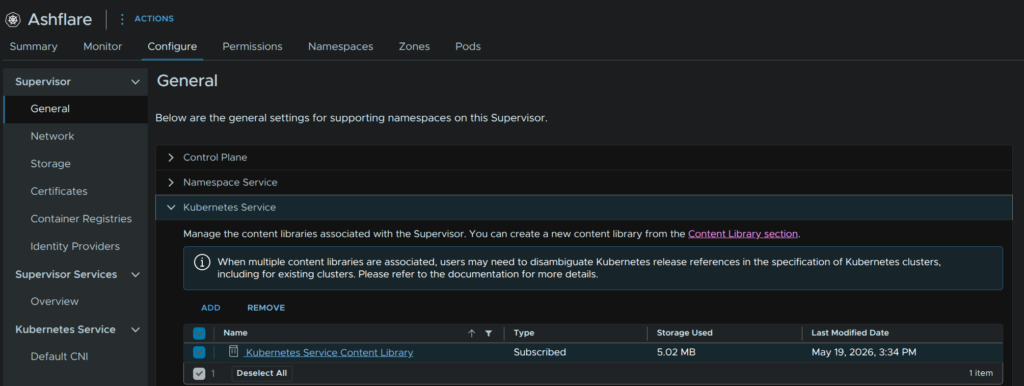
Click the three lines in the top left of vSphere and click Supervisor Management

Click the Supervisors tab, then click your supervisor, in my case, Ashflare

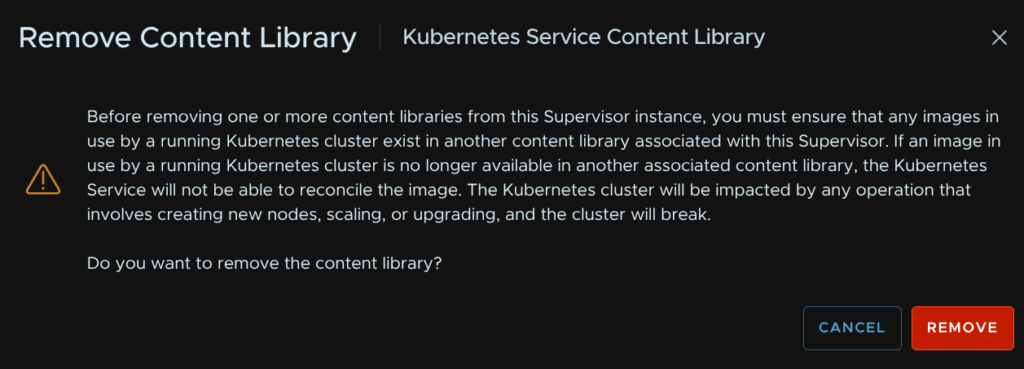
Before proceeding its important this is done before any VKS clusters are provisioned, if you do have some, ensure the images used in all cluster deployments are present in the new content library else it will break them
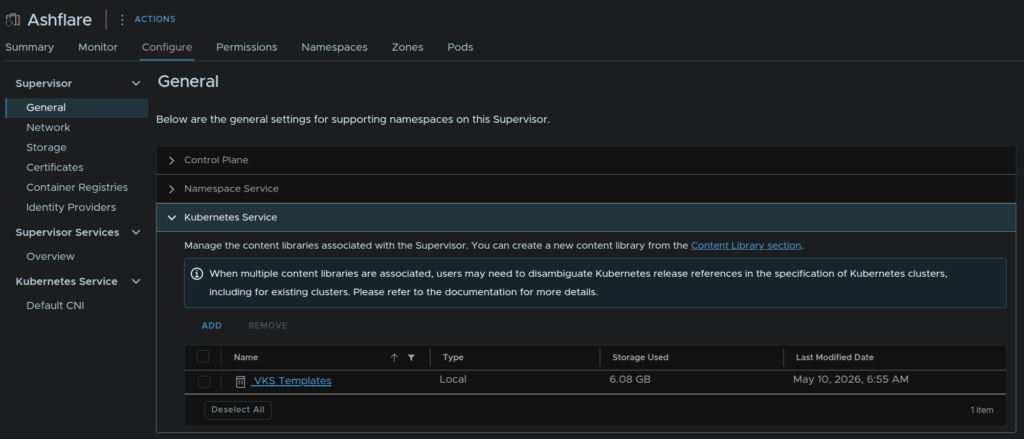
Head to Configure/Supervisor/General then expand Kubernetes Service, check the box for the old content library and click Remove
Then click Remove
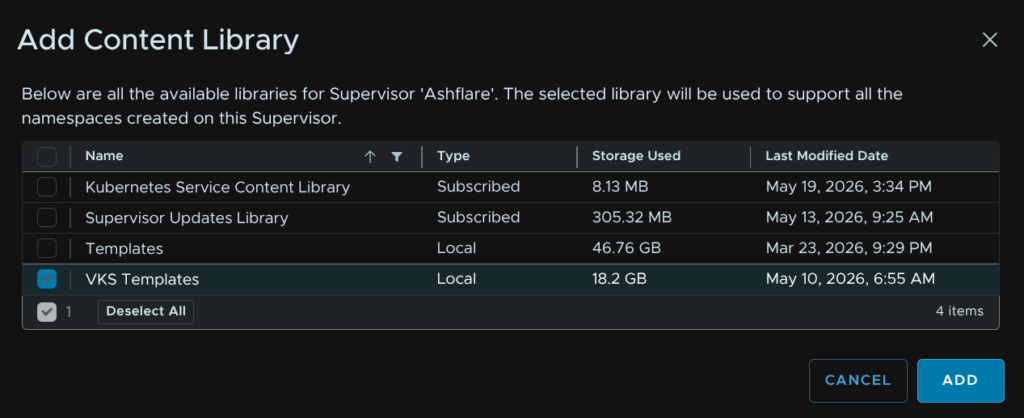
Once thats removed, it’ll take a few mins, click Add
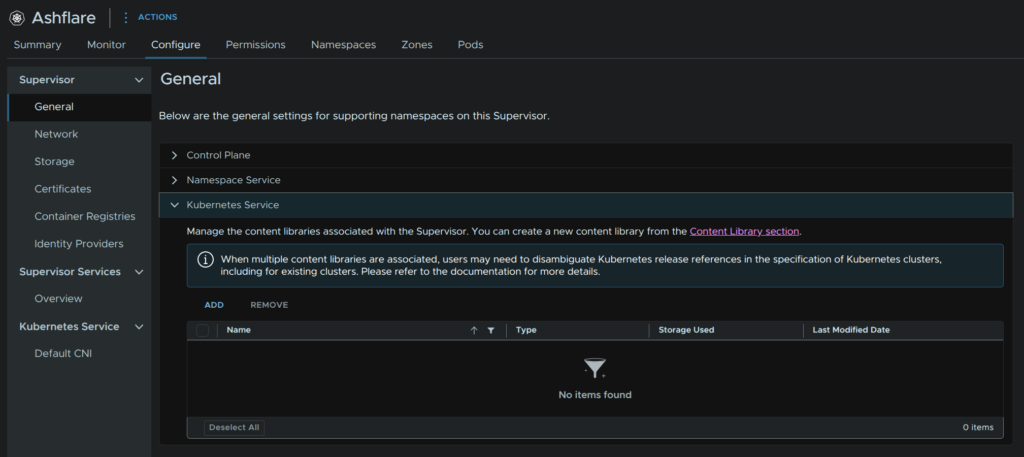
Select our custom VKS Templates content library and click Add
We should then see the library after a refresh
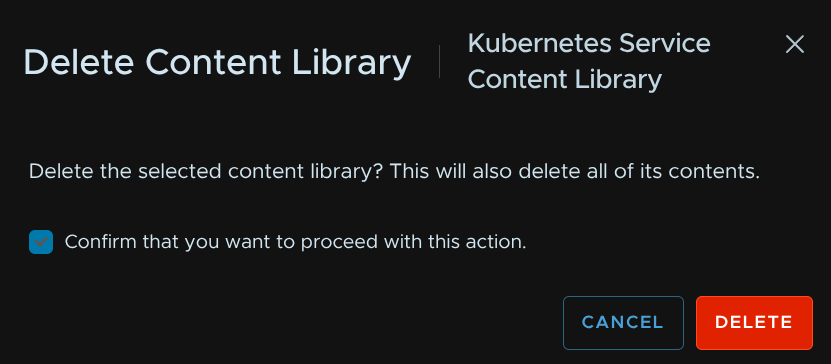
Click the three lines in the top left of vSphere and click Content Libraries

Click into the Kubernetes Service Content Library
Then click Delete from Library
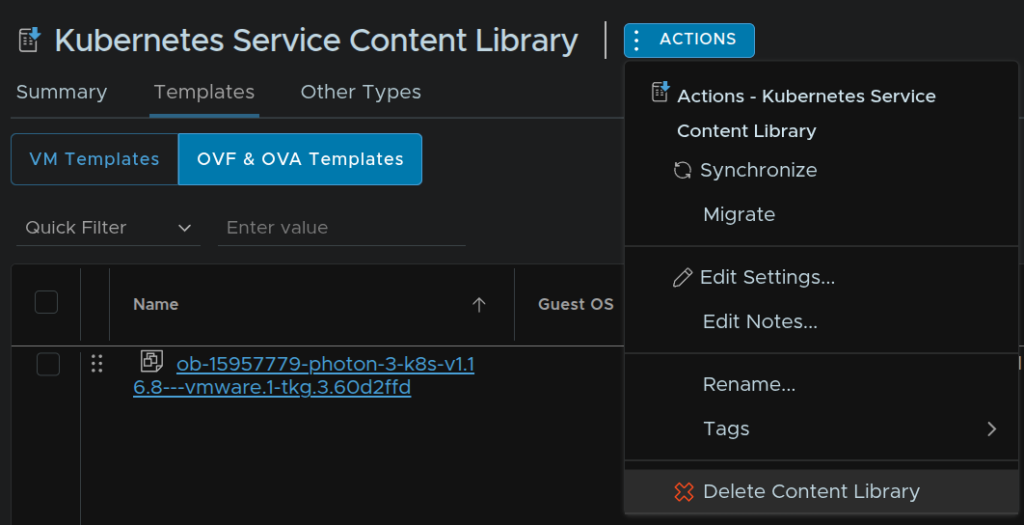
Check the box to confirm and click Delete
If you ever need to put the old content library back, you can create a subscribed one with the same name, ensuring you dont select the option to download content immediately, and use this link for the URL
1.6 – Accessing The CLI For The Supervisor
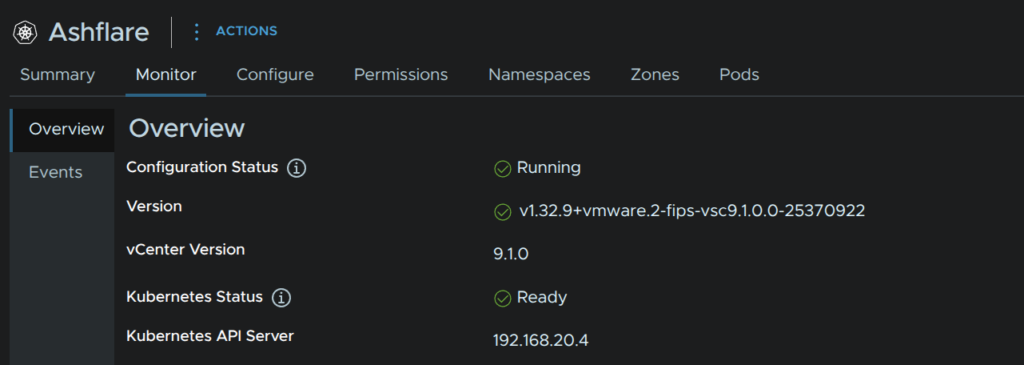
We’ll need the IP of the API service, to get this, in vSphere click the three lines in the top left and click Supervisor Management

Click the Supervisors tab and click our Supervisor, in my case, Rigel

Click Monitor/Overview, here we can see the API server, you may want to bind an FQDN to this which I will be doing, this must be the FQDN supplied during the deployment of the Supervisor if you filled in an FQDN
We need to install the VCF CLI, on Ubuntu we can do this by running the following
sudo apt update
sudo apt install -y ca-certificates curl gpg
sudo mkdir -p /etc/apt/keyrings
sudo curl -fsSL https://packages.broadcom.com/artifactory/vcfcli-debian/tools/keys/BROADCOM-PACKAGING-GPG-RSA-KEY.pub; curl -fsSL https://packages.broadcom.com/artifactory/api/security/keypair/PackagesKey/public | sudo gpg --dearmor -o /etc/apt/keyrings/vcf-archive-keyring.gpg
sudo echo "deb [signed-by=/etc/apt/keyrings/vcf-archive-keyring.gpg] https://packages.broadcom.com/artifactory/vcfcli-debian noble main"| sudo tee /etc/apt/sources.list.d/vcf.list
sudo apt update
sudo apt install -y vcf-cli
For other other operating systems there is more info here
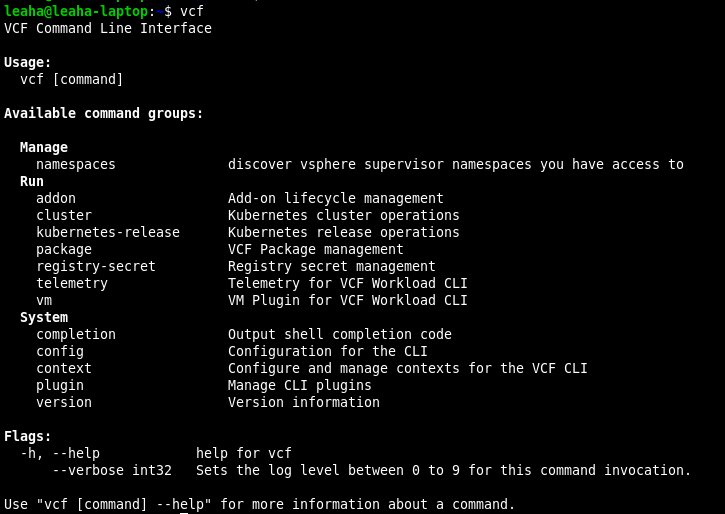
If we now run
vcfWe can see thats working
Lets login to our supervisor with
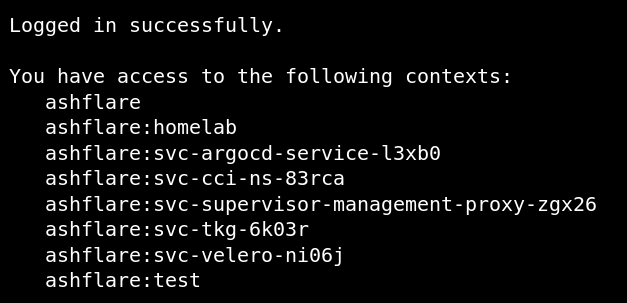
vcf context create --endpoint <supervisor-api> --username <vsphere-username> --type k8s --insecure-skip-tls-verifyI ran the following
vcf context create --endpoint ashflare.leaha.co.uk --username [email protected] --insecure-skip-tls-verify --type k8sYou may see plugins get refreshed/updates/installed, this is expected
Give the context a name, this does need to be unique, but this is also just a name, I used the same as my Supervisor, you can use what ever you like

Provide your vSphere account password and you will be logged in and you can see the contexts you have access to
If you need to check again, you can run
vcf context list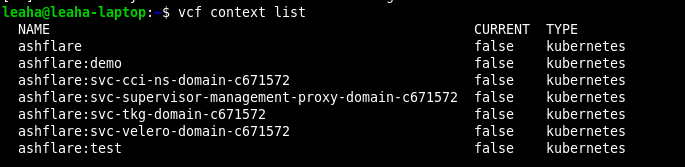
Lets create a folder in our documents, or where ever you like, for k8s files
mkdir ~/k8sThe lets hop into it with
cd ~/k8sNow, we can access our vSphere namespace, mine was k8s-blog-demo, with
vcf context use <context-name>:<namespace>For me, I ran
vcf context use ashflare:testThis may install plugins if needed

Now we have our namespace selected we need kubectl commands, which the VCF CLI doesnt have by default
We can install this manually for your operating system, but I’ll walk you through Ubuntu/Debian based systems
Information for all operating systems can be found here
We can do this in a single line with snap by running
sudo snap install kubectl --classicWe can now see our contexts using kubectl with
kubectl config get-contexts
Now all we have is the vSphere namespace, this doesnt show us our actual clusters, and there is a reason I started here
This is because with VKS in vSphere we have two main options for deploying pods, the first is a little more classic, we can deploy them in our VKS cluster like you expect, the other, is directly in the vSphere namespace in vSphere pods, this requires NSX networking, and here, our ESX hosts function as the worker nodes, so no VKS cluster is required, however, backing up PVCs isnt really possible
In addition to this, VKS clusters are deployed into the vSphere namespace, so if you want to instead manage your VKS cluster with kubectl and yaml files, you can do this here too
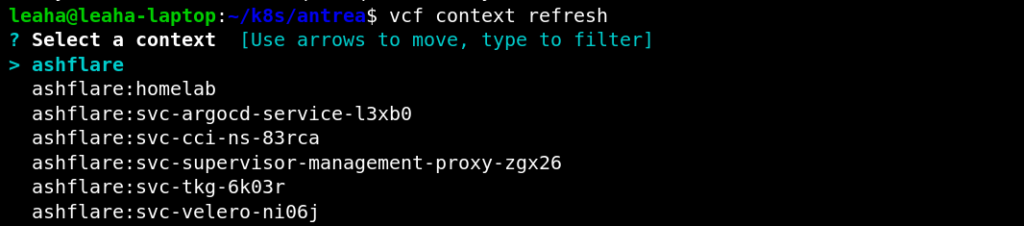
If you get logged out and the token expires, you can run the following to re authenticate
vcf context refreshThen use the selector to select the context, this scrolls down
1.7 – Setting Up The NSX vDefend Antrea Integration
It seems that the addon is required with VKS 3.4 or higher, and with VKR 1.34 or higher
The plugin is needed for VKR 1.33 or lower, VKS 3.6 doesnt seem to change this
After some testing on VKS 3.6 and VKR 1.35 the addon works as expected, but with VKS 3.6 on VKR 1.33 the addon didnt work and the plugin was required
I have not tested how this works when running a VKS 1.33 cluster with the plugin, and upgrading VKR to 1.35 and how that works with probably migrating to the Addon, given the addon is an addon and they follow a desired state it should be able to be applied post upgrade and it will be reconsiled into the cluster
1.7.1 – Antrea Addon
If you want to use vDefend we need the VKS cluster to appear within the NSX Inventory, but to do this the NSX Antrea addon will need enabling, this is meant for VKR 1.34 and newer
To do this, a config yaml file needs creating within the vSphere namespace
The general config is this
apiVersion: addons.kubernetes.vmware.com/v1alpha1
kind: AddonConfig
metadata:
name: <vks-cluster-name>-antrea # Addon name, should be <k8s-cluster>-antrea
namespace: <vsphere-namespace> # vSphere namespace containing the VKS cluster
annotations:
clusteraddon.addons.kubernetes.vmware.com/owned-for-deletion: "true" # Ensures when the VKS cluster is removed, this config is also cleaned up
spec:
values:
antreaNSX:
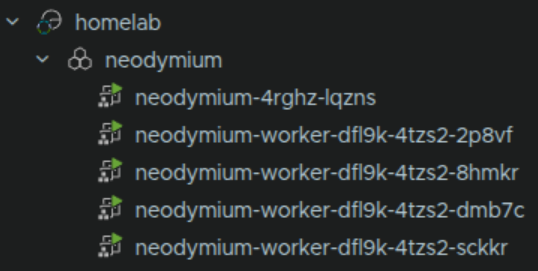
enable: true # Enables the Antrea NSX AdapterLets take my vSphere namespace called homelab, and my VKS cluster, neodymium, I have the following config file
apiVersion: addons.kubernetes.vmware.com/v1alpha1
kind: AddonConfig
metadata:
  name: neodymium-antrea # Addon name, should be <k8s-cluster>-antrea
  namespace: homelab # vSphere namespace containing the VKS cluster
  annotations:
    clusteraddon.addons.kubernetes.vmware.com/owned-for-deletion: "true" # Ensures when the VKS cluster is removed, this config is also cleaned up
spec:
  values:
    antreaNSX:
      enable: true # Enables the Antrea NSX Adapter
We will want to ensure, from the previous section, we have a VCF context created to the supervisor, which should mean our namespace, test in my case, is available
Switch to it with
kubectl config use-context ashflare:homelabThen apply the YAML
kubectl apply -f antrea-neodymium.yaml1.7.2 – Antrea Plugin
If you want to use vDefend we need the VKS cluster to appear within the NSX Inventory, but to do this the NSX Antrea adapter will need enabling, this is meant for older VKR releases, 1.33 and older
To do this, a config yaml file needs creating within the vSphere namespace
The general config is this
apiVersion: cni.tanzu.vmware.com/v1alpha1
kind: AntreaConfig
metadata:
 name: <vks-cluster-name>-antrea-package # Addon name, should be <k8s-cluster>-antrea-package
 namespace: <vsphere-namespace> # vSphere namespace containing the VKS cluster
spec:
  antrea:
    config:
      featureGates:
        AntreaTraceflow: true # Facilitates network troubleshooting and visibility (Optional)
        AntreaPolicy: true # Enables advanced policy capabilities in Antrea (Required)
        NetworkPolicyStats: true # Provides visibility into the enforcement of network policies (Optional)
  antreaNSX:
    enable: true # This is the Antrea-NSX adapter which is disabled by default
Lets take my vSphere namespace called homelab, and my VKS cluster, neodymium, I have the following config file
apiVersion: cni.tanzu.vmware.com/v1alpha1
kind: AntreaConfig
metadata:
 name: neodymium-antrea-package # Addon name, should be <k8s-cluster>-antrea-package
 namespace: homelab # vSphere namespace containing the VKS cluster
spec:
  antrea:
    config:
      featureGates:
        AntreaTraceflow: true # Facilitates network troubleshooting and visibility (Optional)
        AntreaPolicy: true # Enables advanced policy capabilities in Antrea (Required)
        NetworkPolicyStats: true # Provides visibility into the enforcement of network policies (Optional)
  antreaNSX:
    enable: true # This is the Antrea-NSX adapter which is disabled by default
We will want to ensure, from the previous section, we have a VCF context created to the supervisor, which should mean our namespace, test in my case, is available
Switch to it with
kubectl config use-context ashflare:homelabThen apply the YAML
kubectl apply -f antrea-neydymium.yaml1.8 – Deploying A Kubernetes Cluster
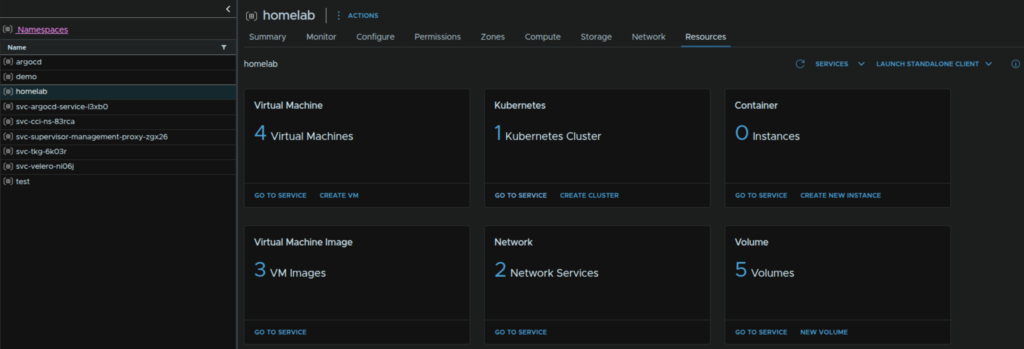
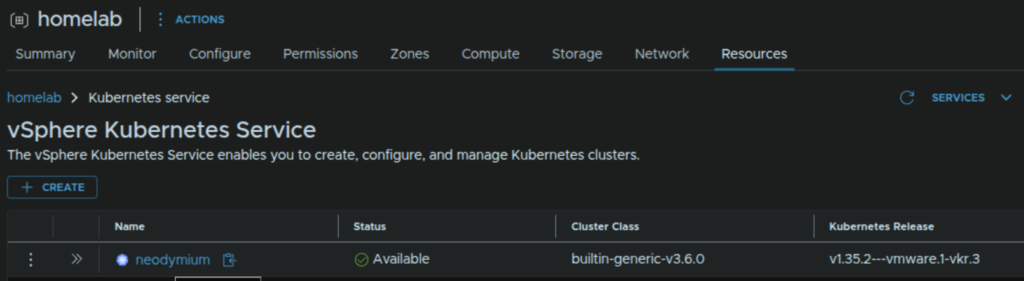
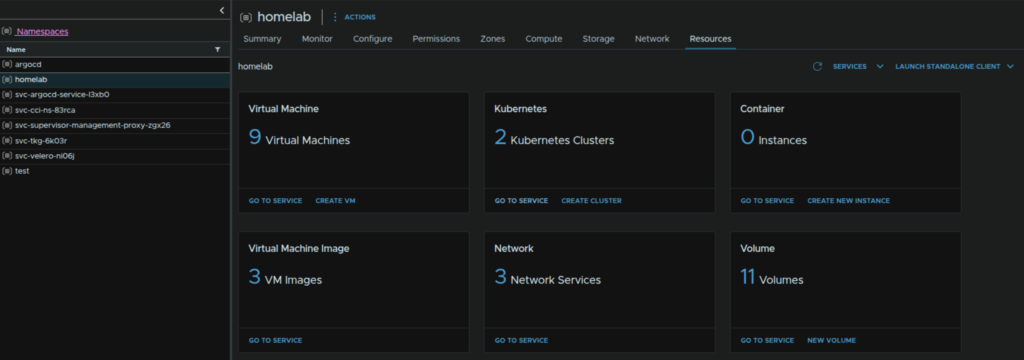
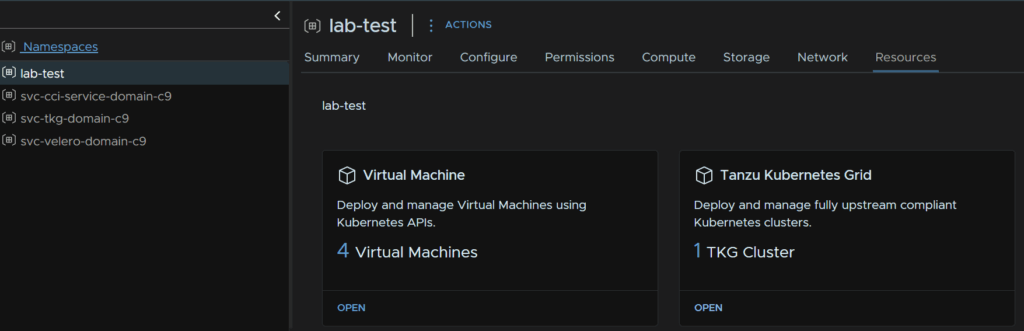
To create the VKS cluster, in vSphere click the three lines in the top left and click Supervisor Management

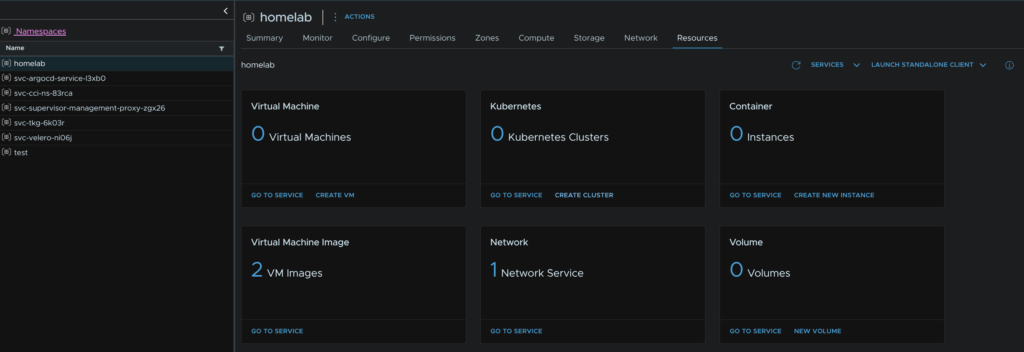
Select your namespace, and click Resources then Create Cluster on the Kubernetes widget
This requires the local consumption interface service, which we covered in the deployment guides
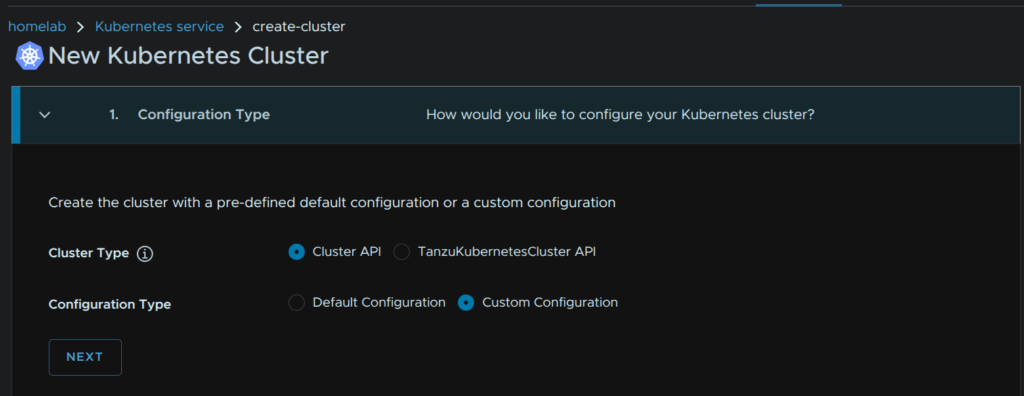
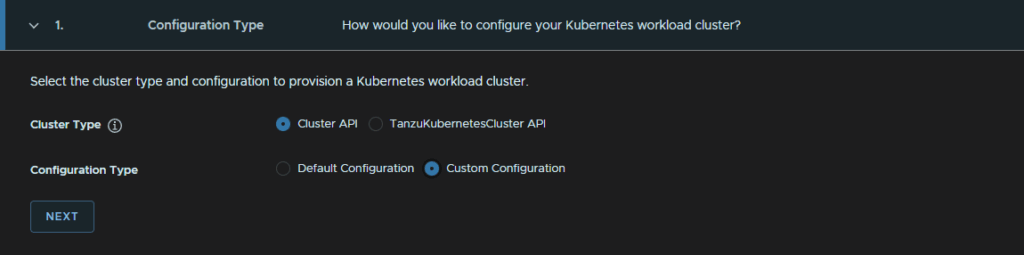
Click Custom Config and then click Next
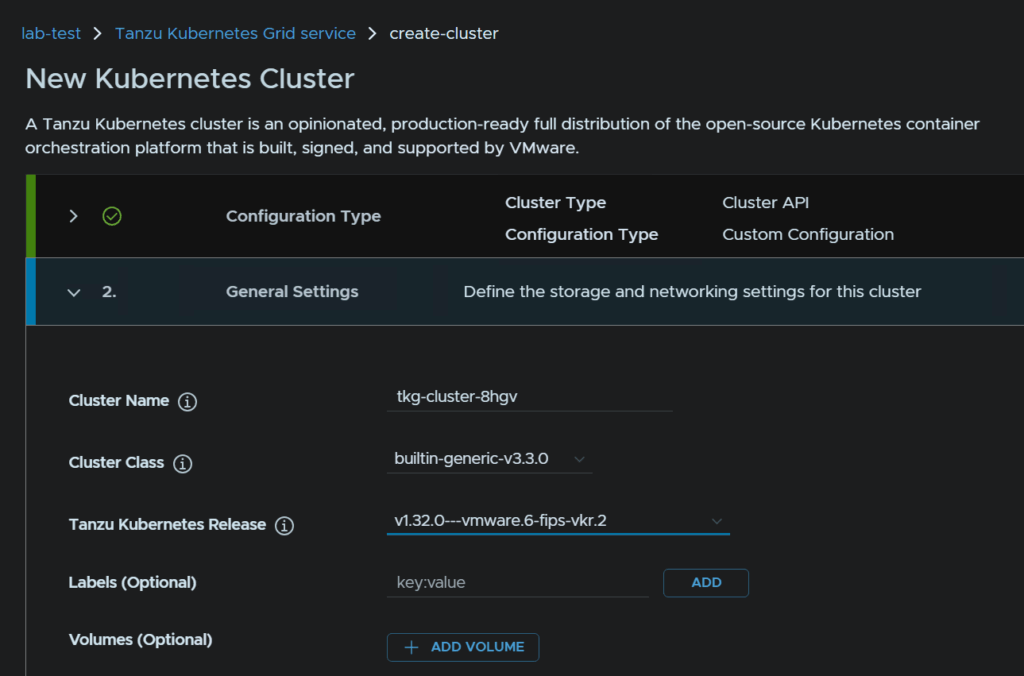
Give it a name that matches the addon yaml, select your K8S release version, and ensure the cluster class is 3.6 or higher
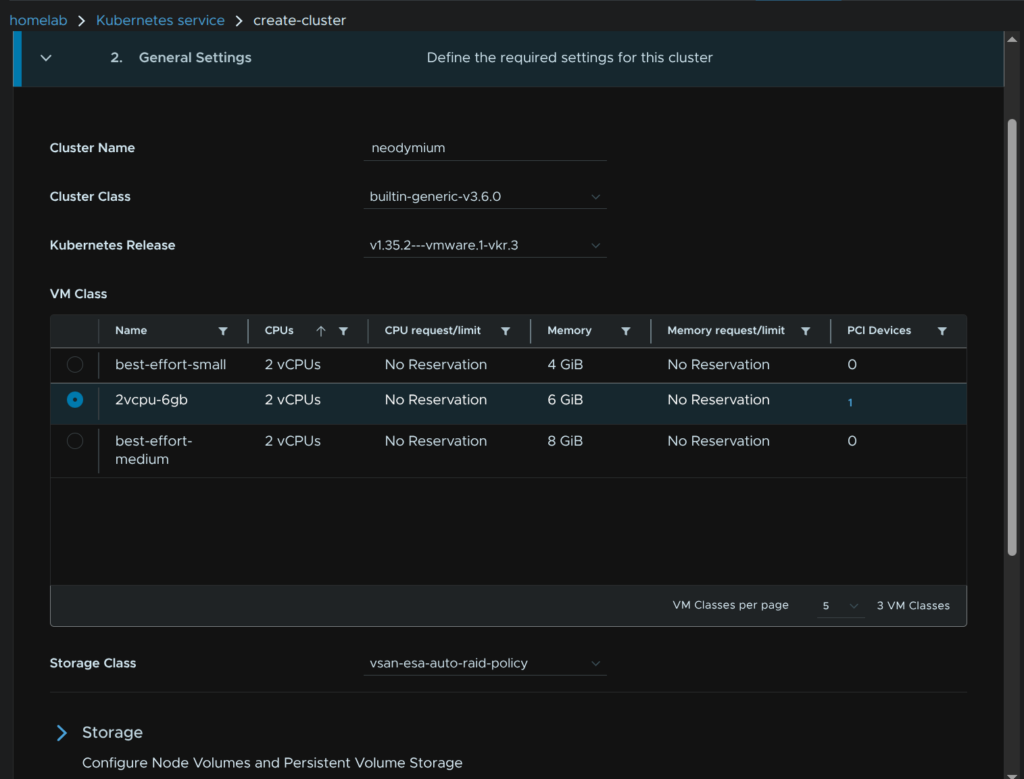
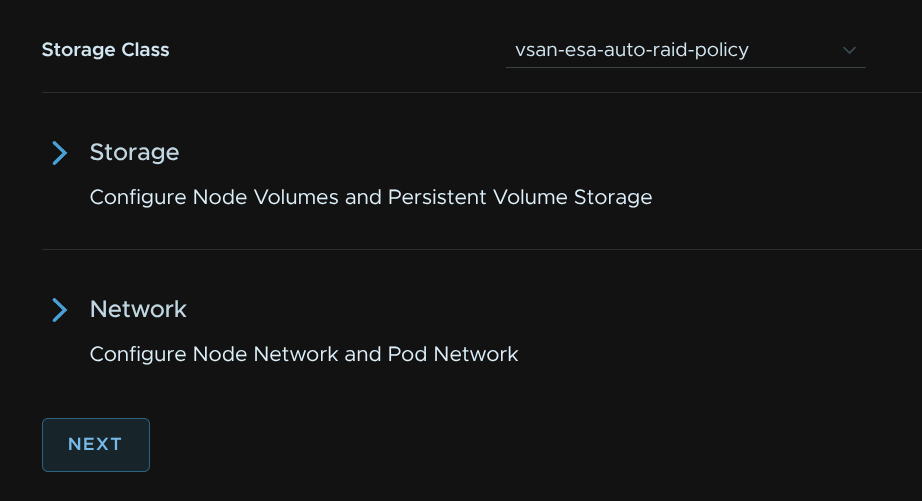
Scroll all the way to the bottom and click Next
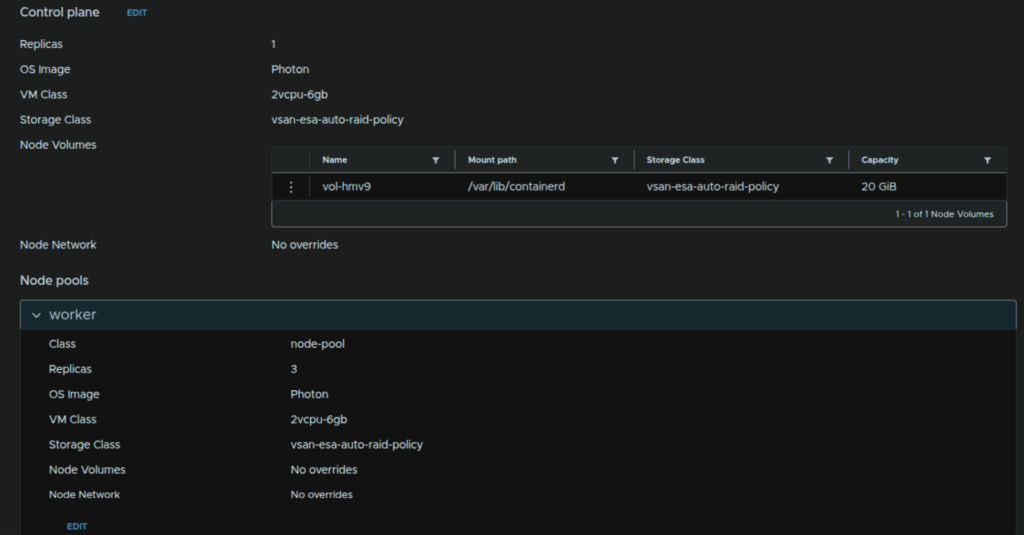
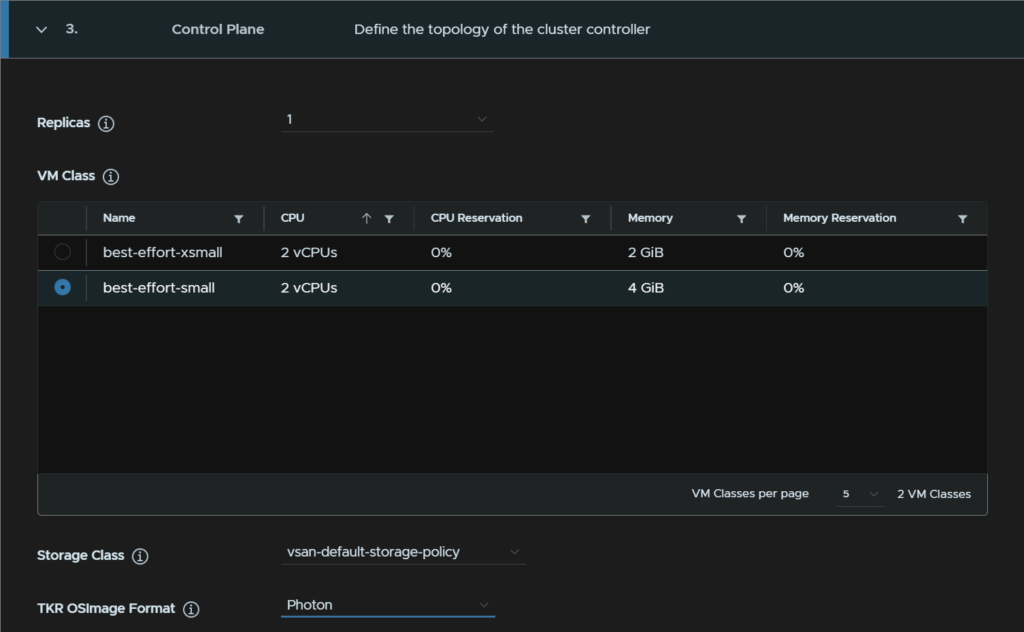
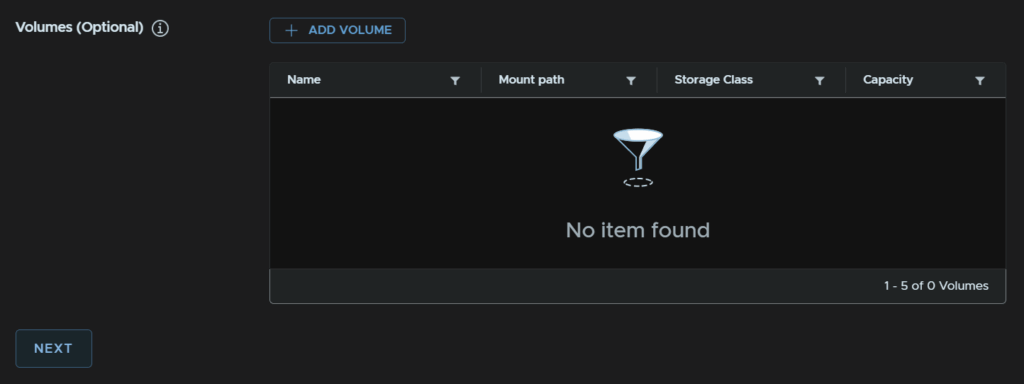
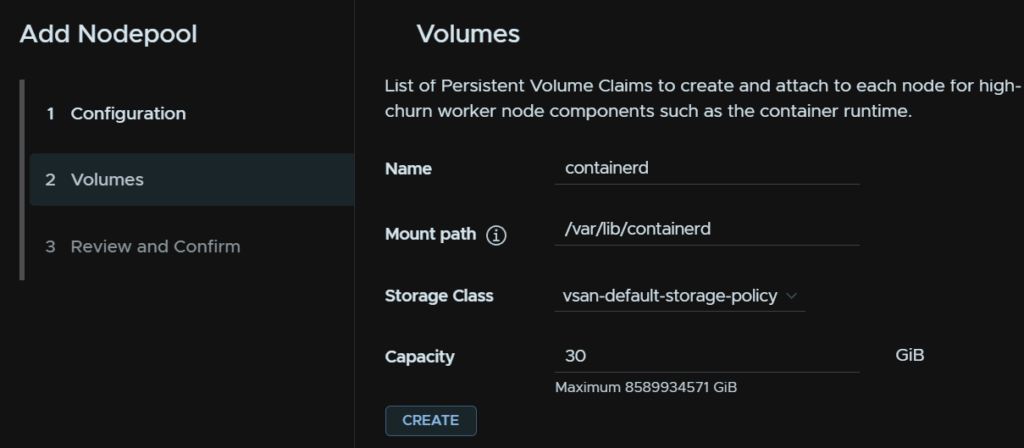
For our control plane, select the number of repliacs, you ideally want three for production workloads, then select the VM Class, Storage Class, and OS Image, I recommend the Photon image as it uses less disk space, then enable the Overrides toggle, optionally you can specify a size just for the control plane VMs
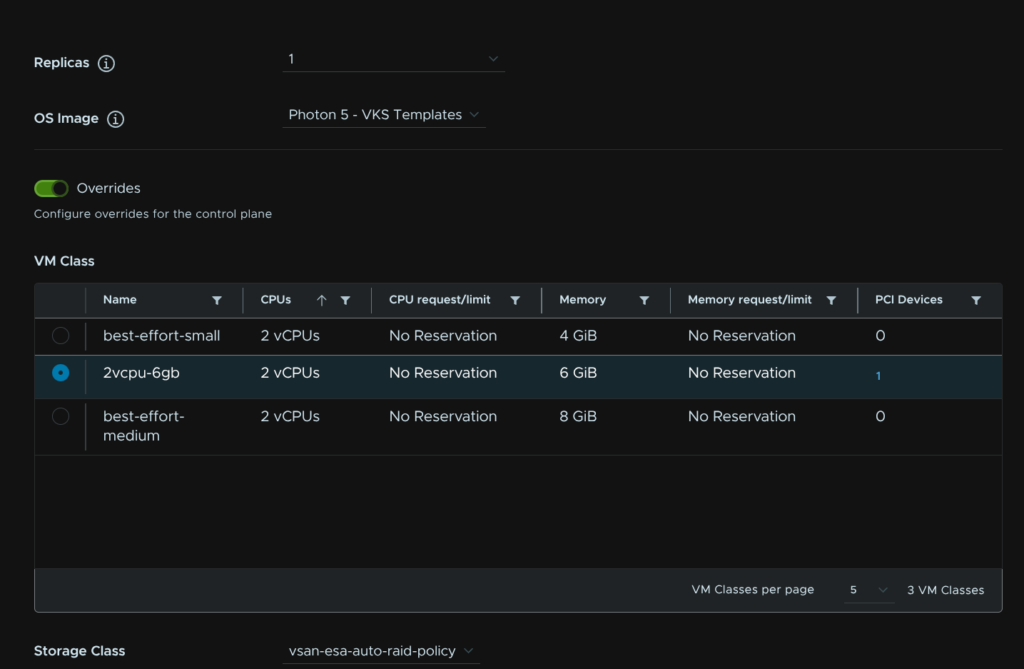
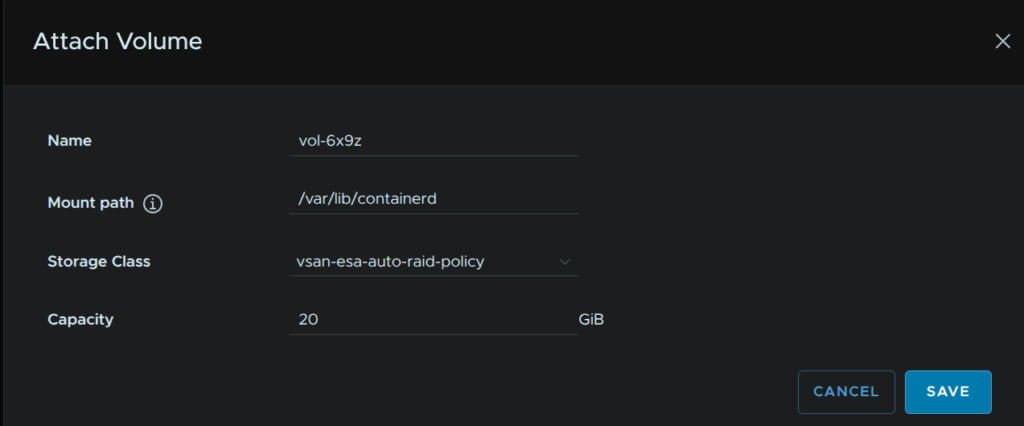
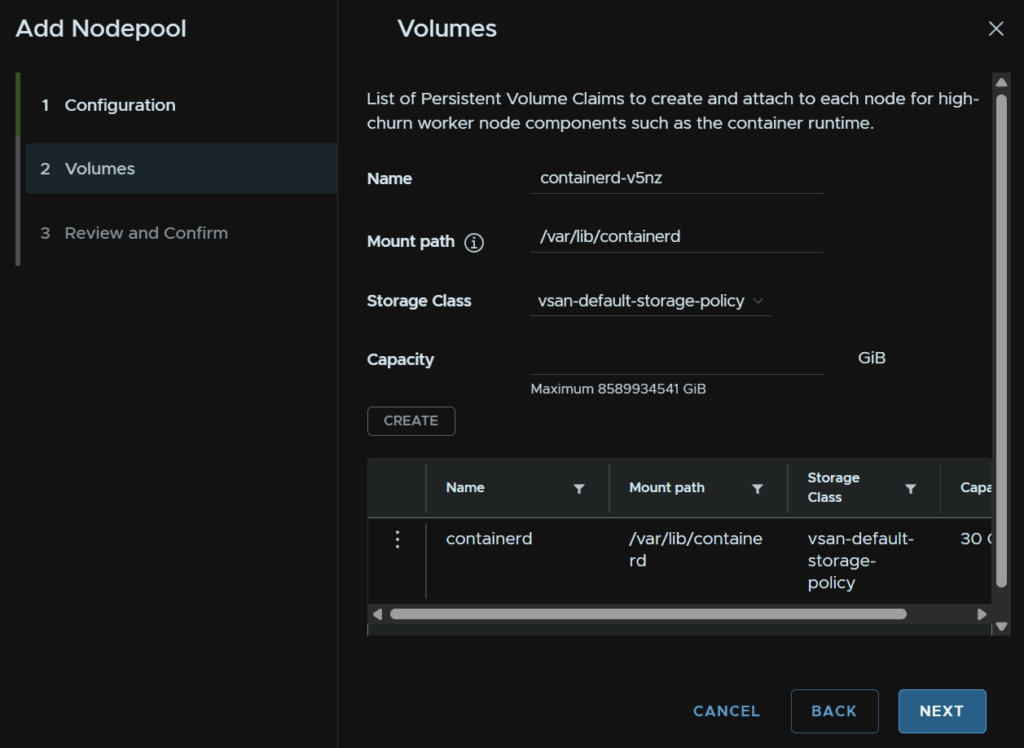
Click click Attach Volume
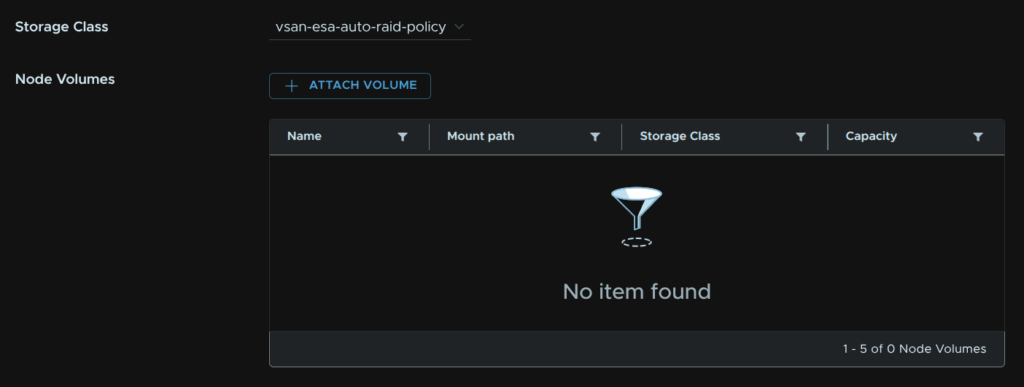
Leave the config on default, if you have a particularly large cluster you may need more than 20GB, then click Save
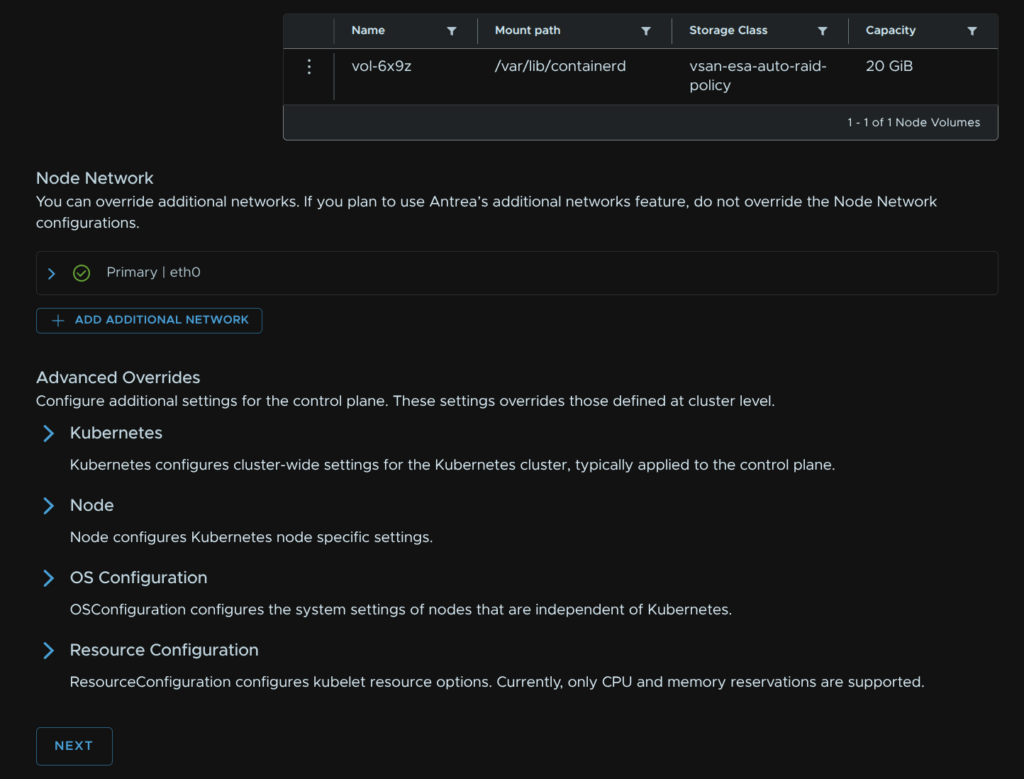
Scroll down to the bottom and click Next
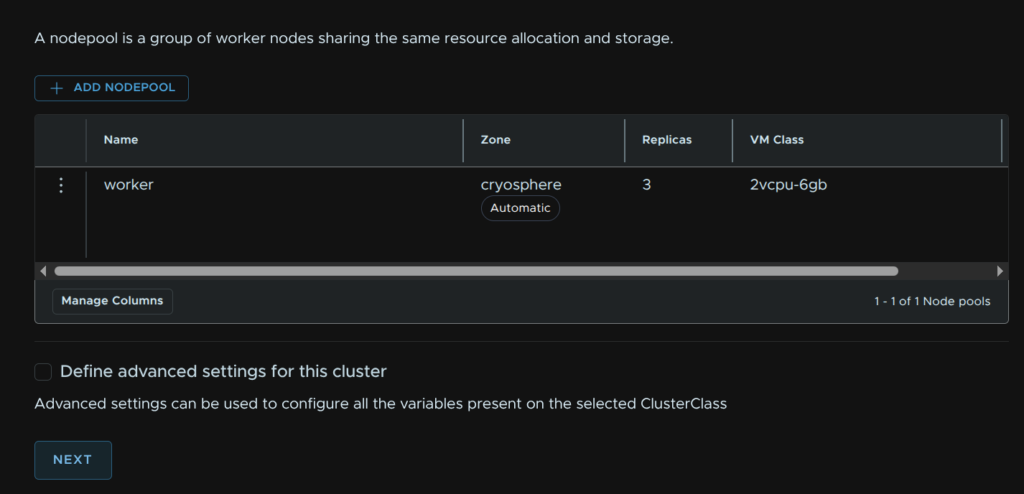
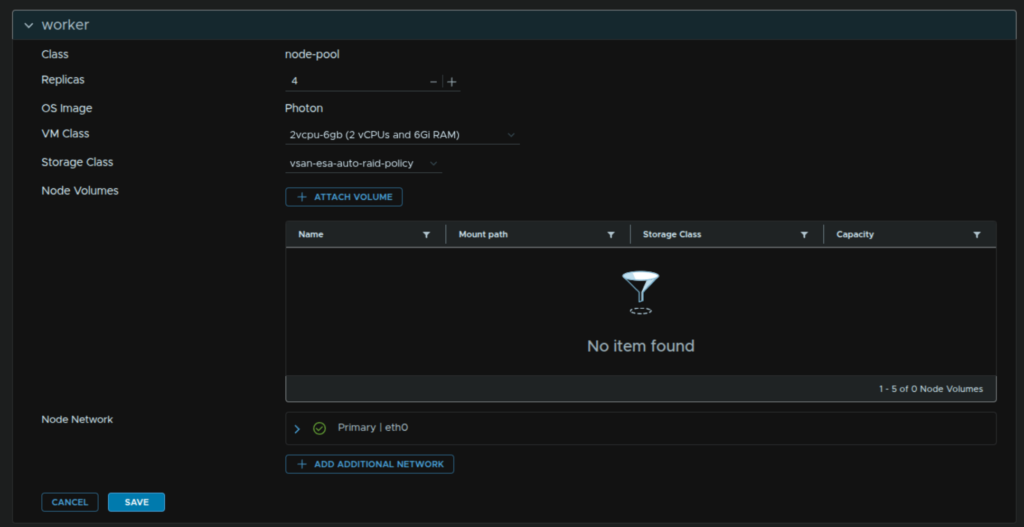
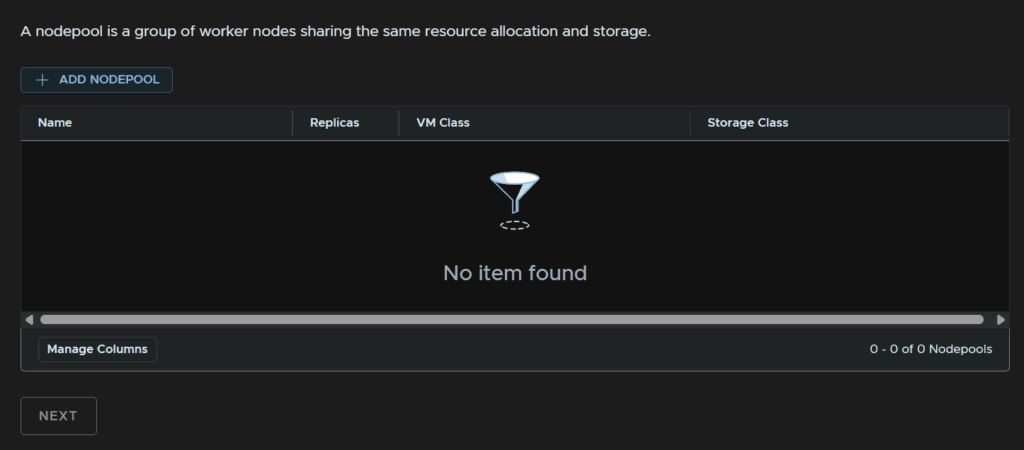
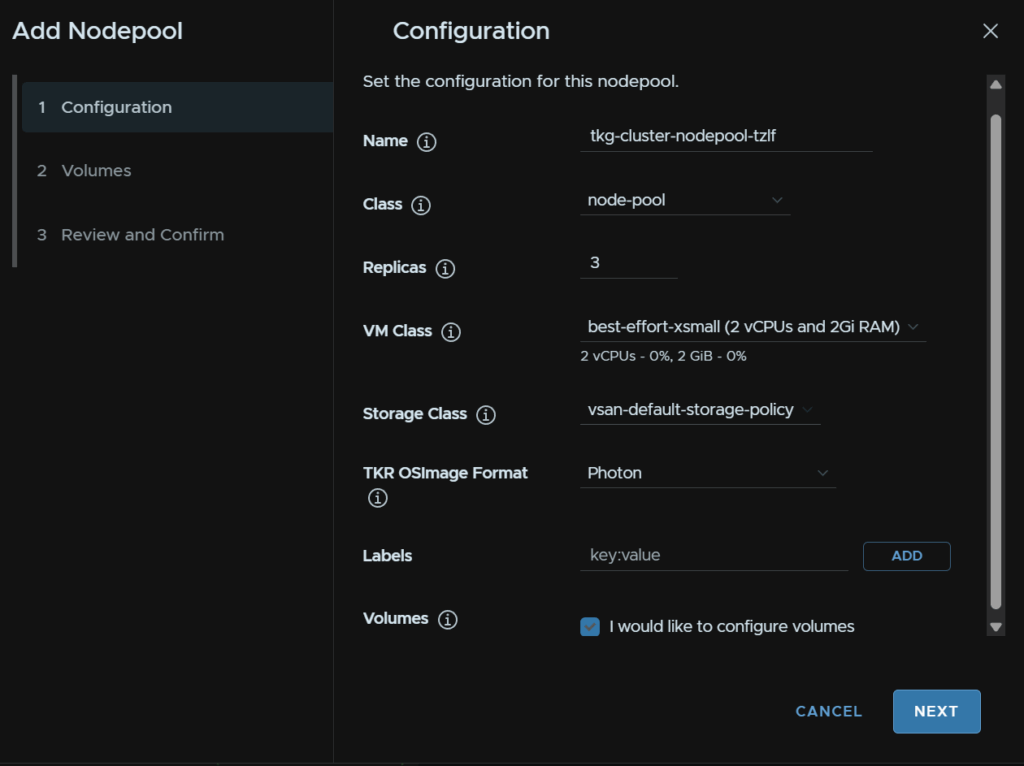
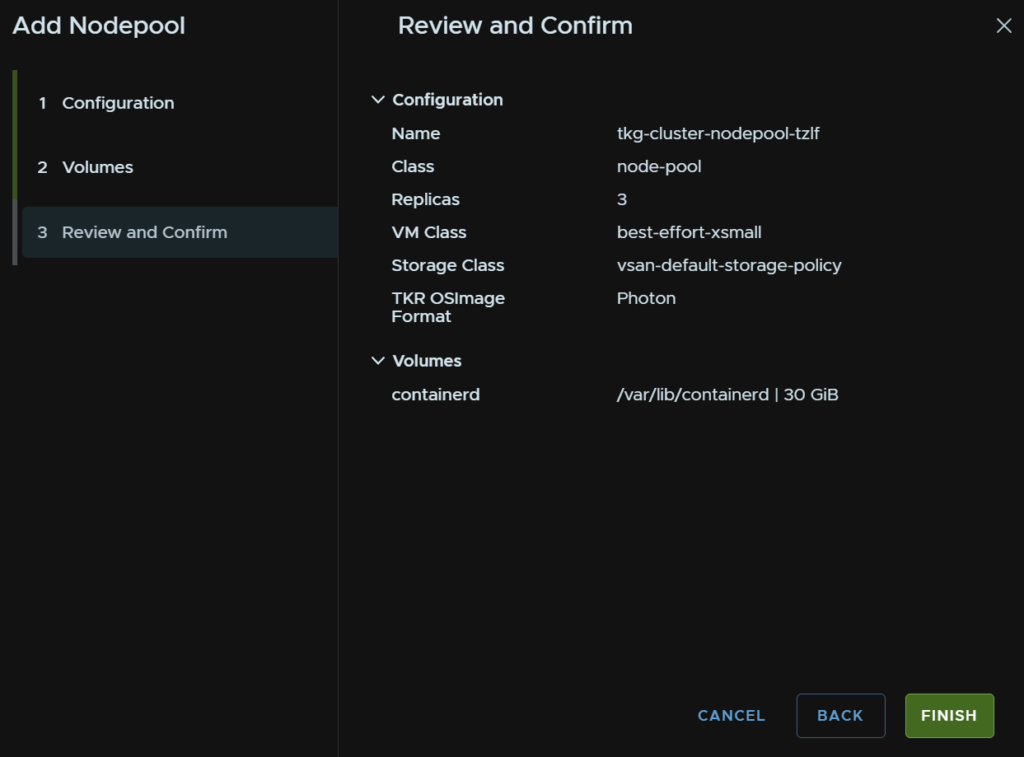
Click the three dots and click Edit for the node pool
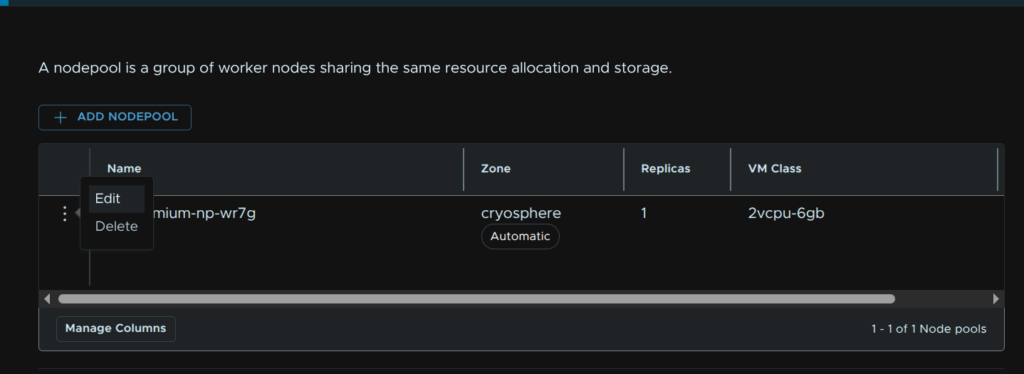
By default the nodepool name is <k8s-cluster-name>-np-<some-string>, Id recommend removing the K8S cluster name here, as it will be at the start of the node pool VMs anyway, and it makes the names very long and repetitive
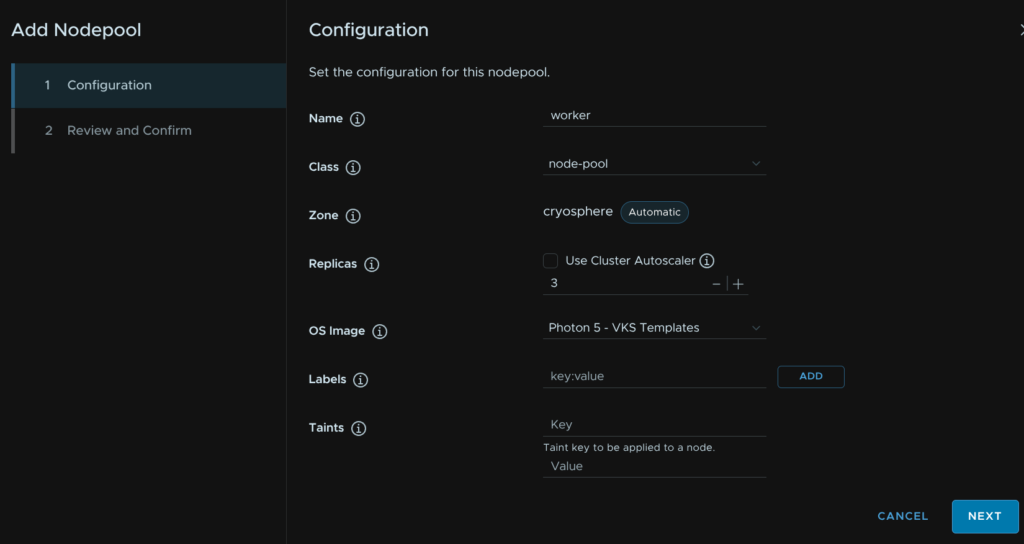
I ended up calling it worker, set your number of replicas, you can also use the auto scaler if needed with a min and max node count, this can be scaled later, the VM Class, Storage Class, and OS Image, optionally you can check the box to add labels if needed, then click Next
There is an option for overrides at the bottom but we generally wont need them
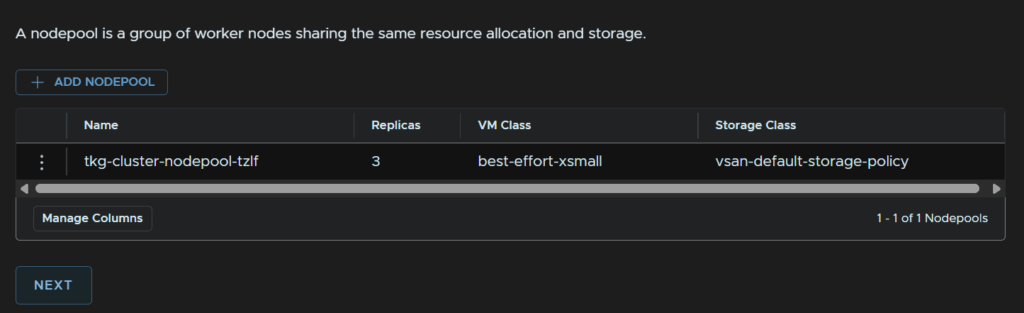
Then click Finish
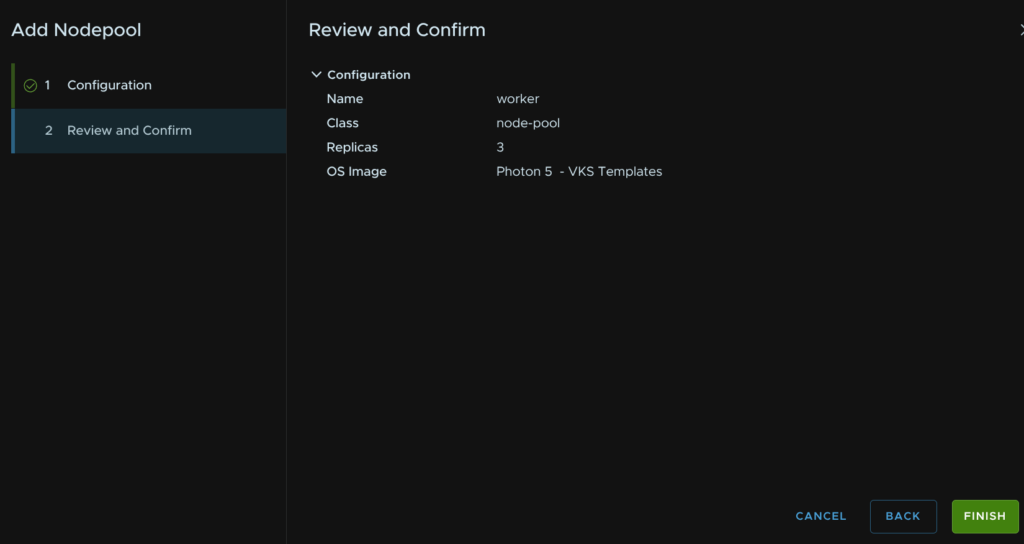
Then click Next
And click Finish
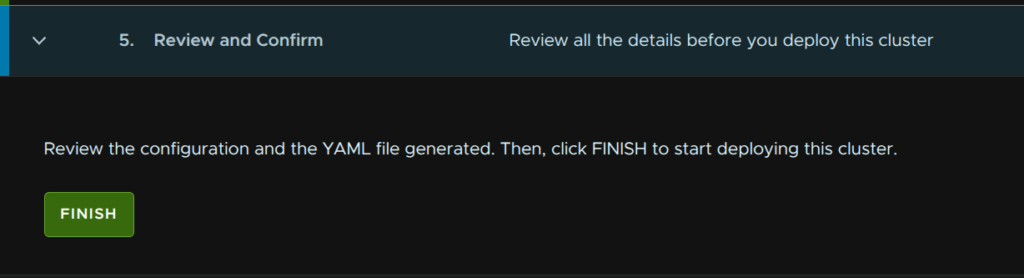
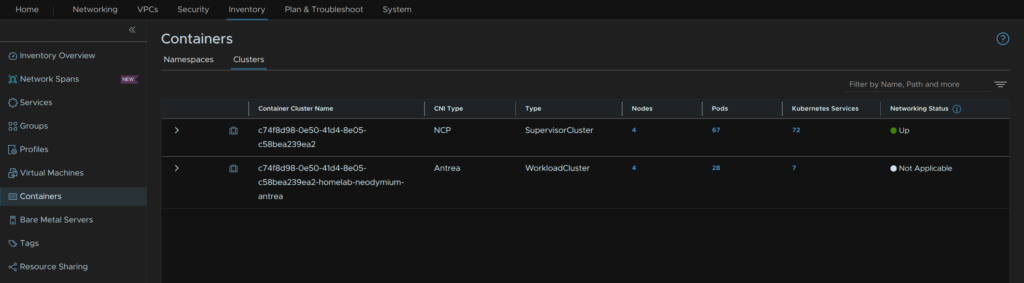
Once thats deployed, if we have this setup with the Andrea addon, in the NSX inventory, we will see the cluster under Inventory/Containers/Clusters
1.9 – Accessing The CLI For VKS Clusters
If we now want to access our K8S cluster, we can create a new context, my cluster I deployed earlier was called k8s-blog-01 in the namespace k8s-blog-demo
Our context file would be
vcf context create --endpoint <supervisor-api> --workload-cluster-name <k8s-cluster> --workload-cluster-namespace <vpshere-namespace> --username <vsphere-username> --insecure-skip-tls-verifySo for me, I ran
vcf context create --endpoint ashflare.leaha.co.uk --workload-cluster-name neodymium --workload-cluster-namespace homelab --username [email protected] --insecure-skip-tls-verifyGive the context a name, I suggest the K8S cluster name, and provide your login password

We can see all our contexts, like before, with
vcf context list
And we can do the same in kubectl with
kubectl config get-contexts
If I want to switch to my K8S cluster to deploy some applications, I can run
kubectl config use-context <context-name>:<cluster>I ran
kubectl config use-context neodymium:neodymiumWe can also see our nodes with
kubectl get nodes
Now we can access our vSphere namespaces and K8S clusters using the kubectl commands like any other platform
If you get logged out and the token expires, you can run the following to re authenticate
vcf context refresh --insecure-skip-tls-verifyThen use the selector to select the context, this scrolls down, you’ll notice my VKS cluster is missing

1.10 – Viewing Node Resource Usage
If at any point you want to check the resource usage on your nodes, run
kubectl top nodesWhich will look like this

We can also do this for all pods with
kubectl top pods -AWe could also filter per namespace with
kubectl top pods -n <namespace>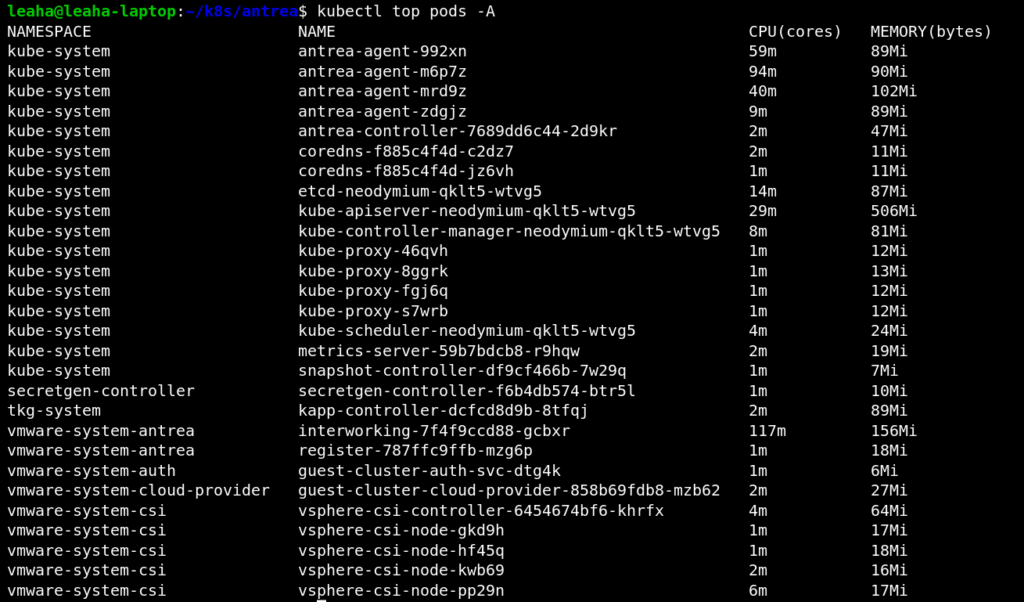
1.11 – Configuring ArgoCD
1.11.1 – Installing An ArgoCD Instance
As it was done in the vSphere namespace directly it uses vSphere pods and will require NSX being setup, if you are using vSphere, not NSX, this will not work, so Id recommend trying it in a VKS cluster
We now need a vSphere namespace for this to go in, we can add remote VKS clusters that are in other namespaces, so we’ll deploy this into its own namespace to keep it segmented
We will be deploying this as an infrastructure admin, rather than an end user in a self service context, with the idea that our production applications can be deployed using ArgoCD as our CI/CD tool
In vSphere, click the three lines in the top left and click Supervisor Management

Click New Namespace
Select our Supervisor and click Next
Give it a name and click Next
Select your zone and click Next
Then Finish

Click Add Storage
Select a storage policy used for your shared storage and click ok
Click Permissions/Add

Select the identity source, this will want to be vsphere.local, unless you are using another, search for the user, I am giving my user owner permissions here, also enable the propagate to children option, then click ok
There are three roles, namespaces owner, view and edit

Now when using the VCF CLI, I found the context didnt update pulling in the new namespace, and while you can refresh the context with
vcf context refreshAnd select the supervisor context, which mine was Ashflare, if the token is still valid, this fails
The easiest, if not very clean, way to fix this, is to delete the context
vcf context delete ashflare -yLike so

And recreate with the same command, which for me was
vcf context create --endpoint ashflare.leaha.co.uk --username [email protected] --insecure-skip-tls-verify --type k8sWe can then switch to the new argocd namespace with, in my case
kubectl config use-context ashflare:argocdWe need to check what version of ArgoCD we have, this must be pinned in the yaml config, to do this, run
kubectl get packages -A | grep argocdWe should see a version, sadly, there is no latest, and this must be changed per version
Here we can see my version is 3.0.19+vmware.1-vks.1

We then need to create a YAML file to deploy ArgoCD in this namespace, I called the file argocd.yaml
This file should have the following text
apiVersion: argocd-service.vsphere.vmware.com/v1alpha1
kind: ArgoCD
metadata:
  name: system-argocd # Your ArgoCD instance name
  namespace: argocd  # Your vSphere namespace
  labels:
    example: basic
spec:
  version: 3.0.19+vmware.1-vks.1   # Replace with your supported version from above
We can then apply this file with
kubectl apply -f argocd.yamlThis will take ~ 10 mins to deploy
We then need to get the default admin password with
kubectl get secret -n <vsphere-namespace> argocd-initial-admin-secret -o jsonpath='{.data.password}' | base64 -dFor me, I ran
kubectl get secret -n argocd argocd-initial-admin-secret -o jsonpath='{.data.password}' | base64 -dNow we have the admin password, we can check what the WebUI is bound on by running
kubectl get svcHere its the External IP that we want, which is my case is 192.168.20.11

We can get to the WebUI from that IP on HTTP, so for me thats
http://192.168.20.11
1.11.2 – Setting Up The ArgoCD CLI
We will need the ArgoCD CLI to add remote VKS clusters, we downloaded this earlier, we can use the Ubuntu UI to double click to decompress it

And we’ll get a folder like this

Open a terminal in that directory and rename it with
mv argocd-cli-fips-linux-amd64 argocdThen make it executable with
chmod +x argocdThen move it into the default PATH for commands
sudo mv argocd /usr/local/bin/Now we can run the argocd command to test, and will see the help screen
argocd
1.11.3 – Setting A New Admin Password
We need to change the default admin password and remove the default secret as its not needed, but we can do this via the CLI
We can login with this command
argocd login <instance-ip>So for my instance, which from my service we saw the IP was 192.168.20.11, I ran
argocd login 192.168.20.11Enter y as there isnt a valid certificate, or in my case, no certificate, we can enter the username, admin, and the password we got earlier

To reset the admin account password run
argocd account update-passwordWe’ll need to enter the current admin password, and then the new one to set it to
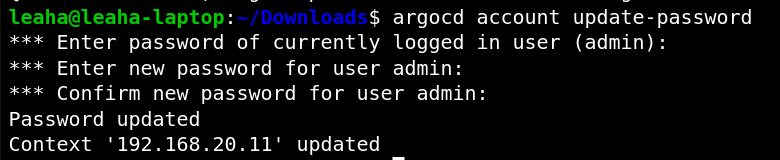
We then need to remove the default secret, switch back to the context we deployed ArgoCD into, if youre not already in it
Mine was ashflare:argocd, so I ran
kubectl config use-context ashflare:argocdThen remove the secret with
kubectl delete secret argocd-initial-admin-secret1.11.4 – Registering Our VKS Cluster
Now we have ArgoCD deployed, and the admin password changed and default cleaned up, we can register our VKS cluster, earlier we created the cluster k8s-test
We can see our clusters with
kubectl config get-contextsAnd the context we created last time for the cluster is k8s-test:k8s-test, and this is what we want to note down

We are already logged in with the ArgoCD CLI so we can run
argocd cluster add <context-name>So I ran
argocd cluster add neodymium:neodymiumPress Y when prompted for the service account, and the cluster will be registered

If you ever need to remove a cluster you can run
argocd cluster rm <context-name>1.12 – Installing Helm
Various K8S workloads may require Helm to be installed so it can be used to deploy workloads onto clusters
Helm functions like a package manager, similar to apt in Ubuntu, but for apps in K8S, and significantly simplifies the installation of ones that suport it
Helm needs to be installed on whatever device you are connecting to a VKS/K8S cluster with, not the cluster its self
For me, this is my Ubuntu based laptop
First lets install the prerequisites
sudo apt install curl gpg apt-transport-https --yesThen add the GPG key for the Helm repo with
curl -fsSL https://packages.buildkite.com/helm-linux/helm-debian/gpgkey | gpg --dearmor | sudo tee /usr/share/keyrings/helm.gpg > /dev/nullNow add the Helm apt repo with
echo "deb [signed-by=/usr/share/keyrings/helm.gpg] https://packages.buildkite.com/helm-linux/helm-debian/any/ any main" | sudo tee /etc/apt/sources.list.d/helm-stable-debian.listNow we can update apt with
sudo apt updateAnd install Helm with
sudo apt install helmWe can check its installed by verifying the version with
helm versionWhich shows something like this

1.13 – Expanding Clusters
Click on the three lines in vSphere in the top left and click Supervisor Management

Select your namespace and click Resources, then on the Kubernetes widget click Go To Service
Click the cluster
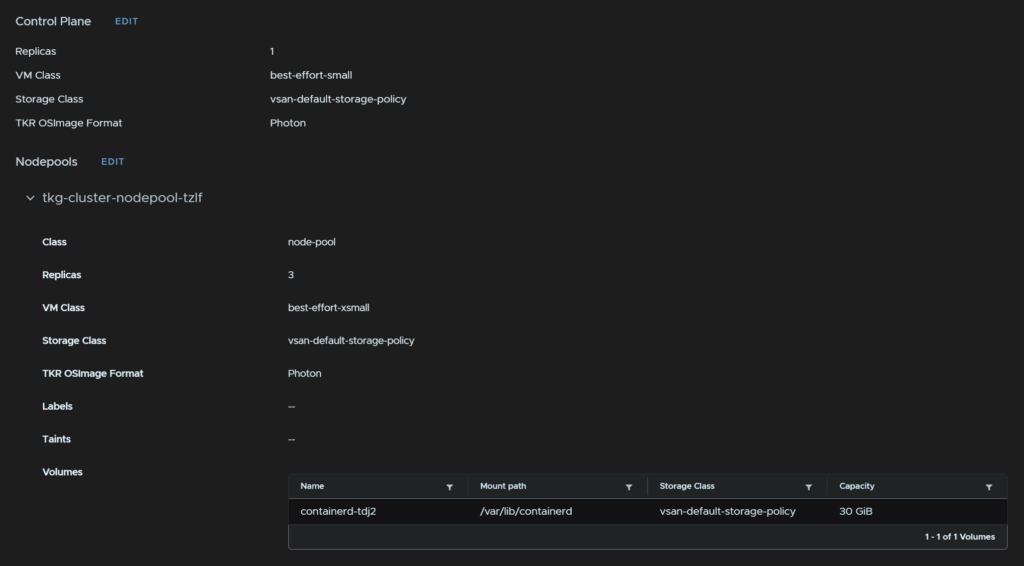
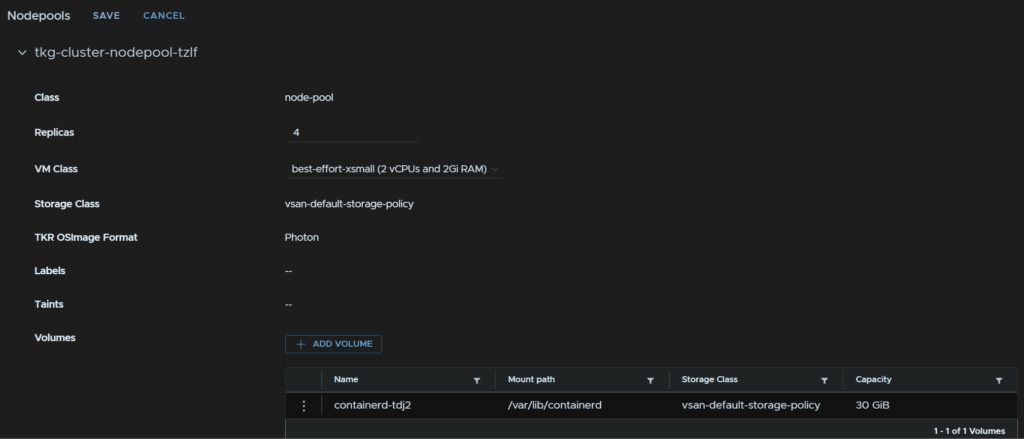
We can click Edit to change the control plane, which you likely wont need to change, we can then expand the node pools and click Edit on ours
We can change the replicas and the VM class, lets set the replica count to 4 and click Save
Changing the VM class will resize the cluster
After a few mins the cluster should have an extra worker node added
We can see thats being deployed now
1.14 – Upgrading Clusters
When the vSphere Kubernetes Services has been updated new K8S updates may be available to your clusters, or they may have been deployed on an older version and need upgrading
To do this, in vSphere, click the three lines in the top left and click Supervisor Management

Select the namespace which has clusters you want to upgrade, then click Resources and on the Kubernetes widget click Go To Service
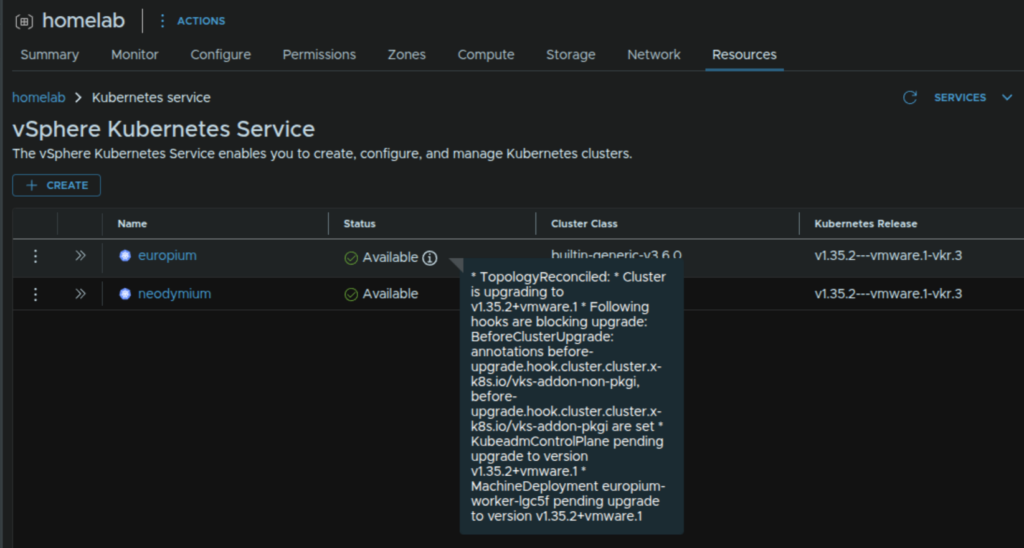
On the cluster, click the three dots, then click Upgrade
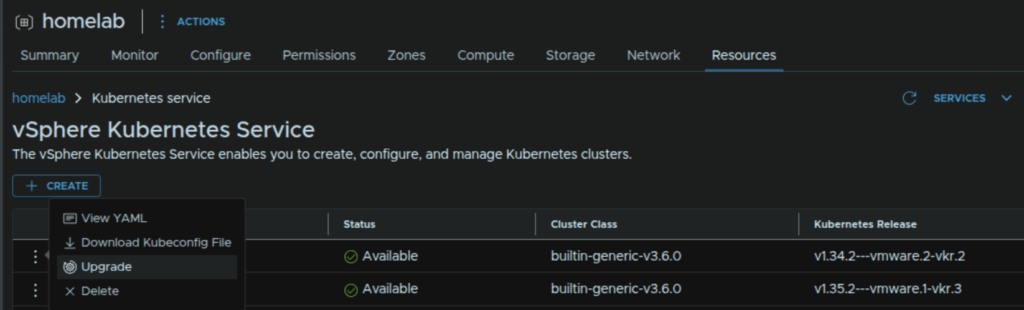
Select the target release from the drop down and click Upgrade
You’ll need the release adding to your content library if youre using an offline one like I am, otherwise it wont show up here
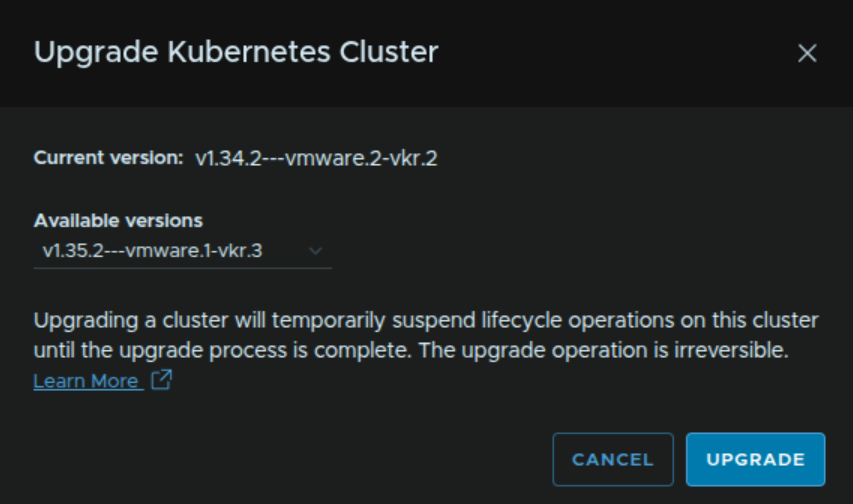
We can see the status from the information popup on the status tab
2 – vSphere 8/VCF 5.x
This section focuses on vSphere 8 and VCF 5.x, the CLI tool, vsphere-kubectl, is used for this version
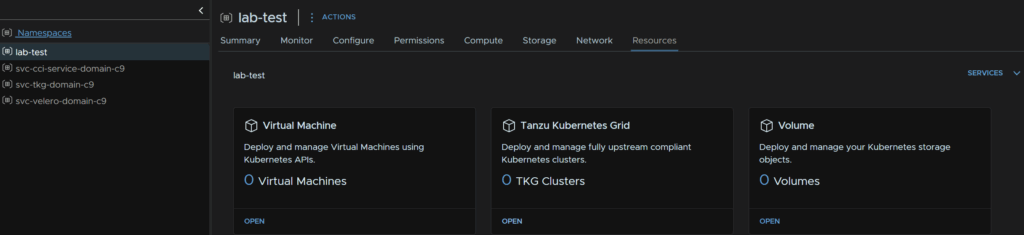
2.1 – Creating A Namespace
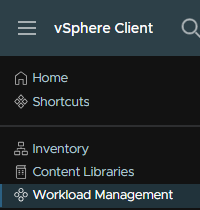
Before we can start deploying K8S clusters we need a namespace to put them in, in vSphere click the three lines in the top left and click workload Management
Then click New Namespace
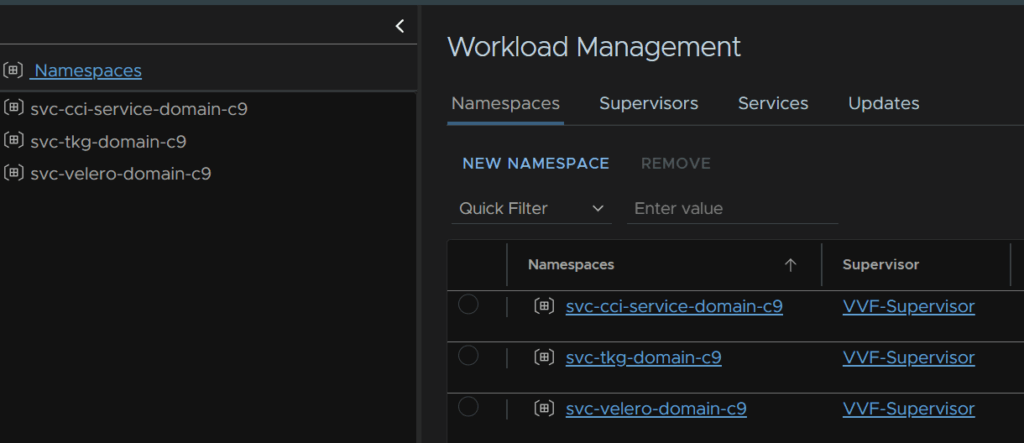
Select the supervisor and give it a name, it must be DNS compliant, so no capitals for example, and select the network, we will be using our workload network, then click Create
If you had NSX networks the Network option isnt needed
In our new namespace, on the permissions widget, click Add permissions
Select the identity source, this will want to be vsphere.local, search for the user, I am giving my dev user permissions here, and select the role, they will be the owner, then click ok
Under the storage Widget, click Add Storage
Select a storage policy, I am using the vSAN default policy here and click ok
This is the storage policy your user wants to be using when creating Physical Volume Claims on a K8S cluster
It can be checked within the K8S CLI later with
kubectl get storageclasses
It is also worth noting the user, in the case Dev, will need at least read rights to the vCenter, cluster and hosts
I have a custom role for users so they have read permissions to the those bits, so the UI will load properly, from there they can access Workload Management to manage their namespace and resources, they wont see any VMs in vSphere though
As an admin you can apply limits like any other resource groups to limit how much can be deployed
This can be done by clicking Edit on the Capacity And Usage widget
2.2 – Setting Up A VM Class
Next we need a VM class, else creating Kubernetes clusters isnt going to work
In our new namespace, on the VM Service widget, click Add VM Class
And select the VM class you’d like to be deployable in this namespace and click ok
We can use these sizes to define our K8S cluster when we deploy them
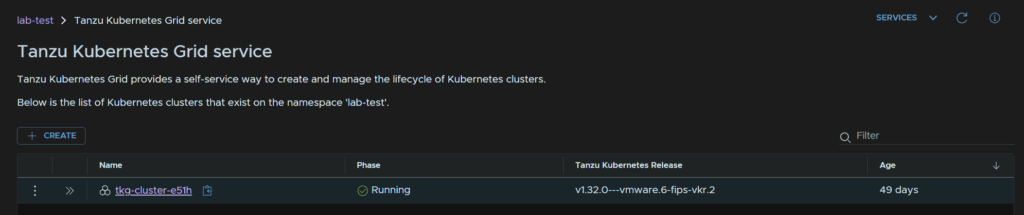
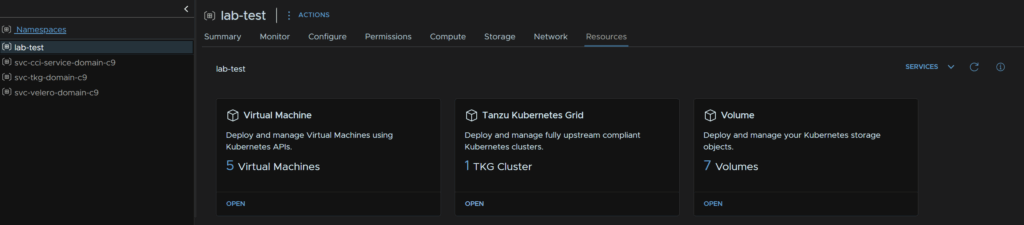
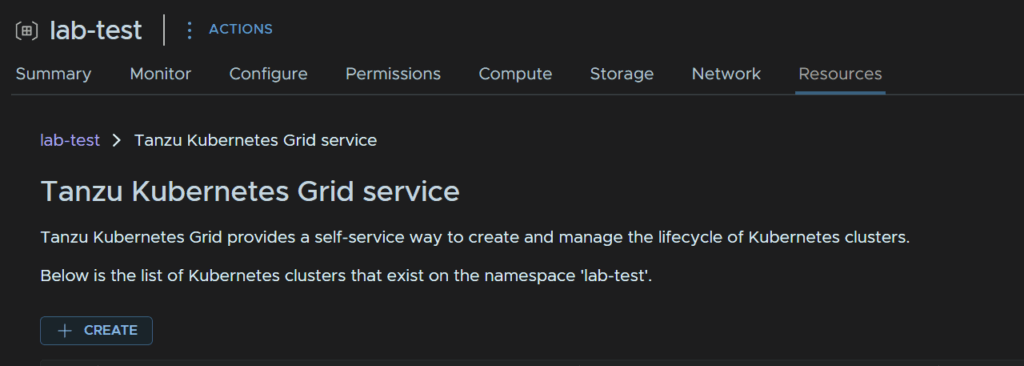
2.3 – Deploying A Kubernetes Cluster
From our namespace, click Resources, then in the Tanzu Kubernetes Grid widget click Open
Now click Create
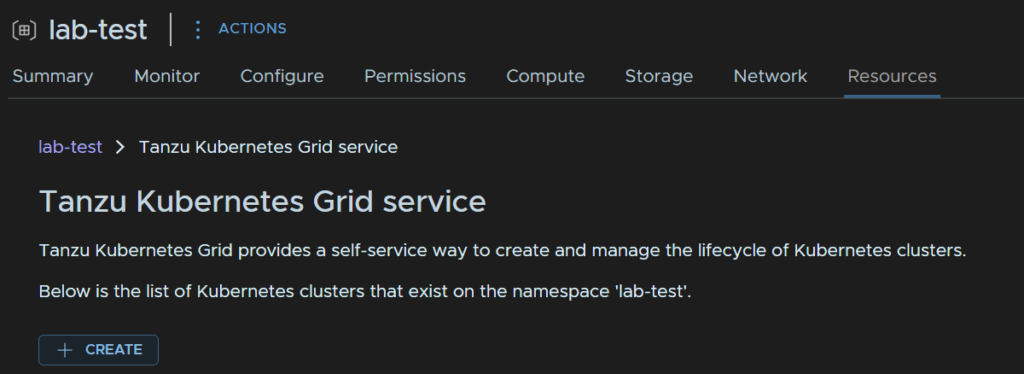
To start with, ensure the Cluster Type is set to Cluster API, TanzuKubernetesCluster API is deprecated, and select Custom Configuration, then click Next

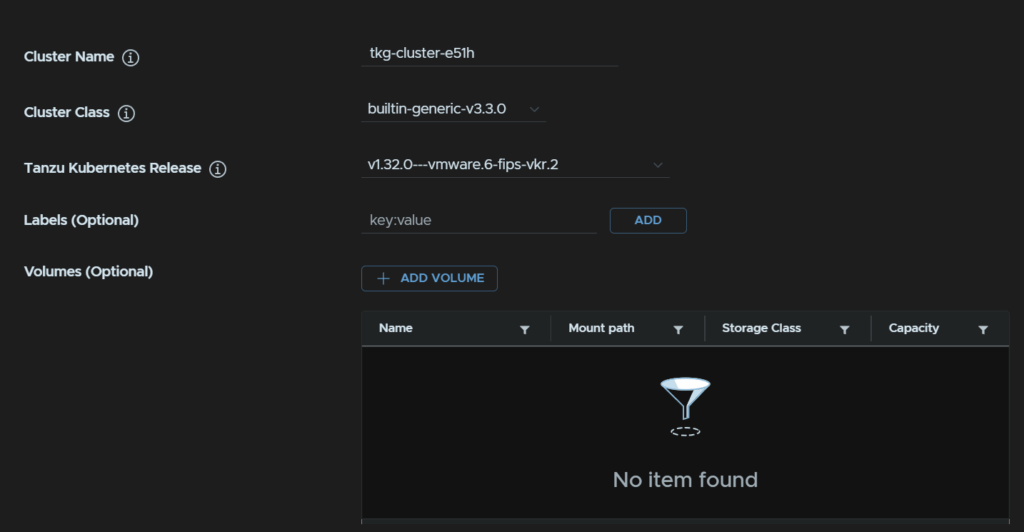
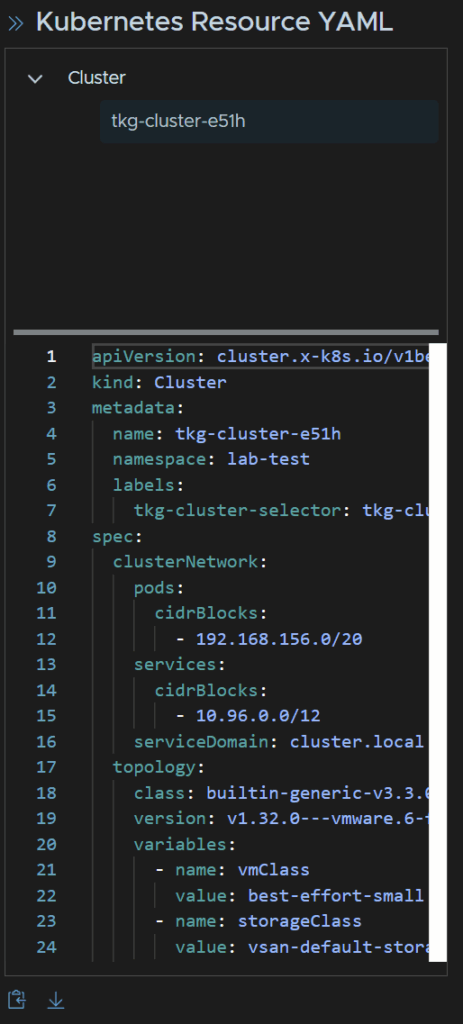
Give the cluster a naming convention, I used the default, select the cluster class, I opted for the latest of 3.3.0, select the K8S release, I used the latest, you can add labels and volumes, for now we will leave these blank
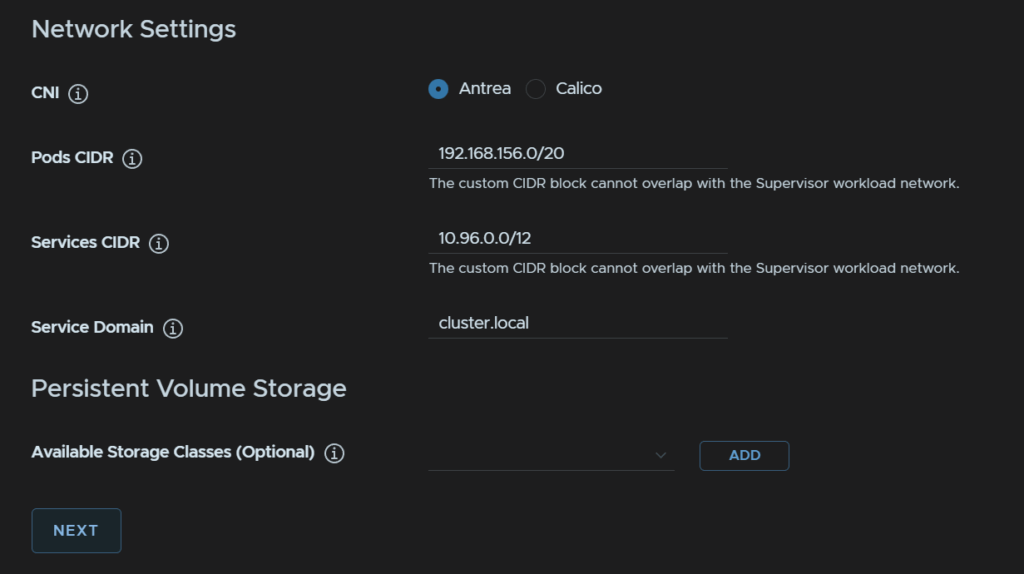
Networking wise, use the default CNI of Antrea, add a pod CIDR, I am again using the default, this is internal to the cluster and should not overlap with the supervisor networks, as ours was 10.1.21.0/24 and 10.1.22.0/24, we are fine there, leave the services CIDR at the default, this also must not overlap with the workload network, and enter a service domain, the default is fine here, you can add persistent volumes, but I have left this blank
When you are done click Next
For the control plane, select a VM size, I am going to use the small image from what I added for VM classes, and enter the number of replicas, you can do one or three, one is fine in my lab, but production should be using three here, select a storage class, this will be what me added for storage earlier, then select the OS Image, I recommend Photon as they are significantly smaller on disk usage
We can also optionally add volumes, but I am skipping this, and then click Next
Next we need a node pool for the workloads to run on, click Add Nodepool
Enter a nodepool name, I used the default, the class should be node-pool, enter the number of replicas, this can be 1-16, select the VM size, the drop down reflects the VM classes we added earlier again, select the storage class, OS Image, again, I recommend Photon, and you can add volume claims, check this box and click Next
The size of the volume you add here can vary on how much you are throwing into the cluster, but 30-60GB is a good range, I am using 30GB
Leave everything on default, set the capacity and click Create
Then click Next
Then click Finish
You can add more if needed, when you have your worker pools click Next
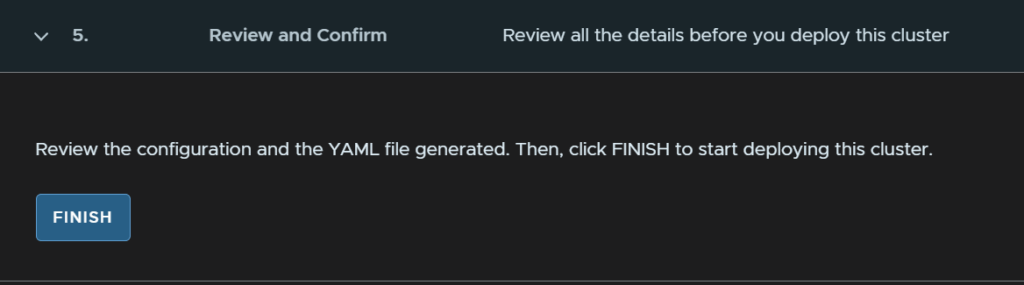
On the right we can see the YAML for our cluster deployment, which we can edit and download if needed
We can then click Finish
The system will the download the files and create the cluster
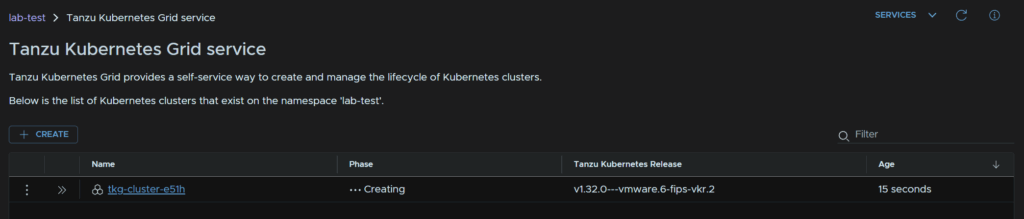
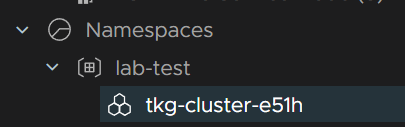
In the vSphere inventory we can see the cluster shows up in the vSphere Namespaces resource pool, and the worker/control plane nodes will get added as they are deployed
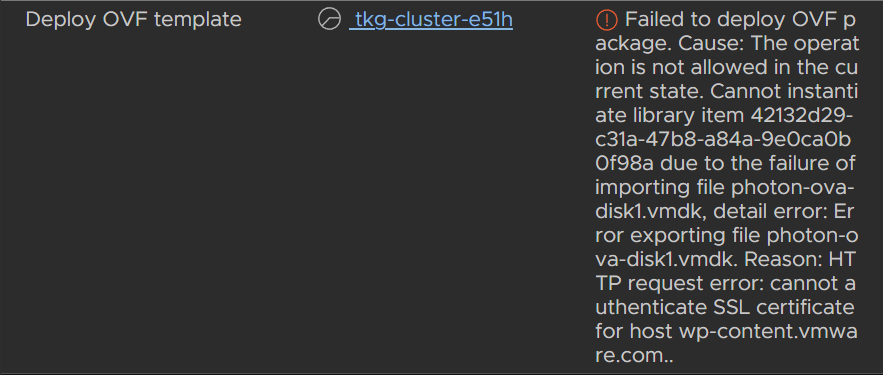
I did notice this error kept cropping up preventing the VMs from being deployed
Failed to deploy OVF package. Cause: The operation is not allowed in the current state. Cannot instantiate library item 42132d29-c31a-47b8-a84a-9e0ca0b0f98a due to the failure of importing file photon-ova-disk1.vmdk, detail error: Error exporting file photon-ova-disk1.vmdk. Reason: HTTP request error: cannot authenticate SSL certificate for host wp-content.vmware.com..
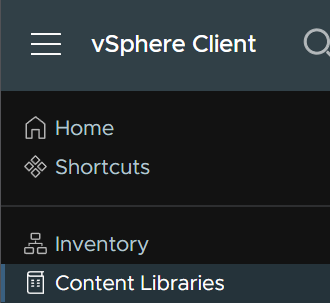
To fix this, click the three lines in vSphere and click Content Libraries
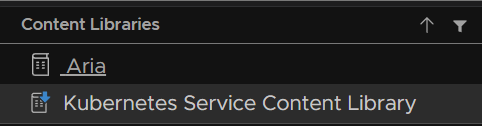
Select the Kubernetes Service Content Library
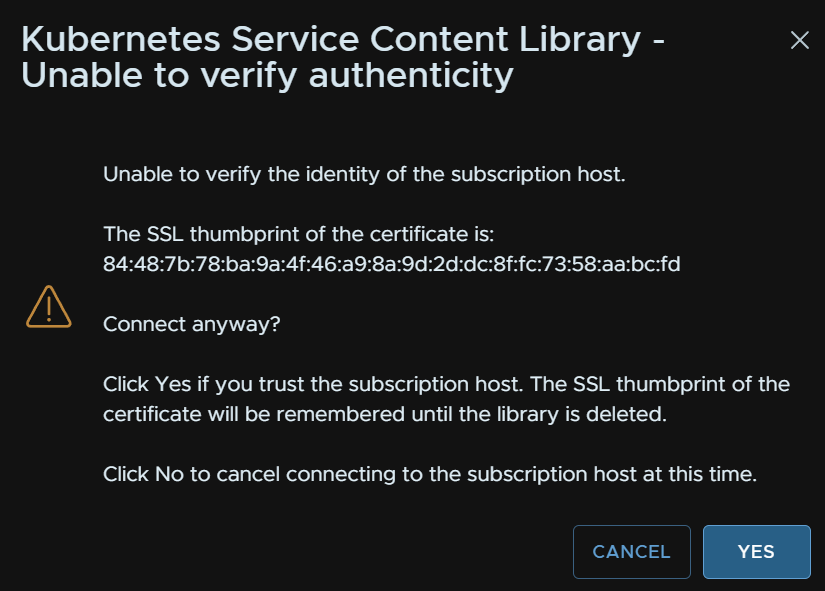
Click Actions/Edit Settings
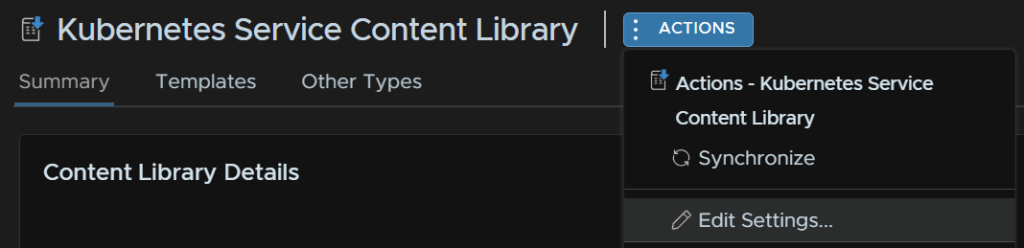
Dont change anything and click ok
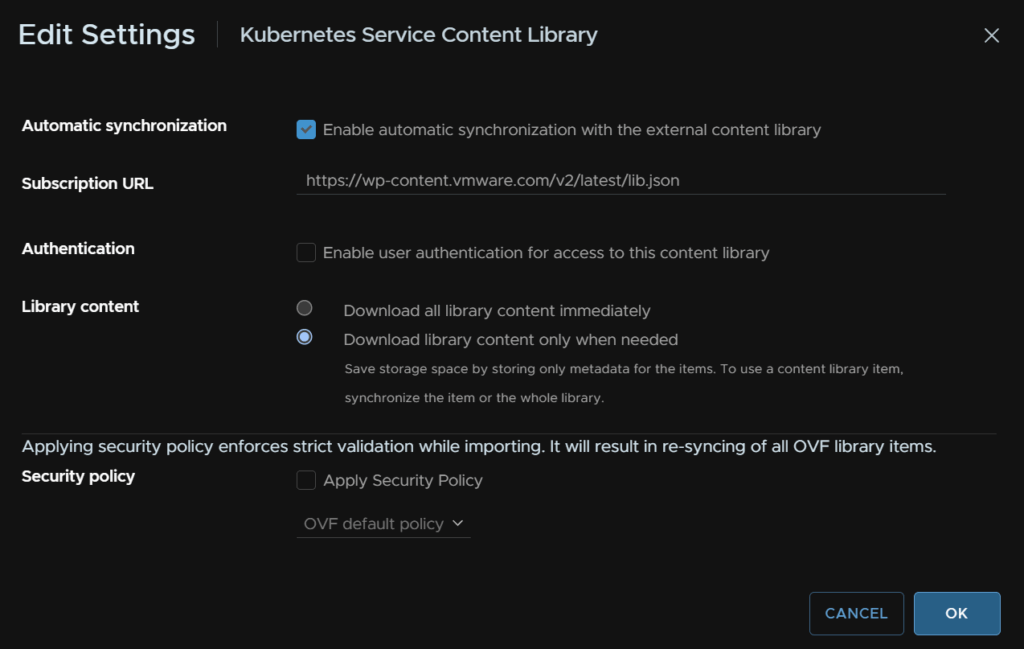
And accept the SSL certificate
I can only assume Broadcom changed the cert in between me setting the cluster up and deploying this K8S cluster
After a while the cluster will be deployed
2.4 – Accessing The CLI
First, you’ll need the CLI tools, these can be gotten from the namespace under Workload Management
Click your namespace and you’ll have a link to the CLI tools in the status widget
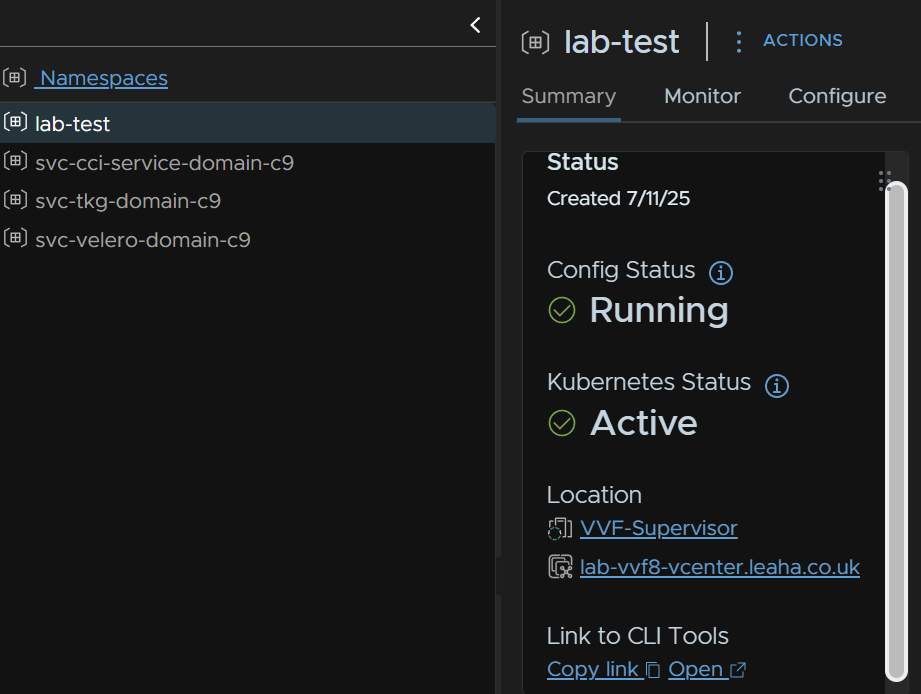
Make a note of the IP this URL is on, we’ll need this for connecting
Download the CLI Plugin tools for you OS, it supports Windows, Linux And Mac
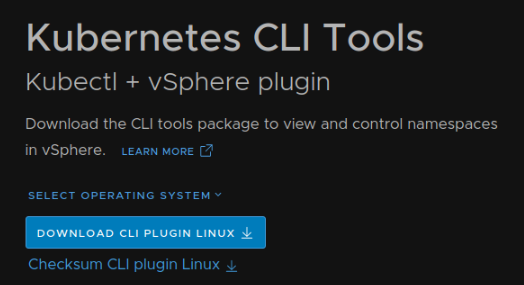
If you have Linux with a GUI then you can download with the WebUI
For the CLI, head to your Downloads with cd ~/Downloads
And download it with
wget https://<ip-address>/wcp/plugin/linux-amd64/vsphere-plugin.zip --no-check-certificateWhere the <ip-address> is the IP you get from the vSphere UI
So for me this was
wget https://10.1.21.11/wcp/plugin/linux-amd64/vsphere-plugin.zip --no-check-certificateLets unzip it with
unzip ./vsphere-plugin.zipAnd then lets move this to the /bin folder to execute kubectl and kubectl-vsphere directly with
sudo cp ./bin/kubectl-vsphere /bin
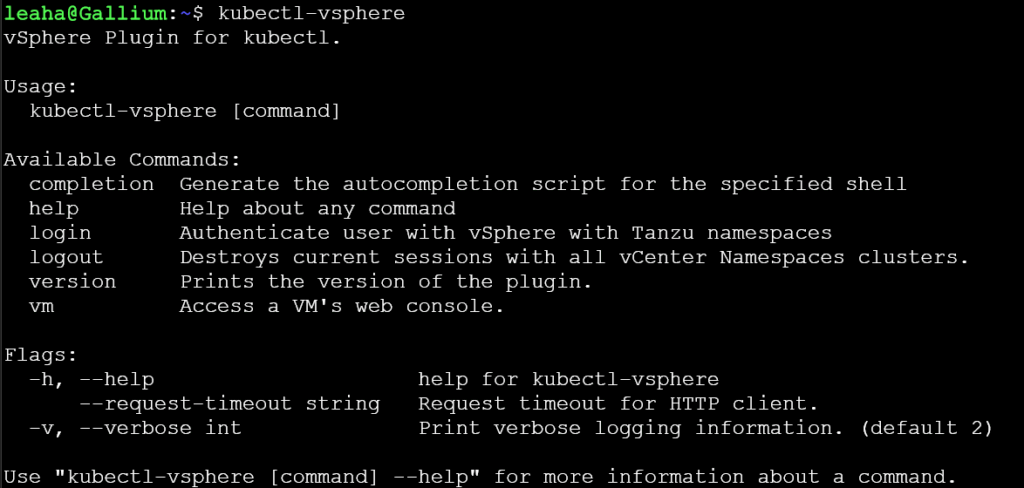
sudo cp ./bin/kubectl /binIf we now run
kubectl-vsphereWe can see thats working
Lets login to our K8S cluster with
kubectl-vsphere login --insecure-skip-tls-verify --vsphere-username <sso-username> --server=<ip-address> --tanzu-kubernetes-cluster-namespace=<namespace> --tanzu-kubernetes-cluster-name=<clustername>Where <sso-username> is your login, can be the admin or your own account you are using to access the service
And <ip-address> is that IP we got earlier where the kubctl package is
For me using my dev user this was
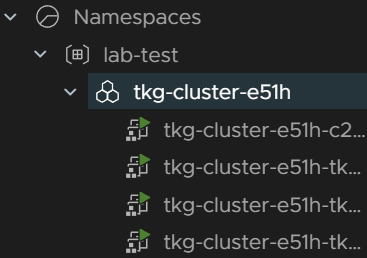
kubectl-vsphere login --insecure-skip-tls-verify --vsphere-username [email protected] --server=10.1.21.11 --tanzu-kubernetes-cluster-namespace=lab-test --tanzu-kubernetes-cluster-name=tkg-cluster-e51hAnd input your password
It should look like this

You can see the namespaces you have access to with
kubectl config get-contextsWe can see all the namespaces we have access too, which is our lab-test namespace

Lets create a folder in our documents, or where ever you like, for Tanzu files
mkdir ~/TanzuThe lets hop into it with
cd ~/TanzuWe can also verify the nodes with
kubectl get nodes -o wide
2.5 – Using And Troubleshooting Deployments
This will focus on an Nginx K8S deployment YAML and how we can trouble shoot this if you have issues, in general, but also with the demos below
We can apply any YAML file with a deployment by running
kubectl apply -f <yaml-file>Eg
kubectl apply -f nginx.yamlThis will apply that, create the pods and service if defined, so you can access your application
We can get our deployments in a cluster with
kubectl get deploymentsAn example output

We can get more info on this deployment with
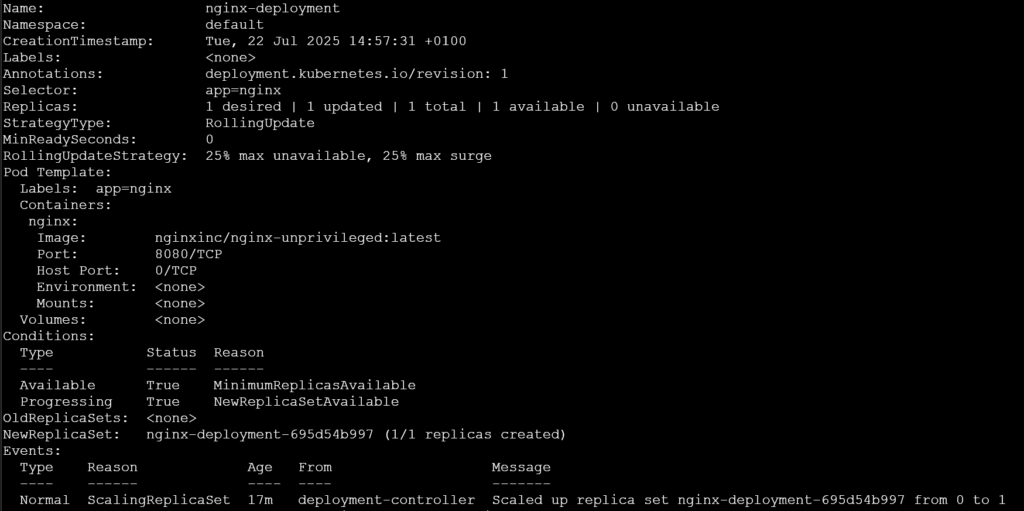
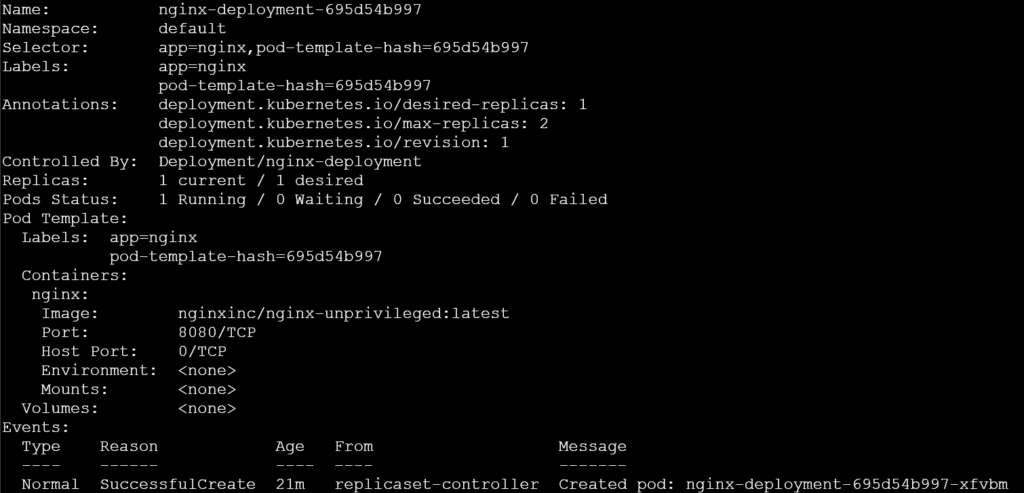
kubectl describe deployment <Deployment>For our example output we can run
kubectl describe deployment nginx-deploymentIf you get this error, type the command, as it doesnt work well with copy and paste
kubectl describe deployment nginx-deployment: command not found
The output will look like this
The important bit here is the NewReplicaSet
nginx-deployment-695d54b997
This is the replica set
We can see what its doing, and any error with
kubectl describe rs <replica set>For mine I ran
kubectl describe rs nginx-deployment-695d54b997The output will look like this
An example error would be
Warning FailedCreate 2m13s (x8 over 7m38s) replicaset-controller (combined from similar events): Error creating: pods “nginx-deployment-96b9d695-rn44x” is forbidden: violates PodSecurity “restricted:latest”: allowPrivilegeEscalation != false (container “nginx” must set securityContext.allowPrivilegeEscalation=false), unrestricted capabilities (container “nginx” must set securityContext.capabilities.drop=[“ALL”]), runAsNonRoot != true (pod or container “nginx” must set securityContext.runAsNonRoot=true), seccompProfile (pod or container “nginx” must set securityContext.seccompProfile.type to “RuntimeDefault” or “Localhost”)
This is caused by pods running as root, this isnt allowed with Pod Security Admission enabled, which is on by default in Tanzu
Now this might not have any issues in it, so we know the pod in the replica set is create so we can run
kubectl get podsWhich outputs this

We can get more info on the pod with
kubectl describe pod <pod>For my example this is
kubectl describe pod nginx-deployment-695d54b997-xfvbmAnd we have an events section

An example of an issue caused by the default Nginx container requiring the image run as root, this helps you identify the issue quickly

To see how to access the container once its deployed we will need to see the service information, this name is defined in your deployment YAML or device YAML if you have it separately
kubectl get svc <Service-Name>My service is called nginx-service, so I ran
kubectl get svc nginx-serviceHere we can see the external IP address, and from the deployment YAML I know that its port 80 to access this

2.6 – Expanding Clusters
Click on the three lines in vSphere in the top left and click Workload Management
Select your namespace and click Resources, then on the Tanzu Kubernetes Grid widget click Open
Click the cluster
We can click Edit to change the control plane, which you likely wont need to change, and the node pool, lets click Edit on the node pool
We can change the replicas and the VM class, lets set the replica count to 4 and click Save
After a few mins the cluster should have an extra worker node added
We can see thats being deployed now

2.7 – Creating A Local Content Library
If youre like me and hate that after setting up the supervisor service, your template deployment, using content libraries is now very cluttered with Kubernetes templates, it looks a little like this
This is a nightmare to get to my old templates that were there as I need to search through everything
There is a way to deal with this by using a manual Kubernetes content library with a few images, as you likely dont need them all, to keep things simple
We will be removing the default internet subscribed content library, which you can set back up so this is reversable, and manually download the right images we need
This has the draw back pf being managed by yourself for the latest releases, but declutters the template deployment menu
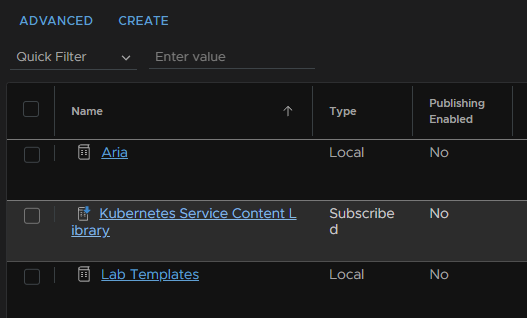
Click the three lines in the top left of vSphere and click Content Libraries

Click into the Kubernetes Service Content Library
Then click Delete from Library
No we can click Create for a new library, from the Content Libraries menu
Give it a name and click Next
Make sure Local Content Library is selected and click Next
Click Apply Security Policy and click Next
Select your datastore, if you have vSAN, this is what you should use, then click Next
And click Finish

Now we have our library, we need to download some templates for it
If we head to the URL the remote content library uses, we can see the images, the URL is
https://wp-content.vmware.com/v2/latest/
Its worth noting not all releases are supported, I downloaded the v1.32.3 and this didnt show up in the deployment, I suspect this is related to the supervisor version and that would need updating, as there is a new vCenter release
Here we can see all the templates and their links
I am going to click into the last one with VKR in the name, I do recommend Photon OS as they are significantly smaller VMs
And I will create a local folder with the same name to download the files to

Right click all the files, except the item.json, individually then click Save Link As
Once you have everything, it should look like this
In vSphere, head to the content library and click Actions/Import Item
Select Local File, and click Upload Files
Select all four of the files in a folder from our earlier downloads
Make sure the name matches exactly whats on the website repository for this, and click Import
Then repeat for any remaining downloaded images
Once they have all been uploaded, we need to set the TKG default repository back up on the supervisor, as that was using the remove content library we removed
Click the three lines in the top left of vSphere and click Workload Management
Click the Supervisors tab, then click your supervisor

Head to Configure/Supervisor/General then expand Tanzu Kubernetes Grid Service and click Edit
Select our custom TKG content library and click ok
Give it a couple of mins and you should see the error goes away and it recognises it
Now to test this works, I opened the test namespace
Head to Resources, then click Open on Tanzu Kubernetes Grid
Click Create
We we proceed with a custom configuration and click Next
We can see the VMI templates are showing
Now my templates are much less cluttered and I have my Kubernetes VM releases, as an example
2.8 – Cluster Demos
2.8.1 – Nginx
This works for Nginx in the SVC port 80 on a TKG cluster
The YAML can be applied with
kubectl apply -f <file-name>.yamlEg
kubectl apply -f nginx.yamlWe can view the external IP for the service with
kubectl get svc nginx-service
nginx.yaml
apiVersion: apps/v1
kind: Deployment
metadata:
  name: nginx-deployment
spec:
  replicas: 1
  selector:
    matchLabels:
      app: nginx
  template:
    metadata:
      labels:
        app: nginx
    spec:
      securityContext:
        runAsNonRoot: true
        seccompProfile:
          type: RuntimeDefault
      containers:
      - name: nginx
        image: nginxinc/nginx-unprivileged:latest
        ports:
        - containerPort: 8080
        securityContext:
          allowPrivilegeEscalation: false
          capabilities:
            drop:
              - ALL
          runAsNonRoot: true
---
apiVersion: v1
kind: Service
metadata:
  name: nginx-service
spec:
  type: LoadBalancer
  selector:
    app: nginx
  ports:
    - protocol: TCP
      port: 80
      targetPort: 8080
2.8.2 – WordPress
We can see our storage classes to use with
kubectl get storageclassesIts worth noting to get WordPress to work with PSA using the default image, there is some extra config to force Apache to use ports above 1024
We dont do anything with the LB service other than create one and specify the ports
We will be using the one for the vSAN policy we added, vsan-default-storage-policy
We can apply the YAML with
kubectl apply -f wordpress.yamlWe can see the PVCs this deployment created from the namespace in vSphere from the namespace at Storage/Persistent Volume Claims

wordpress.yaml
# ========================
# PersistentVolumeClaim for MySQL
# ========================
apiVersion: v1
kind: PersistentVolumeClaim
metadata:
  name: mysql-pvc
spec:
  accessModes:
    - ReadWriteOnce
  storageClassName: vsan-default-storage-policy
  resources:
    requests:
      storage: 10Gi
---
# ========================
# MySQL Deployment
# ========================
apiVersion: apps/v1
kind: Deployment
metadata:
  name: mysql-deployment
spec:
  replicas: 1
  selector:
    matchLabels:
      app: mysql
  template:
    metadata:
      labels:
        app: mysql
    spec:
      securityContext:
        runAsNonRoot: true
        runAsUser: 999
        runAsGroup: 999
        fsGroup: 999
        seccompProfile:
          type: RuntimeDefault
      containers:
      - name: mysql
        image: mysql:8.0
        ports:
        - containerPort: 3306
        env:
        - name: MYSQL_DATABASE
          value: "wordpress"
        - name: MYSQL_USER
          value: "wpuser"
        - name: MYSQL_PASSWORD
          value: "wppassword"
        - name: MYSQL_ROOT_PASSWORD
          value: "notusedbutrequired"
        securityContext:
          allowPrivilegeEscalation: false
          runAsNonRoot: true
          capabilities:
            drop:
              - ALL
        volumeMounts:
        - name: mysql-persistent-storage
          mountPath: /var/lib/mysql
      volumes:
      - name: mysql-persistent-storage
        persistentVolumeClaim:
          claimName: mysql-pvc
---
# ========================
# MySQL Service (internal only)
# ========================
apiVersion: v1
kind: Service
metadata:
  name: mysql-service
spec:
  type: ClusterIP
  selector:
    app: mysql
  ports:
    - protocol: TCP
      port: 3306
      targetPort: 3306
---
# ========================
# PersistentVolumeClaim for WordPress
# ========================
apiVersion: v1
kind: PersistentVolumeClaim
metadata:
  name: wordpress-pvc
spec:
  accessModes:
    - ReadWriteOnce
  storageClassName: vsan-default-storage-policy
  resources:
    requests:
      storage: 10Gi
---
# ========================
# ConfigMap to override Apache ports.conf
# ========================
apiVersion: v1
kind: ConfigMap
metadata:
  name: wordpress-apache-config
data:
  ports.conf: |
    Listen 8080
    <IfModule ssl_module>
      Listen 8443
    </IfModule>
    <IfModule mod_gnutls.c>
      Listen 8443
    </IfModule>
---
# ========================
# WordPress Deployment
# ========================
apiVersion: apps/v1
kind: Deployment
metadata:
  name: wordpress-deployment
spec:
  replicas: 1
  selector:
    matchLabels:
      app: wordpress
  template:
    metadata:
      labels:
        app: wordpress
    spec:
      securityContext:
        runAsNonRoot: true
        runAsUser: 1000
        runAsGroup: 1000
        fsGroup: 1000
        seccompProfile:
          type: RuntimeDefault
      containers:
      - name: wordpress
        image: wordpress:php8.2-apache
        ports:
        - containerPort: 8080
        env:
        - name: WORDPRESS_DB_HOST
          value: "mysql-service"
        - name: WORDPRESS_DB_USER
          value: "wpuser"
        - name: WORDPRESS_DB_PASSWORD
          value: "wppassword"
        - name: WORDPRESS_DB_NAME
          value: "wordpress"
        securityContext:
          allowPrivilegeEscalation: false
          runAsNonRoot: true
          capabilities:
            drop:
              - ALL
        volumeMounts:
        - name: wordpress-persistent-storage
          mountPath: /var/www/html
        - name: apache-config
          mountPath: /etc/apache2/ports.conf
          subPath: ports.conf
      volumes:
      - name: wordpress-persistent-storage
        persistentVolumeClaim:
          claimName: wordpress-pvc
      - name: apache-config
        configMap:
          name: wordpress-apache-config
---
# ========================
# WordPress Service (external access)
# ========================
apiVersion: v1
kind: Service
metadata:
  name: wordpress-service
spec:
  type: LoadBalancer
  selector:
    app: wordpress
  ports:
    - protocol: TCP
      port: 80
      targetPort: 8080
2.8.2.1 – Setting A LB Static IP
# ========================
# WordPress Service (external access)
# ========================
apiVersion: v1
kind: Service
metadata:
  name: wordpress-service
spec:
  type: LoadBalancer
  loadBalancerIP: <Workload-IP> # <-- Assigns static IP
  selector:
    app: wordpress
  ports:
    - protocol: TCP
      port: 80
      targetPort: 8080
2.9 – Spherelet Pod Demos – VCF Only
These demos will only have the YAML files, if you need more info on using K8S look at the demos in section 8 as they are the same
There is also an edit in 8.2 for setting static load balancer IP addresses that isnt in this section
2.9.1 – Nginx
apiVersion: apps/v1
kind: Deployment
metadata:
  name: nginx-deployment
spec:
  replicas: 1
  selector:
    matchLabels:
      app: nginx
  template:
    metadata:
      labels:
        app: nginx
    spec:
      securityContext:
        runAsNonRoot: true
        seccompProfile:
          type: RuntimeDefault
      containers:
      - name: nginx
        image: nginxinc/nginx-unprivileged:latest
        ports:
        - containerPort: 8080
        securityContext:
          allowPrivilegeEscalation: false
          capabilities:
            drop:
              - ALL
          runAsNonRoot: true
---
apiVersion: v1
kind: Service
metadata:
  name: nginx-service
spec:
  type: LoadBalancer
  selector:
    app: nginx
  ports:
    - protocol: TCP
      port: 80
      targetPort: 8080
2.9.2 – WordPress
For this, the pod will give an Out Of Memory error, so the config below expands the pod to use more memory to prevent this
# ========================
# PersistentVolumeClaim for MySQL
# ========================
apiVersion: v1
kind: PersistentVolumeClaim
metadata:
  name: mysql-pvc
spec:
  accessModes:
    - ReadWriteOnce
  storageClassName: vsan-default-storage-policy
  resources:
    requests:
      storage: 10Gi
---
# ========================
# MySQL Deployment
# ========================
apiVersion: apps/v1
kind: Deployment
metadata:
  name: mysql-deployment
spec:
  replicas: 1
  selector:
    matchLabels:
      app: mysql
  template:
    metadata:
      labels:
        app: mysql
    spec:
      securityContext:
        runAsNonRoot: true
        runAsUser: 999
        runAsGroup: 999
        fsGroup: 999
        seccompProfile:
          type: RuntimeDefault
      containers:
      - name: mysql
        image: mysql:8.0
        ports:
        - containerPort: 3306
        env:
        - name: MYSQL_DATABASE
          value: "wordpress"
        - name: MYSQL_USER
          value: "wpuser"
        - name: MYSQL_PASSWORD
          value: "wppassword"
        - name: MYSQL_ROOT_PASSWORD
          value: "notusedbutrequired"
        resources:
          requests:
            memory: "512Mi"
            cpu: "250m"
          limits:
            memory: "1Gi"
            cpu: "500m"
        securityContext:
          allowPrivilegeEscalation: false
          runAsNonRoot: true
          capabilities:
            drop:
              - ALL
        volumeMounts:
        - name: mysql-persistent-storage
          mountPath: /var/lib/mysql
      volumes:
      - name: mysql-persistent-storage
        persistentVolumeClaim:
          claimName: mysql-pvc
---
# ========================
# MySQL Service (internal only)
# ========================
apiVersion: v1
kind: Service
metadata:
  name: mysql-service
spec:
  type: ClusterIP
  selector:
    app: mysql
  ports:
    - protocol: TCP
      port: 3306
      targetPort: 3306
---
# ========================
# PersistentVolumeClaim for WordPress
# ========================
apiVersion: v1
kind: PersistentVolumeClaim
metadata:
  name: wordpress-pvc
spec:
  accessModes:
    - ReadWriteOnce
  storageClassName: vsan-default-storage-policy
  resources:
    requests:
      storage: 10Gi
---
# ========================
# ConfigMap to override Apache ports.conf
# ========================
apiVersion: v1
kind: ConfigMap
metadata:
  name: wordpress-apache-config
data:
  ports.conf: |
    Listen 8080
    <IfModule ssl_module>
      Listen 8443
    </IfModule>
    <IfModule mod_gnutls.c>
      Listen 8443
    </IfModule>
---
# ========================
# WordPress Deployment
# ========================
apiVersion: apps/v1
kind: Deployment
metadata:
  name: wordpress-deployment
spec:
  replicas: 1
  selector:
    matchLabels:
      app: wordpress
  template:
    metadata:
      labels:
        app: wordpress
    spec:
      securityContext:
        runAsNonRoot: true
        runAsUser: 1000
        runAsGroup: 1000
        fsGroup: 1000
        seccompProfile:
          type: RuntimeDefault
      containers:
      - name: wordpress
        image: wordpress:php8.2-apache
        ports:
        - containerPort: 8080
        env:
        - name: WORDPRESS_DB_HOST
          value: "mysql-service"
        - name: WORDPRESS_DB_USER
          value: "wpuser"
        - name: WORDPRESS_DB_PASSWORD
          value: "wppassword"
        - name: WORDPRESS_DB_NAME
          value: "wordpress"
        resources:
          requests:
            memory: "512Mi"
            cpu: "250m"
          limits:
            memory: "1Gi"
            cpu: "500m"
        securityContext:
          allowPrivilegeEscalation: false
          runAsNonRoot: true
          capabilities:
            drop:
              - ALL
        volumeMounts:
        - name: wordpress-persistent-storage
          mountPath: /var/www/html
        - name: apache-config
          mountPath: /etc/apache2/ports.conf
          subPath: ports.conf
      volumes:
      - name: wordpress-persistent-storage
        persistentVolumeClaim:
          claimName: wordpress-pvc
      - name: apache-config
        configMap:
          name: wordpress-apache-config
---
# ========================
# WordPress Service (external access)
# ========================
apiVersion: v1
kind: Service
metadata:
  name: wordpress-service
spec:
  type: LoadBalancer
  selector:
    app: wordpress
  ports:
    - protocol: TCP
      port: 80
      targetPort: 8080
2.9.3 – Monitoring Stack
This demo runs a few pods for Grafana, Telegraf and InfluxDB
For this you need to apply the yaml, this will create the InfluxDB instance, you set that up, get the bucket and token which we can then add details to in the config map for Telegraf, the config map section is ready to have the info added below the commented marker
Once thats done, remove the pods, but not the PVCs with
kubectl delete deployment grafana influxdb2 telegrafAnd re apply the YAML for the effects to properly take effect
monitoring.yaml
# ========================
# Grafana PersistentVolumeClaim
# ========================
apiVersion: v1
kind: PersistentVolumeClaim
metadata:
  name: grafana-pvc
spec:
  accessModes:
    - ReadWriteOnce
  storageClassName: vsan-default-storage-policy
  resources:
    requests:
      storage: 40Gi
---
# ========================
# InfluxDB2 PersistentVolumeClaims
# ========================
apiVersion: v1
kind: PersistentVolumeClaim
metadata:
  name: influxdb2-data-pvc
spec:
  accessModes:
    - ReadWriteOnce
  storageClassName: vsan-default-storage-policy
  resources:
    requests:
      storage: 50Gi
---
apiVersion: v1
kind: PersistentVolumeClaim
metadata:
  name: influxdb2-config-pvc
spec:
  accessModes:
    - ReadWriteOnce
  storageClassName: vsan-default-storage-policy
  resources:
    requests:
      storage: 50Gi
---
# ========================
# Grafana Deployment
# ========================
apiVersion: apps/v1
kind: Deployment
metadata:
  name: grafana
spec:
  replicas: 1
  selector:
    matchLabels:
      app: grafana
  template:
    metadata:
      labels:
        app: grafana
    spec:
      securityContext:
        runAsNonRoot: true
        runAsUser: 472      # grafana user inside container
        runAsGroup: 472
        fsGroup: 472
        seccompProfile:
          type: RuntimeDefault
      containers:
      - name: grafana
        image: docker.io/grafana/grafana-oss:latest
        ports:
        - containerPort: 3000
        env:
        - name: GF_PLUGINS_ALLOW_LOADING_UNSIGNED_PLUGINS
          value: "vmware-ariaoperations-datasource"
        - name: GF_DEFAULT_APP_MODE
          value: "development"
        securityContext:
          allowPrivilegeEscalation: false
          capabilities:
            drop:
              - ALL
        volumeMounts:
        - name: grafana-storage
          mountPath: /var/lib/grafana
      volumes:
      - name: grafana-storage
        persistentVolumeClaim:
          claimName: grafana-pvc
---
# ========================
# Grafana Service
# ========================
apiVersion: v1
kind: Service
metadata:
  name: grafana-service
spec:
  type: LoadBalancer
  selector:
    app: grafana
  ports:
    - name: web
      protocol: TCP
      port: 80
      targetPort: 3000
---
# ========================
# InfluxDB2 Deployment
# ========================
apiVersion: apps/v1
kind: Deployment
metadata:
  name: influxdb2
spec:
  replicas: 1
  selector:
    matchLabels:
      app: influxdb2
  template:
    metadata:
      labels:
        app: influxdb2
    spec:
      securityContext:
        runAsNonRoot: true
        runAsUser: 1000
        runAsGroup: 1000
        fsGroup: 1000
        seccompProfile:
          type: RuntimeDefault
      containers:
      - name: influxdb2
        image: influxdb:2.7
        ports:
        - containerPort: 8086
        securityContext:
          allowPrivilegeEscalation: false
          capabilities:
            drop:
              - ALL
        resources:
          requests:
            memory: "512Mi"
            cpu: "250m"
          limits:
            memory: "1Gi"
            cpu: "1"
        volumeMounts:
        - name: influxdb2-data
          mountPath: /var/lib/influxdb2
        - name: influxdb2-config
          mountPath: /etc/influxdb2
      volumes:
      - name: influxdb2-data
        persistentVolumeClaim:
          claimName: influxdb2-data-pvc
      - name: influxdb2-config
        persistentVolumeClaim:
          claimName: influxdb2-config-pvc
---
# ========================
# InfluxDB2 Service
# ========================
apiVersion: v1
kind: Service
metadata:
  name: influxdb2-service
spec:
  type: LoadBalancer
  selector:
    app: influxdb2
  ports:
    - name: http
      protocol: TCP
      port: 8086
      targetPort: 8086
---
# ========================
# Telegraf ConfigMap
# ========================
apiVersion: v1
kind: ConfigMap
metadata:
  name: telegraf-config
data:
  telegraf.conf: |
    # paste your telegraf.conf contents here
---
# ========================
# Telegraf Deployment
# ========================
apiVersion: apps/v1
kind: Deployment
metadata:
  name: telegraf
spec:
  replicas: 1
  selector:
    matchLabels:
      app: telegraf
  template:
    metadata:
      labels:
        app: telegraf
    spec:
      securityContext:
        runAsNonRoot: true
        runAsUser: 1000
        runAsGroup: 1000
        fsGroup: 1000
        seccompProfile:
          type: RuntimeDefault
      containers:
      - name: telegraf
        image: telegraf:latest
        securityContext:
          allowPrivilegeEscalation: false
          capabilities:
            drop:
              - ALL
        volumeMounts:
        - name: telegraf-config
          mountPath: /etc/telegraf/telegraf.conf
          subPath: telegraf.conf
      volumes:
      - name: telegraf-config
        configMap:
          name: telegraf-config

do you need to have supervisor cluster before you execute above procedure.
Yes
Can you please add that procedure too so someone can follow start to end procedure